
A
Aakash Chauhan
Guest
Aakash Chauhan shares his experience with his first task as a Progress intern—building a mobile app in one week using Kinvey, NativeScript and Salesforce.
I joined Progress last month as a developer intern, which has been an exciting opportunity. I work in the Waltham, MA office and the first project assigned on day two, after orientation, was to build a mobile app in one week for the field sales team.
That enterprise CRM is Salesforce which tracks 400M+ in annual revenues, which sounded like a lot. I knew nothing about Salesforce and was only given access to an internal Slack channel. I then double checked my resume to see why they thought I knew how to build this.
My Background
I was then informed that I would be building on Progress Kinvey, which is a high productivity platform to build apps using existing systems with less code. I have never developed on this type of platform and don’t know if one week is realistic.
My manager advised me to share my real experience starting my internship at Progress—the good and the bad.
Below is my progress on the projects—one is a Push notification Demo and another is about finding Nearby Contacts in your app. Here is the procedure and some guidelines for those projects.
Environment Setup
NativeScript (cross-platform framework created by Progress for JavaScript developers):
Progress Kinvey:
If you want to use a low code platform for the app like Progress Kinvey, you have to set it up by the following steps.
Once you completed these steps you are all set up for the development.
Tutorial 1: Push Notification
I made a demo app for the Push notification, as nowadays Push notifications are the best way to communicate with users of your application and the best strategy to retain users on the app.
To create a new project use “tns create MyApp –ng”. It will create a new app named MyApp with an Angular & TypeScript template. Alternatively, you can use NativeScript Sidekick to ease the process.
Here is a picture of NativeScript Sidekick:

Once this app is created then you can use any editors you want to use. I am using Visual Studio Code because it is lightweight, fast and easy to use.
Follow these steps to make push notification work for your Android app:
For the Android push notification, it works with the firebase cloud messaging. So first I registered my app in the firebase console. After you register, you will have your server key and sender id in your project settings with firebase console.
You will need to use those keys to configure push engagement on your Kinvey console. Once done, you have to register push in your app otherwise you won’t be able to see any push notifications on your device.
Use following snippets to register for push in your app:
import {Push} from 'kinvey-nativescript-sdk/push'
const promise = Push.register({
Note: Do not forget to add a user for your app, as you have to be logged in at all times to successfully send push notifications to your device.
For testing purposes you can try to send any message two ways:
If you get 202 accepted with sent to one or more devices, then you made it for this demo. Moreover, you can schedule it or program your own custom endpoint through the Business Logic.
Tutorial 2: Nearby Contacts App
This application basically gets contacts from the customer service enterprise platform Salesforce and shows that information to our app. One more functionality is that users can also filter contacts by the distance of their current device location to the contacts’ location. So, they can find their nearby contacts’ details. I have built this app on iOS device.
Follow these steps to build an app like this:
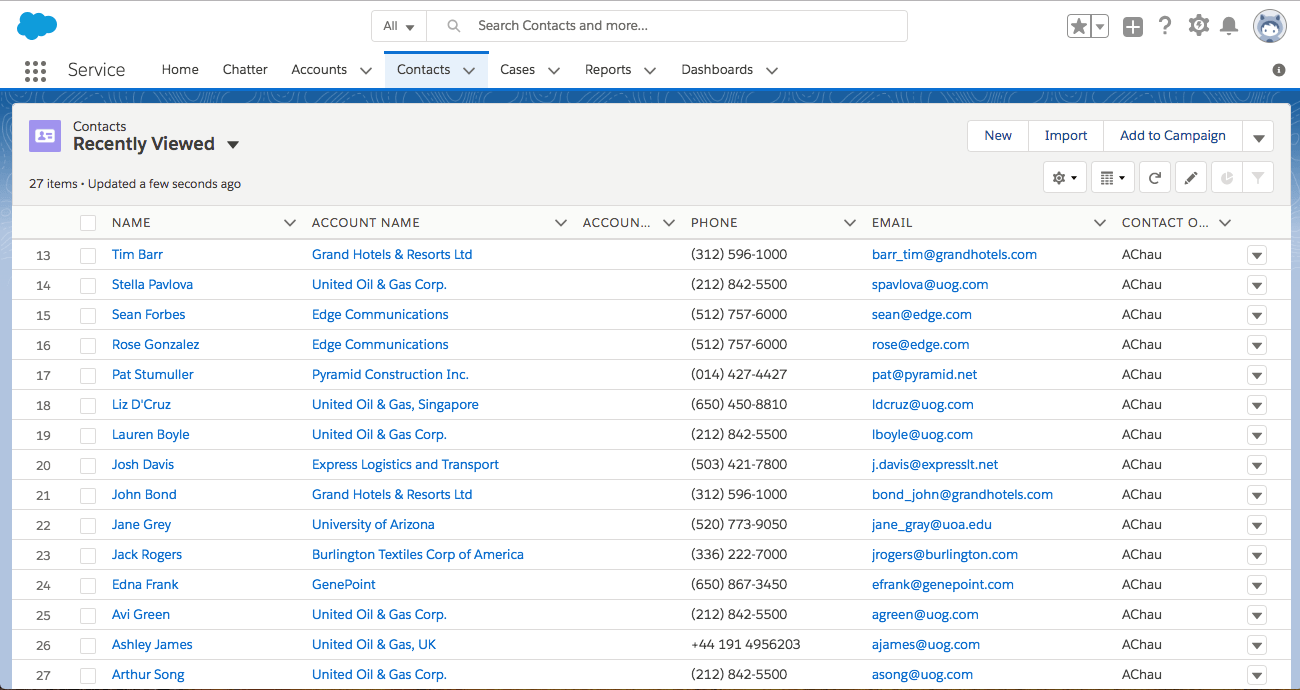
As you can see below, here is the Salesforce contact list in my account:
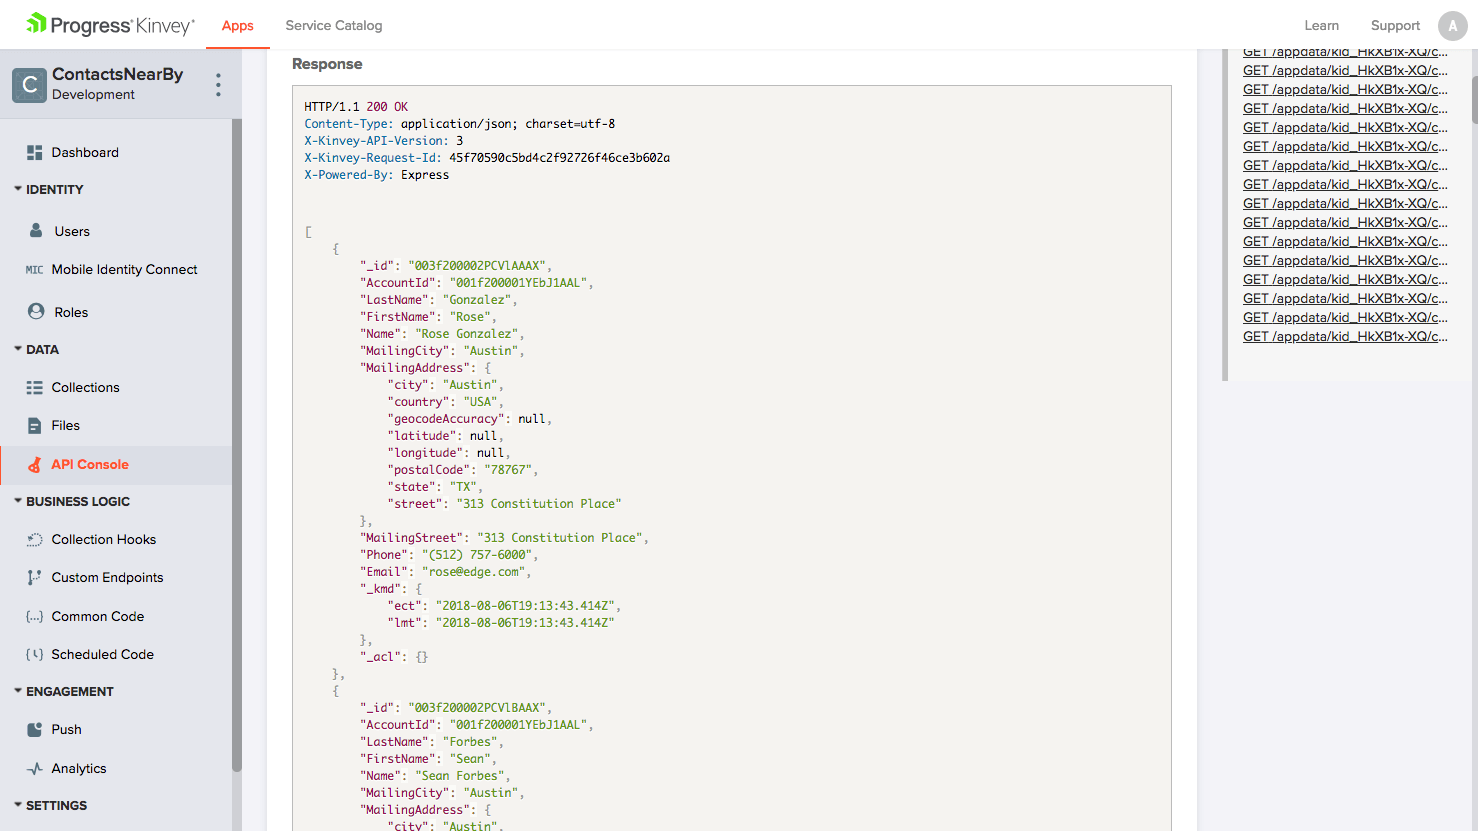
And this is the screenshot of the response for my collection:
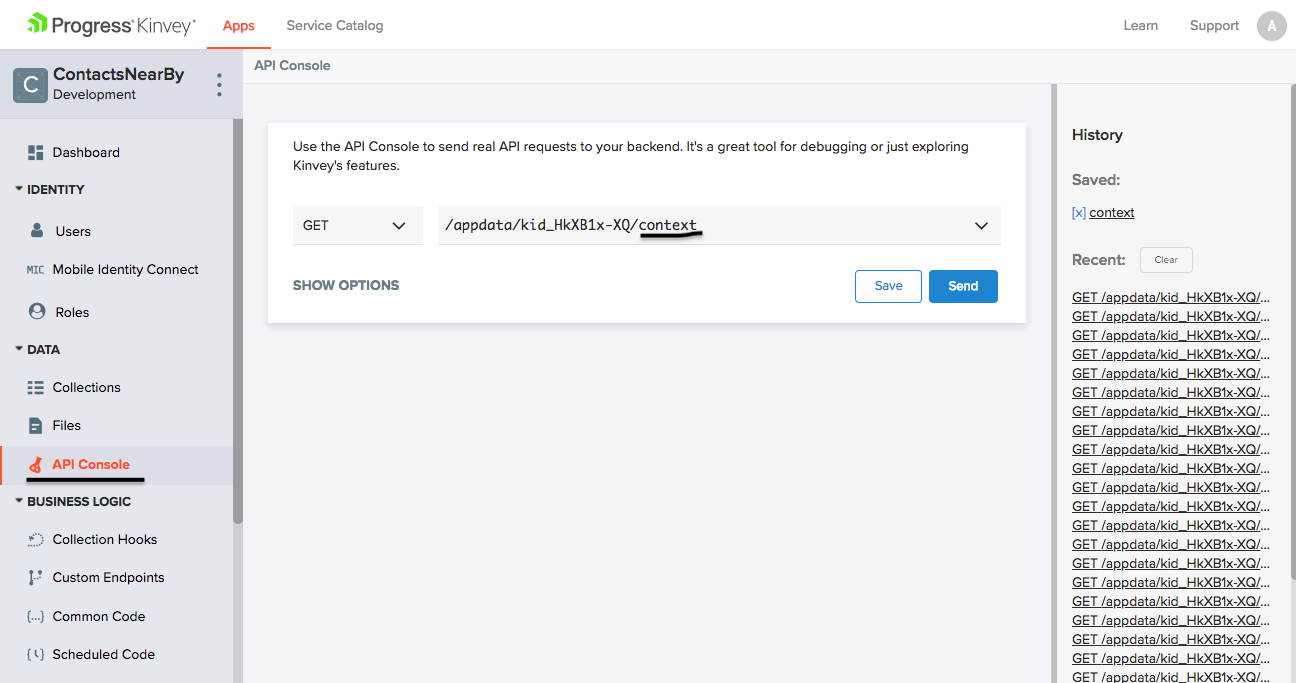
You can get this by sending an API request within your Kinvey API Console. Below, context stands for the collection name.
Now, in your project’s home page, make a list view so contacts can be set up in that list view. Create an array list and an array to get all data from Kinvey.
Assuming you have initialized Kinvey and are logged in to your account, you can now bring all the data to the app by calling Kinvey.DataStore.collection<>(“Your_Collection_Name”).
To get all the data, write the following in your project:
const subscription = this.dataStore.find()
Above, contactList is the name of my list of Array.
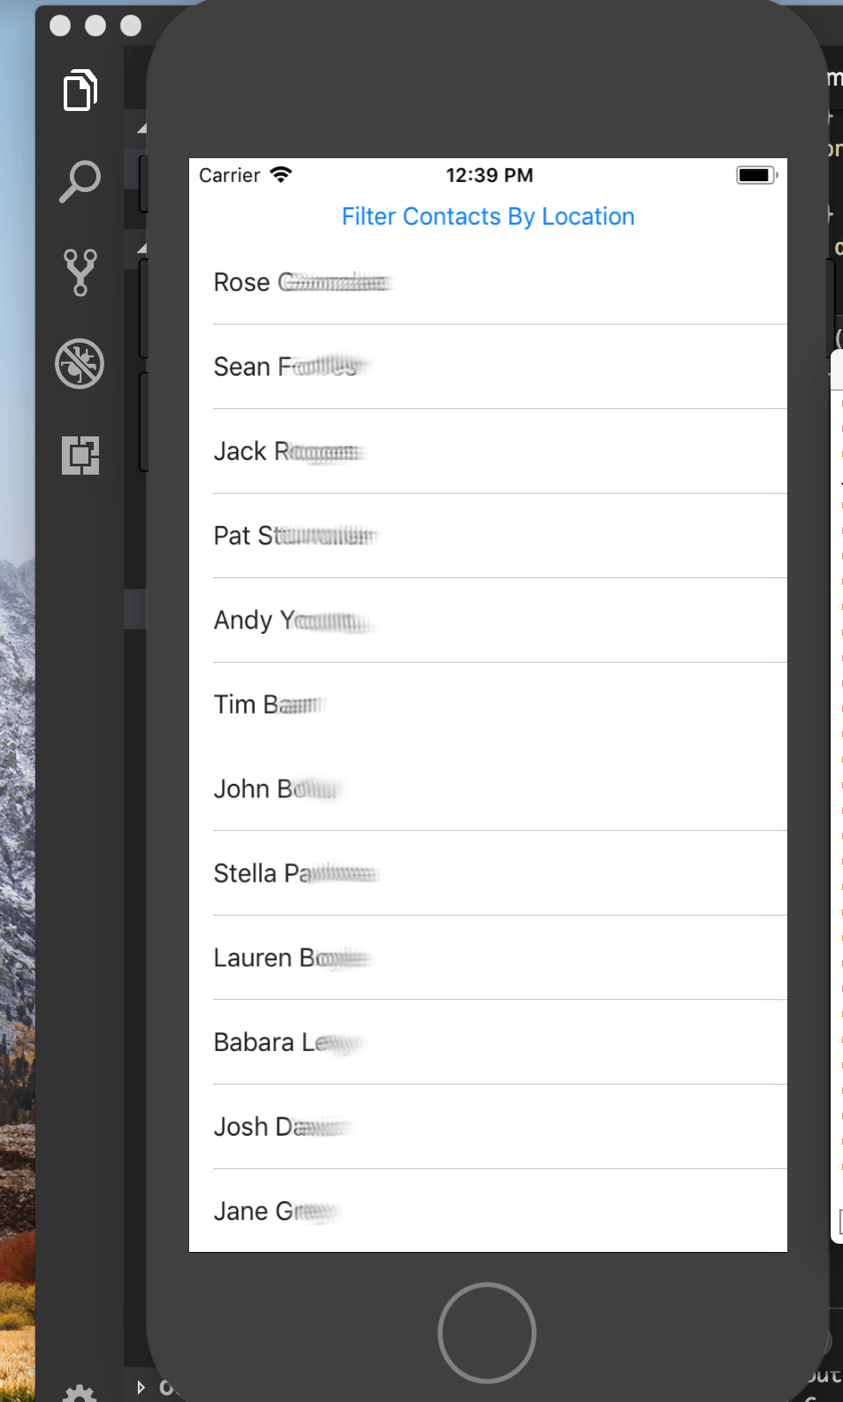
You should now be able to see your all contacts in the front page of your app. I have created another module to show filtered contacts. After clicking on the homepage’s button it will redirect to the second page where I am using a card view to show a contact’s name, phone and email address.
Next, you need to get your_api_key for google maps. I have used this URL : “https://maps.googleapis.com/maps/api/geocode/json?address=345ShorelinePark&key=YOUR_KEY” to get users’ latitude and longitude for their location.
You’ll need your current location as well for calculating the distance between two points. You can get your current location with the code below:
var location = getCurrentLocation({desiredAccuracy: 3, updateDistance: 10, maximumAge: 20000, timeout: 20000}).
Now that you have your current location’s coordinates and each contact’s coordinates you should be able to find distance between current user and his/her contacts. The next step is to filter them by distance.
To get the distance, you can apply this sample code:
calculateDistance(lat1:number,lat2:number,long1:number,long2:number){
let p = 0.017453292519943295; // Math.PI / 180
let c = Math.cos;
let a = 0.5 - c((lat1-lat2) * p) / 2 + c(lat2 * p) *c((lat1) * p) * (1 - c(((long1- long2) * p))) / 2;
let dis = (12742 * Math.asin(Math.sqrt(a))); // 2 * R; R = 6371 km
return dis;
}
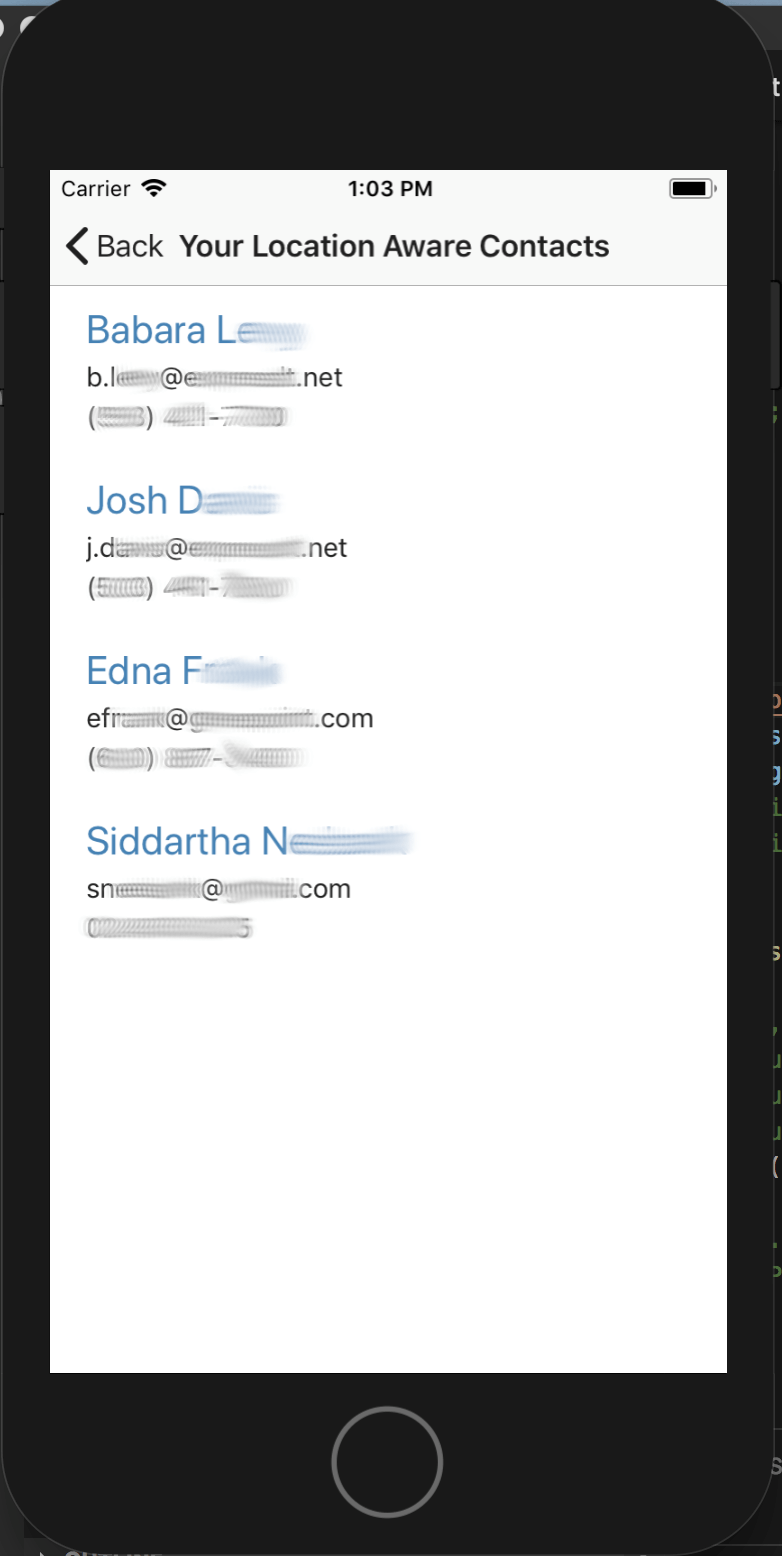
And with that, you can easily develop an app with the NativeScript-Kinvey integration. Below are screenshots for both of the pages we’ve just created.
I created this app in less than the one week I was assigned, and am relieved as this seemed like a lot for my very first internship project—remember that I did not have any experience with the Salesforce or Progress authentication systems. But after getting started in Progress Kinvey I quickly learned how to build apps with the skills I already have from school and early work experience.
It was really cool how the platform took care of all infrastructure and scaling, while making the Salesforce CRM easy to work with for JavaScript developers. It does the same for other systems too, which makes the platform easy to use and powerful once you get started.
And Progress Kinvey developers are always enhancing features like offline data management, experience APIs, push notification, etc., making them more efficient. When I find issues, I consult with other colleagues and report it as a bug on the developers channel where it’s addressed quickly. So, even though I’m new, I already learned lots of the things here at Progress and now understand how their low code approach helps app developers like myself be more productive.
You can find my code on GitHub here.
Click below to try the same developer edition of Kinvey that I used – it’s free forever.
Get Started with Kinvey
Continue reading...
I joined Progress last month as a developer intern, which has been an exciting opportunity. I work in the Waltham, MA office and the first project assigned on day two, after orientation, was to build a mobile app in one week for the field sales team.
That enterprise CRM is Salesforce which tracks 400M+ in annual revenues, which sounded like a lot. I knew nothing about Salesforce and was only given access to an internal Slack channel. I then double checked my resume to see why they thought I knew how to build this.
My Background
- Working on Masters of Computer and Information Science at UMass
- 1 year experience building Web Apps using JavaScript
- No experience with Salesforce and Progress ID for SSO
- Limited experience deploying apps on cloud infrastructure
I was then informed that I would be building on Progress Kinvey, which is a high productivity platform to build apps using existing systems with less code. I have never developed on this type of platform and don’t know if one week is realistic.
My manager advised me to share my real experience starting my internship at Progress—the good and the bad.
Below is my progress on the projects—one is a Push notification Demo and another is about finding Nearby Contacts in your app. Here is the procedure and some guidelines for those projects.
Environment Setup
NativeScript (cross-platform framework created by Progress for JavaScript developers):
- First you have to install Node.js to use NativeScript.
- The NativeScript CLI is a node package so you need to install npm [node package manager] with the code: npm install -g nativescript
- After that you can install an Android emulator and Android Studio or/and XCode/iOS set up as per users’ requirement.
Note: If you are getting error installing the NativeScript CLI on macOS, I recommend using Homebrew to simplify installation process. Check out the Homebrew Setup for more on this.
Progress Kinvey:
If you want to use a low code platform for the app like Progress Kinvey, you have to set it up by the following steps.
- You can register/sign up account with Kinvey if you haven’t and it is free of cost for personal use or development.
- To create a new app, click on the green button on top-right side to Add an app. After clicking that button, you will see following dialog box:
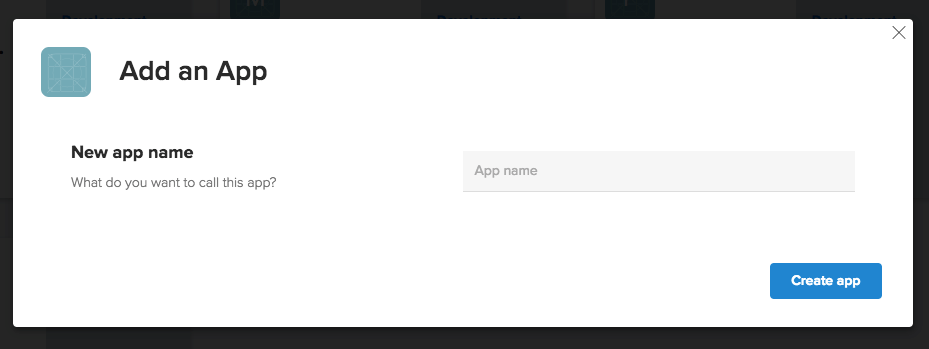
- When you click on the Create app button, the page will redirect to the Dashboard of your app. You can find different tabs like Identity, Data, Business logic, etc on your app console. One can use that depending what they are building.
- Users need to configure it by adding following snippet to your project.
import {Kinvey} from "kinvey-nativescript-sdk"
Kinvey.init({
appKey:"Your_appKey",
appSecret:"Your_secretKey",
});
Once you completed these steps you are all set up for the development.
Tutorial 1: Push Notification
I made a demo app for the Push notification, as nowadays Push notifications are the best way to communicate with users of your application and the best strategy to retain users on the app.
To create a new project use “tns create MyApp –ng”. It will create a new app named MyApp with an Angular & TypeScript template. Alternatively, you can use NativeScript Sidekick to ease the process.
Here is a picture of NativeScript Sidekick:
Once this app is created then you can use any editors you want to use. I am using Visual Studio Code because it is lightweight, fast and easy to use.
Follow these steps to make push notification work for your Android app:
For the Android push notification, it works with the firebase cloud messaging. So first I registered my app in the firebase console. After you register, you will have your server key and sender id in your project settings with firebase console.
You will need to use those keys to configure push engagement on your Kinvey console. Once done, you have to register push in your app otherwise you won’t be able to see any push notifications on your device.
Use following snippets to register for push in your app:
import {Push} from 'kinvey-nativescript-sdk/push'
const promise = Push.register({
android: {
senderID: 'Your_sender_ID'
},
ios: {
alert: true,
badge: true,
sound: true
}
})
.then((deviceToken: string) => {
// ...
})
.catch((error: Error) => {
// ...
});
Push.onNotification((data: any) => {
// ...
});
}
Note: Do not forget to add a user for your app, as you have to be logged in at all times to successfully send push notifications to your device.
For testing purposes you can try to send any message two ways:
- From the firebase console tap on Grow -> Cloud Messaging and then click on Send Message.
- With the Kinvey console you can click on push and type any message and then tap on send push to see that message on your device. Here is the screenshot of that experiment:
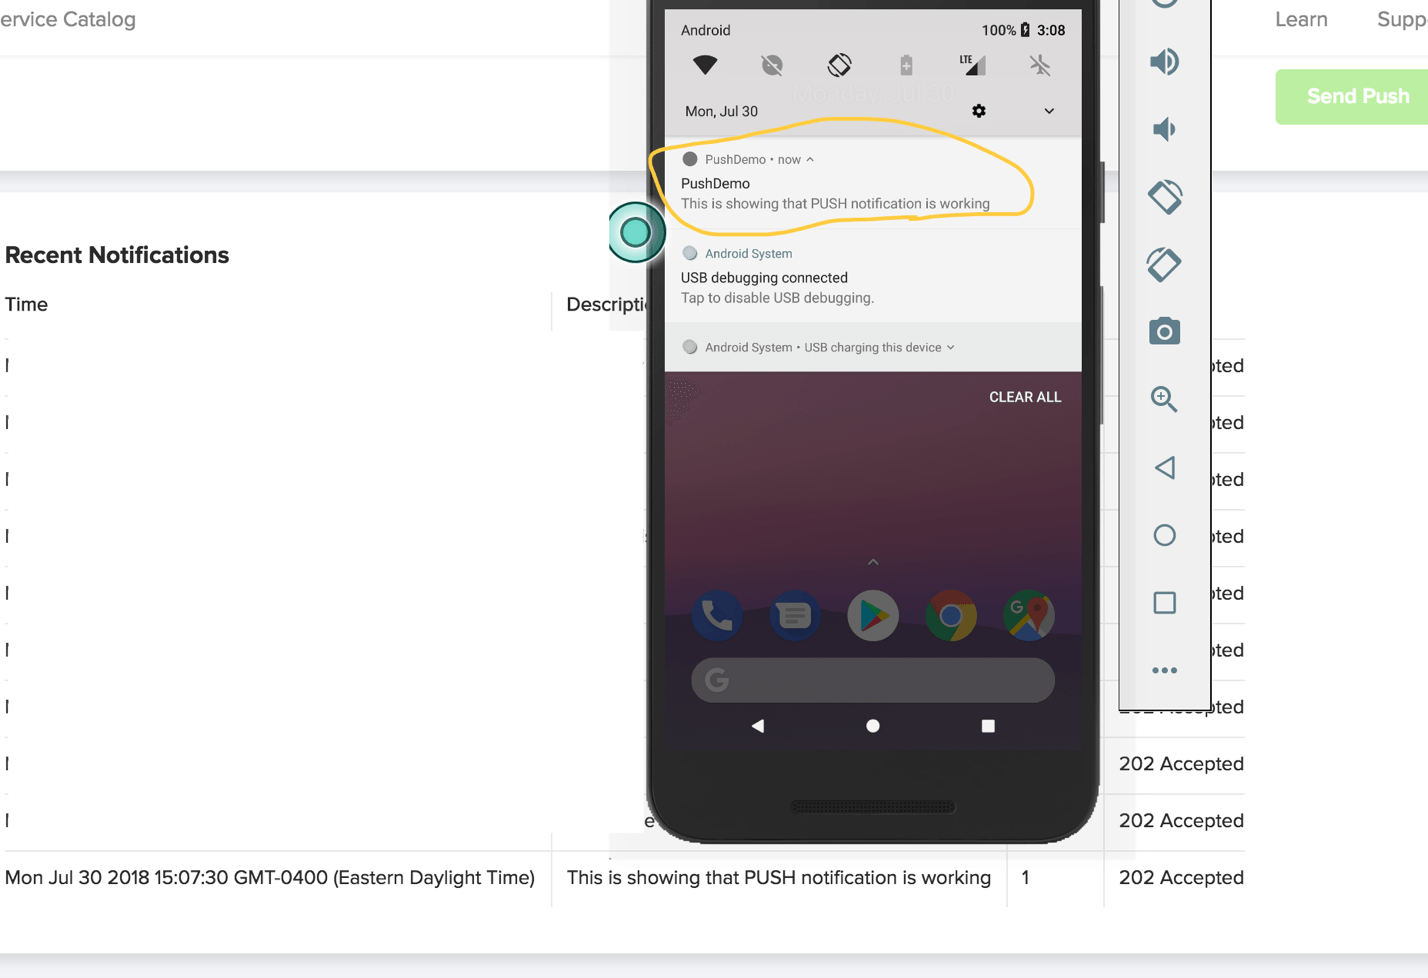
If you get 202 accepted with sent to one or more devices, then you made it for this demo. Moreover, you can schedule it or program your own custom endpoint through the Business Logic.
Tutorial 2: Nearby Contacts App
This application basically gets contacts from the customer service enterprise platform Salesforce and shows that information to our app. One more functionality is that users can also filter contacts by the distance of their current device location to the contacts’ location. So, they can find their nearby contacts’ details. I have built this app on iOS device.
Follow these steps to build an app like this:
- Pre-requisites for this development are a configured NativeScript-Kinvey environment, an existing user or being logged in for authentication, a basic understanding of Salesforce and an understanding of the HTTP GET method.
- Create contacts in your Salesforce account under a sample account name if you don’t have one already. You need to write the name, email, phone number and address for each contact.
- Go to Kinvey and configure Mobile Identity Connect with OAuth2 service. Make sure you have written “http://login.salesforce.com” in the Provider URI field. Provide your salesforce id and secret token in this MIC [mobile identity connects].
- Now configure Salesforce in your service catalog and provide the Host as “https://login.salesforce.com,” authenticate it via Service account and write your salesforce id. Note that in the password field you need to write [password+salesforceToken] as one straight string without the [+] in that string. After that add service objects manually or discover it by selecting any of them. If you are not sure, then select discover objects and create objects you want to use in your app. You can add or remove objects anytime. Once your collection is set to your Salesforce account you can test your configuration of collection by sending API request from “API console” to your collection. You will get a result in JSON format as per your objects.
As you can see below, here is the Salesforce contact list in my account:
And this is the screenshot of the response for my collection:
You can get this by sending an API request within your Kinvey API Console. Below, context stands for the collection name.
Now, in your project’s home page, make a list view so contacts can be set up in that list view. Create an array list and an array to get all data from Kinvey.
Assuming you have initialized Kinvey and are logged in to your account, you can now bring all the data to the app by calling Kinvey.DataStore.collection<>(“Your_Collection_Name”).
To get all the data, write the following in your project:
const subscription = this.dataStore.find()
.subscribe(data => {
this.contactList = data;
}, (error) => {
alert(error)
}, () => {
// ...
}).catch((e)=>{
alert(e)
});
Above, contactList is the name of my list of Array.
You should now be able to see your all contacts in the front page of your app. I have created another module to show filtered contacts. After clicking on the homepage’s button it will redirect to the second page where I am using a card view to show a contact’s name, phone and email address.
Next, you need to get your_api_key for google maps. I have used this URL : “https://maps.googleapis.com/maps/api/geocode/json?address=345ShorelinePark&key=YOUR_KEY” to get users’ latitude and longitude for their location.
You’ll need your current location as well for calculating the distance between two points. You can get your current location with the code below:
var location = getCurrentLocation({desiredAccuracy: 3, updateDistance: 10, maximumAge: 20000, timeout: 20000}).
then(function(loc) {
if (loc) {
console.log("Current location is: " + loc);
}
}, function(e){
console.log("Error: " + e.message);
});
Now that you have your current location’s coordinates and each contact’s coordinates you should be able to find distance between current user and his/her contacts. The next step is to filter them by distance.
To get the distance, you can apply this sample code:
calculateDistance(lat1:number,lat2:number,long1:number,long2:number){
let p = 0.017453292519943295; // Math.PI / 180
let c = Math.cos;
let a = 0.5 - c((lat1-lat2) * p) / 2 + c(lat2 * p) *c((lat1) * p) * (1 - c(((long1- long2) * p))) / 2;
let dis = (12742 * Math.asin(Math.sqrt(a))); // 2 * R; R = 6371 km
return dis;
}
And with that, you can easily develop an app with the NativeScript-Kinvey integration. Below are screenshots for both of the pages we’ve just created.
I created this app in less than the one week I was assigned, and am relieved as this seemed like a lot for my very first internship project—remember that I did not have any experience with the Salesforce or Progress authentication systems. But after getting started in Progress Kinvey I quickly learned how to build apps with the skills I already have from school and early work experience.
It was really cool how the platform took care of all infrastructure and scaling, while making the Salesforce CRM easy to work with for JavaScript developers. It does the same for other systems too, which makes the platform easy to use and powerful once you get started.
And Progress Kinvey developers are always enhancing features like offline data management, experience APIs, push notification, etc., making them more efficient. When I find issues, I consult with other colleagues and report it as a bug on the developers channel where it’s addressed quickly. So, even though I’m new, I already learned lots of the things here at Progress and now understand how their low code approach helps app developers like myself be more productive.
You can find my code on GitHub here.
- Push Demo: Aakashchauhan17/PushDemo
- Nearby Contacts App: Aakashchauhan17/NearBy-Contacts
Click below to try the same developer edition of Kinvey that I used – it’s free forever.
Get Started with Kinvey
Continue reading...