
D
Dan Wilson
Guest
Learn how to quickly and easily leverage Azure Active Directory in your native iOS and Android mobile apps with Kinvey and NativeScript.
Programming authentication and authorization to an Active Directory API has seen many ups and downs over the years, but it has never really been an easy story. .NET application developers have always been treated as first class citizens while other app developers, especially iOS and Android developers, were pretty much left to fend for themselves.
Times have changed and Microsoft supports other platforms. In fact, ever since the big push to the cloud with Azure, Microsoft has embraced open source and standards-based approaches to many technologies, including authentication and authorization methods.
With Active Directory available in Azure as standalone or extending on-premises environments, many enterprises are leveraging its Single Sign-on capabilities in their web and mobile applications. In this article, I’ll show you how to quickly and easily get up and running with Azure Active Directory in native iOS and Android mobile apps. We’ll take a configuration over code approach and you’ll see how easy it is.
There are three things to configure to make user authentication in mobile apps a breeze, and I’ll take you through all the steps in this article.
Azure Active Directory
We’re going to start with setting up Azure. You likely already have Active Directory set up and perhaps you’re even using it in Azure to extend on on-premises Active Directory. Don’t worry if you don’t, I’ll show you how to do this first.
Mobile apps
Next we’ll set up a sample native mobile app for iOS and Android using our enterprise friendly, open source, cross platform framework called NativeScript, plus our NativeScript Sidekick tool that automates many aspects of creating, building, running, and deploying NativeScript apps.
Kinvey Services
Finally we’ll glue authentication together with the help of our fully-managed platform offering low code enterprise and legacy system acceleration, Kinvey (pronounced Kin-vey, like convey). Kinvey makes it ridiculously easy for developers to set up, use and operate a cloud backend for their mobile apps. This allows you not to worry about connecting to various cloud services including Azure, setting up servers for your backend, or maintaining and scaling them.
Azure Active Directory
With Microsoft’s big push to the cloud over the last few years, Active Directory (or AD for short) wasn’t left behind in your on-premises data center. Single-Sign-On accross your apps with Active Directory is here at your fingertips.
Azure AD Auth Flavors
Azure AD supports several methods of authentication, the most common ones used in the enterprise being OAuth, OpenId Connect, and SAML Redirect. In this article I’ll show you how to set up OAuth. The other methods have a pretty similar setup workflow.
Setting up Azure AD for OAuth
Setting up Azure AD is likely the most difficult part of the process. There are a few steps necessary to configure Azure AD to be able to use OAuth. While we are going through these steps, please create a new note or Word document so you can copy and paste values into it for later use. We will need these values when setting up our mobile apps and services later. Let’s take a look.
Whew, that was quite the setup. Now we just need to save off some of our Azure AD settings for use on the client side. Navigate back to the top level Azure Active Directory blade in the portal.
Let’s continue with the mobile app setup next.
Mobile Setup
There are two approaches to authenticating with Azure AD from your iOS and Android apps that we will consider in lieu of writing your own custom Objective C, Swift, Java, or Kotlin code for communicating with Azure AD (aka roll your own). Both of the following approaches eliminate the need to roll your own, however, the second approach goes a step further to smooth out the differences between iOS and Android as well, and provides you a clean simple way to configure authentication using the configuration over code approach.
Approach 1: ADAL
Azure AD provides the Active Directory Authentication Library, or ADAL, for iOS and Android clients that need to access protected resources.
You can read the quick start guides for each at these URLs:
Azure AD iOS getting started
Azure AD Android getting started
If you think that using the ADAL libraries for your iOS and Android apps looks like a challenge in it of itself, then you’re not alone. Even after abstracting away all the HTTP communication details into the ADAL libraries, the task to implement these on each mobile platform requires multiple teams with specific platform knowledge. That’s why we’re going to use Kinvey to simplify this for us.
Approach 2: Kinvey NativeScript SDK
Using NativeScript together with our Kinvey SDK is by far the simplest approach to add authentication to a native mobile app, and do so for both iOS and Android at the same time. I’ll show you how to bootstrap a brand new NativeScript app using a tool called NativeScript Sidekick, which is available as a free download.
NativeScript Sidekick gives you the ability to connect to enterprise authentication providers via OAuth 2.0. Let’s look at the various data points NativeScript Sidekick needs to make the connection.
Note: It’s assumed that you already have a working iOS or Android environment set up on your machine. If you are on a Mac, then you’ll be able to build for iOS, but if you’re on Windows or Linux, you can build for Android locally and use Sidekick to build for iOS in the cloud.
iOS
Nothing else needs to be done to have Android support. If you’ve followed all the steps so far, you will already have your Android app configured since NativeScript creates cross platform native apps using the same JavaScript codebase, and the Kinvey NativeScript SDK handles the authentication and authorization flows for you automatically for both platforms behind the scenes.
After Sidekick deploys your new app to your device you should see an app that looks like this
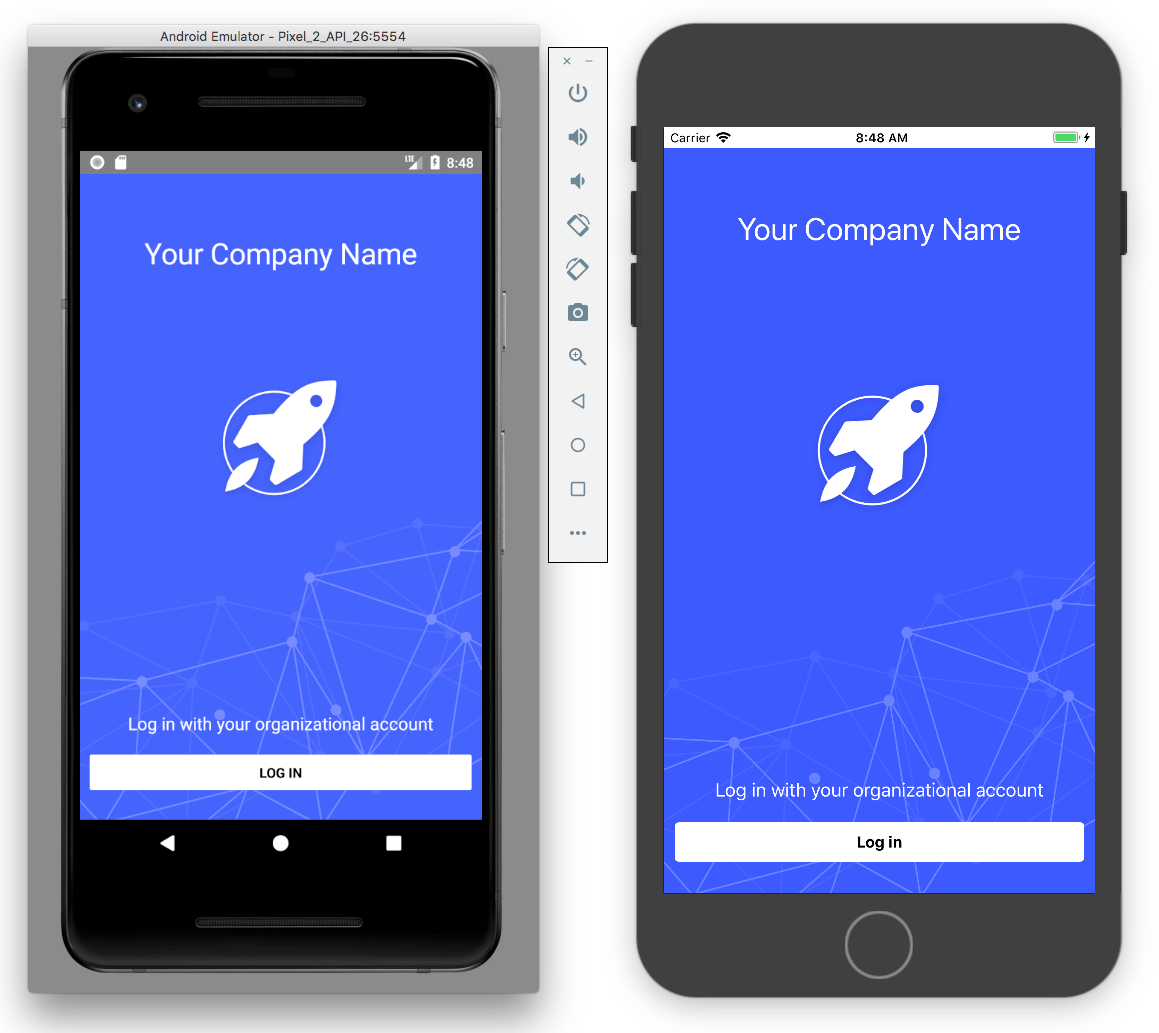
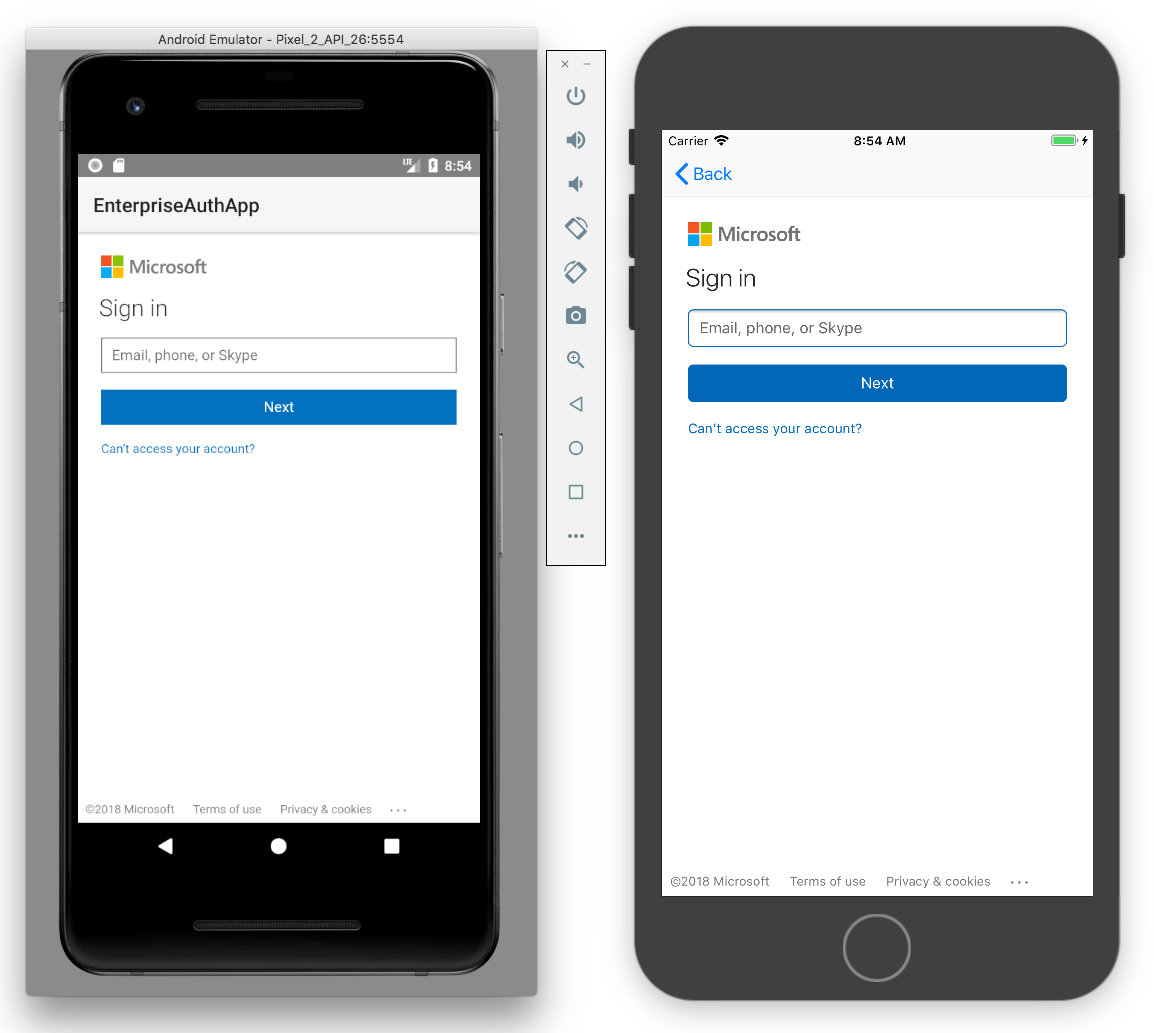
When you tap the Log in button, if all went well, you should be prompted to authenticate with Azure Active Directory. Enter your Microsoft account username and password to login. Since this is a Microsoft screen hosted by Microsoft, there is no need to worry about your credentials going anywhere else or being stored on any other servers, which is what OAuth is designed to do.
You can read more about the Kinvey NativeScript SDK here.
Kinvey Services
Behind the scenes, NativeScript Sidekick created a Kinvey service for you in the cloud and registered a new app with the Azure AD configuration that we’ve specified. This can be edited at any time should you need to just by loggin into your Kinvey console.
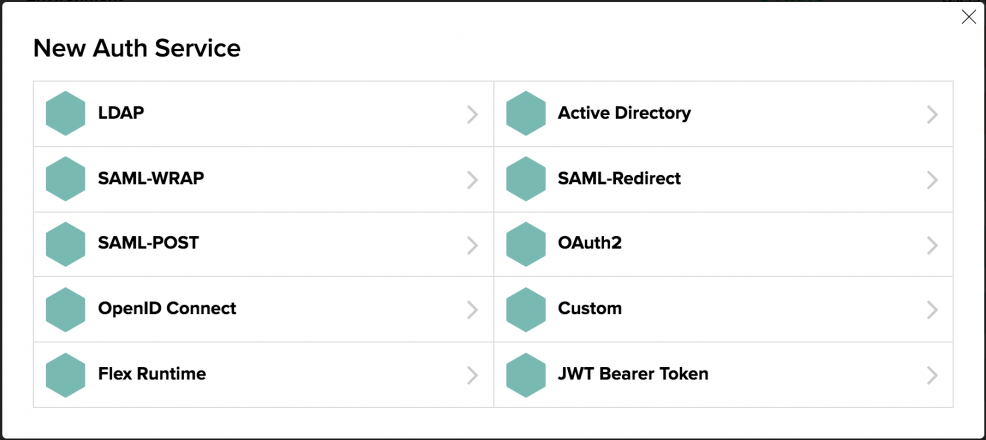
Should you find yourself in a situation where you need another type of auth service configuration not mentioned in this article, you can simply set up a new service instance in your Kinvey console using any of the options listed below. From the console, choose the Mobile Identity Connect option from the left-hand navigation. Then click the “Add Auth Service” button. From there you will see the OAuth option discussed in this article as well as many others.
Over the last six years, Kinvey’s Backend as a Service platform has been used by hundreds of thousands of developers to build rich, engaging apps using their various features, including data and file storage, user authentication and authorization, push notifications, email, custom functions and triggers, 3rd-party data connectivity, analytics, operational intelligence and compliance. Every Kinvey backend service is exposed to front-end developers via SDKs so that they can write their apps without having to think about API protocols, and instead just call methods in the programming language of their choice.
The newest addition to this set is our NativeScript SDK, which offers not only the enterprise authentication and authorization services that we covered in this article, but also data services—you can read about that here.
Wrap Up
The preceding steps describe how to set up a brand new NativeScript app and add Kinvey NativeScript SDK to it. However, you can just as easily extend an existing NativeScript app or any native mobile app with Kinvey Mobile Identity Connect services.
Next Steps
Sign up for the NativeScript Enterprise Auth video course that takes you through the entire setup, from Azure AD to Kinvey Services to your iOS and Android apps.
More Resources
Continue reading...
Programming authentication and authorization to an Active Directory API has seen many ups and downs over the years, but it has never really been an easy story. .NET application developers have always been treated as first class citizens while other app developers, especially iOS and Android developers, were pretty much left to fend for themselves.
Times have changed and Microsoft supports other platforms. In fact, ever since the big push to the cloud with Azure, Microsoft has embraced open source and standards-based approaches to many technologies, including authentication and authorization methods.
With Active Directory available in Azure as standalone or extending on-premises environments, many enterprises are leveraging its Single Sign-on capabilities in their web and mobile applications. In this article, I’ll show you how to quickly and easily get up and running with Azure Active Directory in native iOS and Android mobile apps. We’ll take a configuration over code approach and you’ll see how easy it is.
There are three things to configure to make user authentication in mobile apps a breeze, and I’ll take you through all the steps in this article.
Azure Active Directory
We’re going to start with setting up Azure. You likely already have Active Directory set up and perhaps you’re even using it in Azure to extend on on-premises Active Directory. Don’t worry if you don’t, I’ll show you how to do this first.
Mobile apps
Next we’ll set up a sample native mobile app for iOS and Android using our enterprise friendly, open source, cross platform framework called NativeScript, plus our NativeScript Sidekick tool that automates many aspects of creating, building, running, and deploying NativeScript apps.
Kinvey Services
Finally we’ll glue authentication together with the help of our fully-managed platform offering low code enterprise and legacy system acceleration, Kinvey (pronounced Kin-vey, like convey). Kinvey makes it ridiculously easy for developers to set up, use and operate a cloud backend for their mobile apps. This allows you not to worry about connecting to various cloud services including Azure, setting up servers for your backend, or maintaining and scaling them.
Azure Active Directory
With Microsoft’s big push to the cloud over the last few years, Active Directory (or AD for short) wasn’t left behind in your on-premises data center. Single-Sign-On accross your apps with Active Directory is here at your fingertips.
Azure AD Auth Flavors
Azure AD supports several methods of authentication, the most common ones used in the enterprise being OAuth, OpenId Connect, and SAML Redirect. In this article I’ll show you how to set up OAuth. The other methods have a pretty similar setup workflow.
Setting up Azure AD for OAuth
Setting up Azure AD is likely the most difficult part of the process. There are a few steps necessary to configure Azure AD to be able to use OAuth. While we are going through these steps, please create a new note or Word document so you can copy and paste values into it for later use. We will need these values when setting up our mobile apps and services later. Let’s take a look.
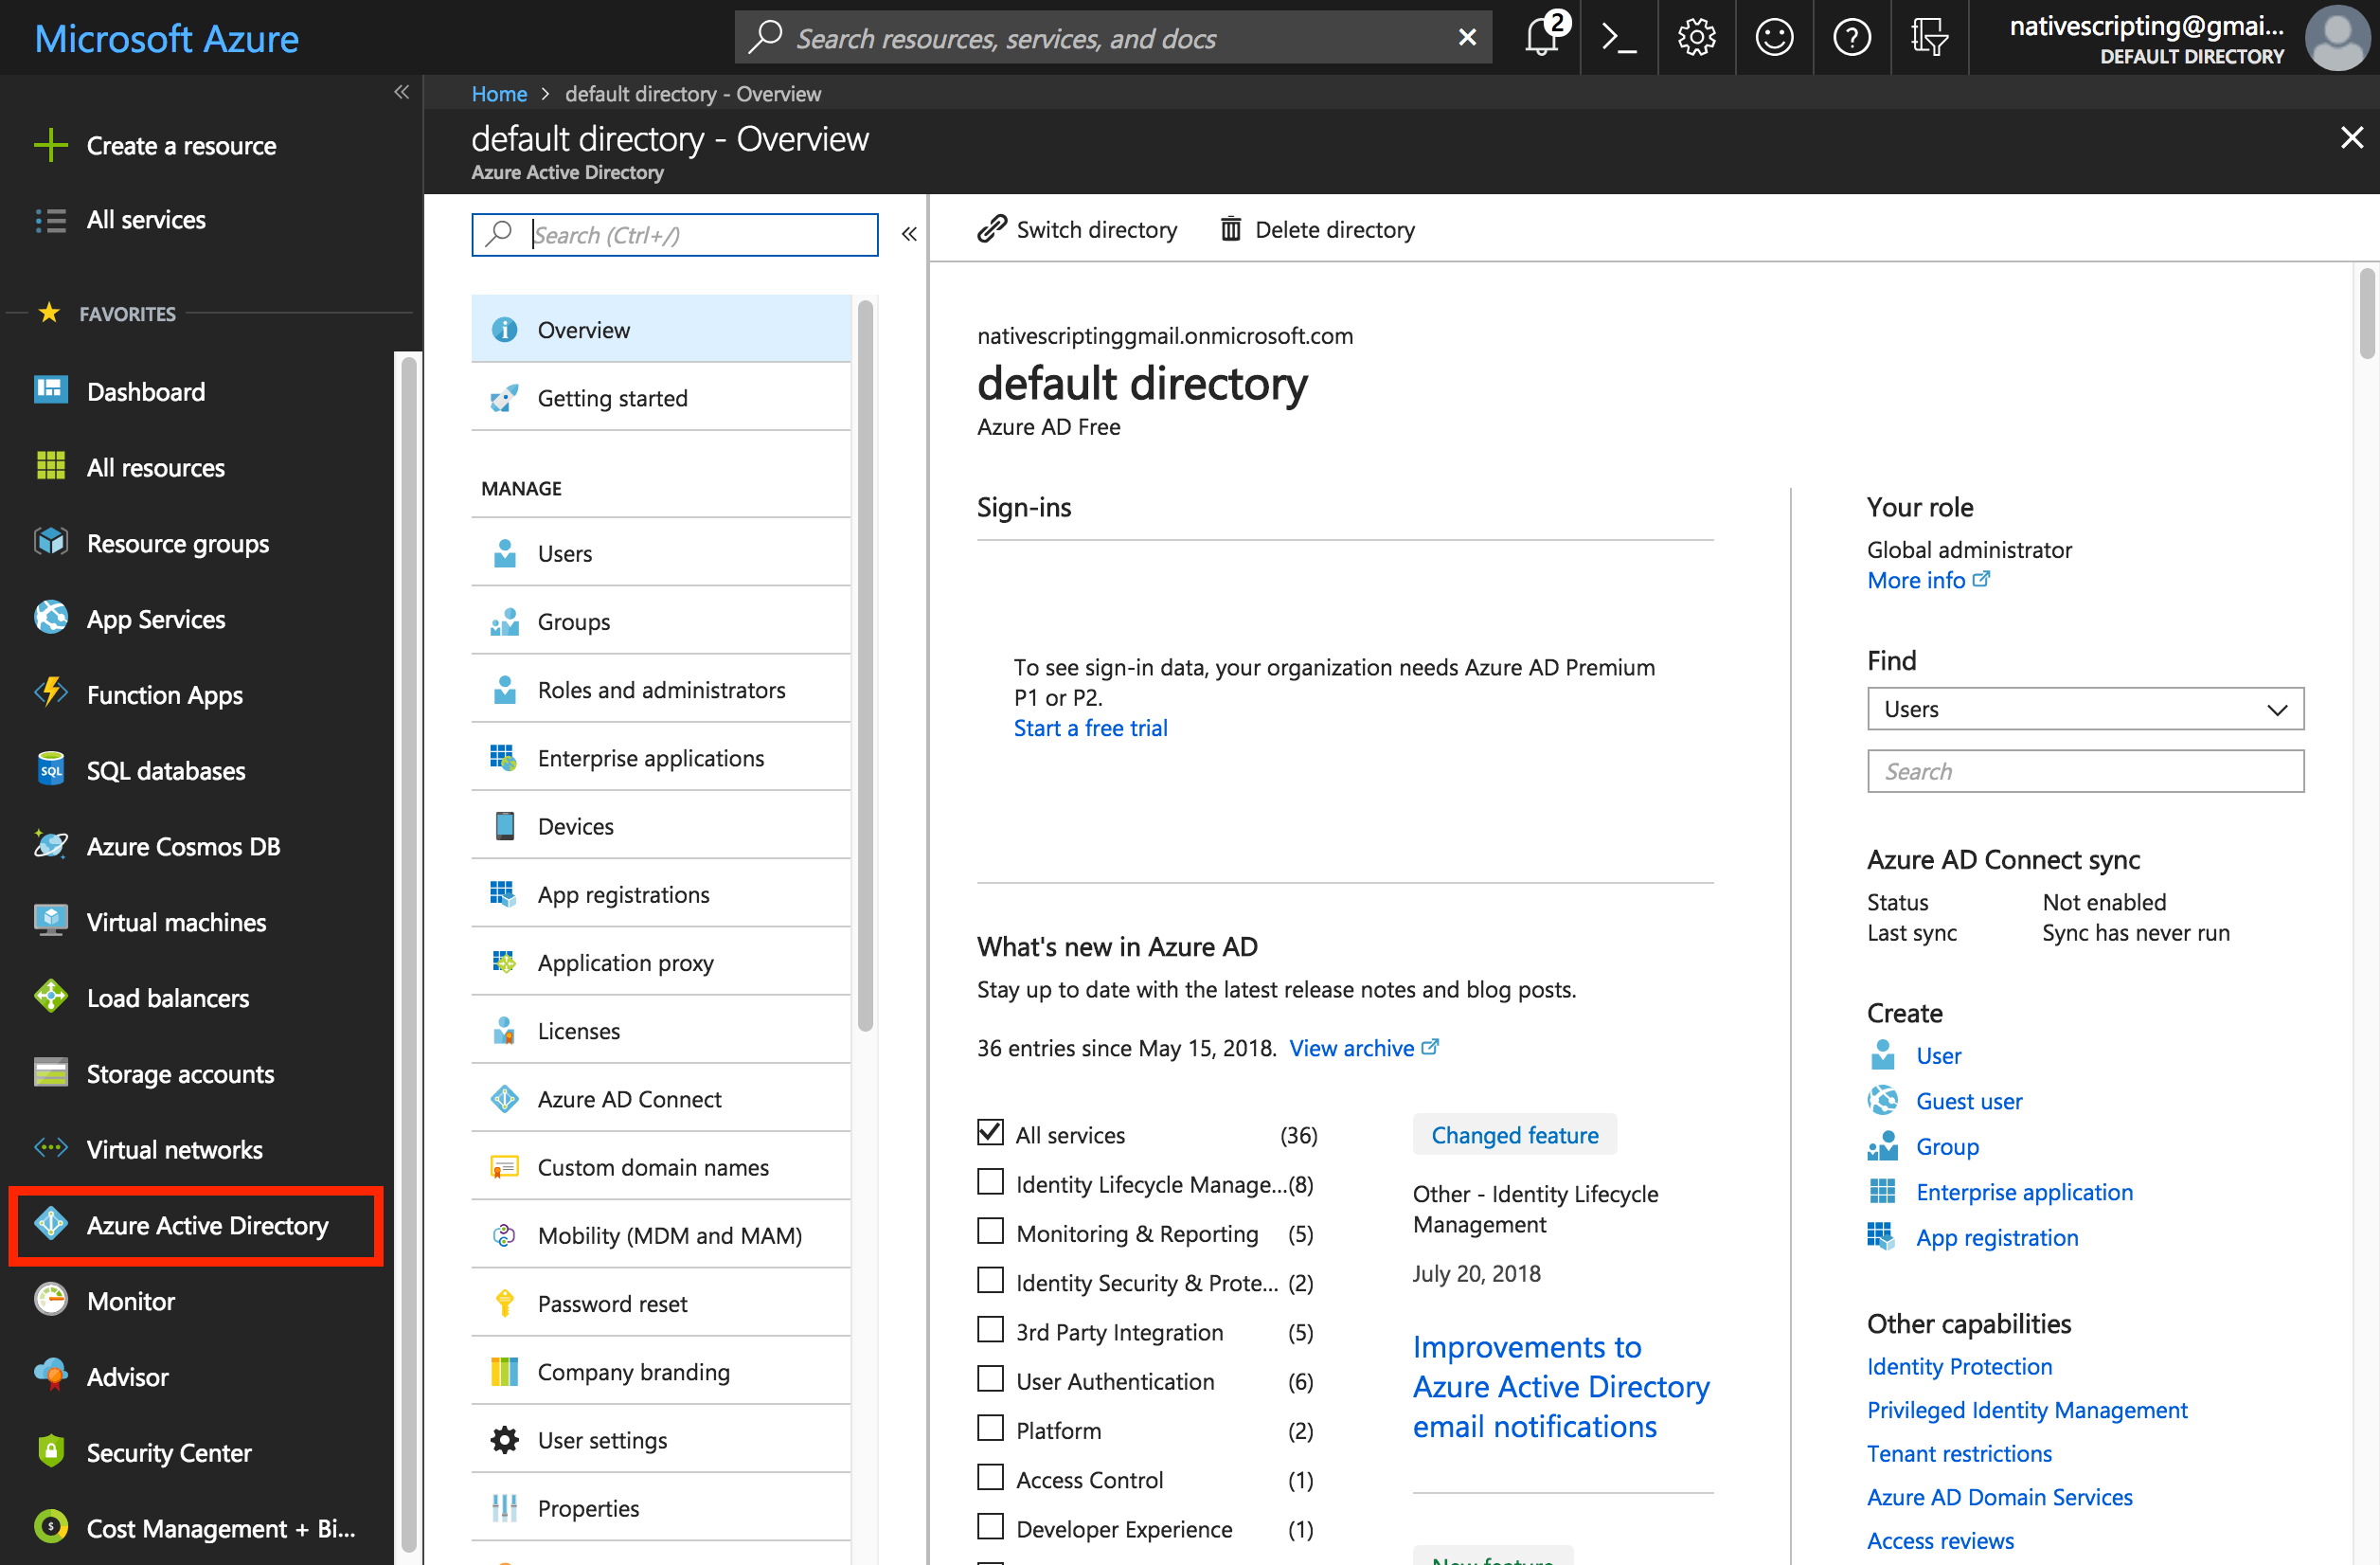
- From within the Azure portal, click on Azure Active Directory or click on +New and search for Azure Active Directory.
- Choose the App Registrations option and New Application Registration.
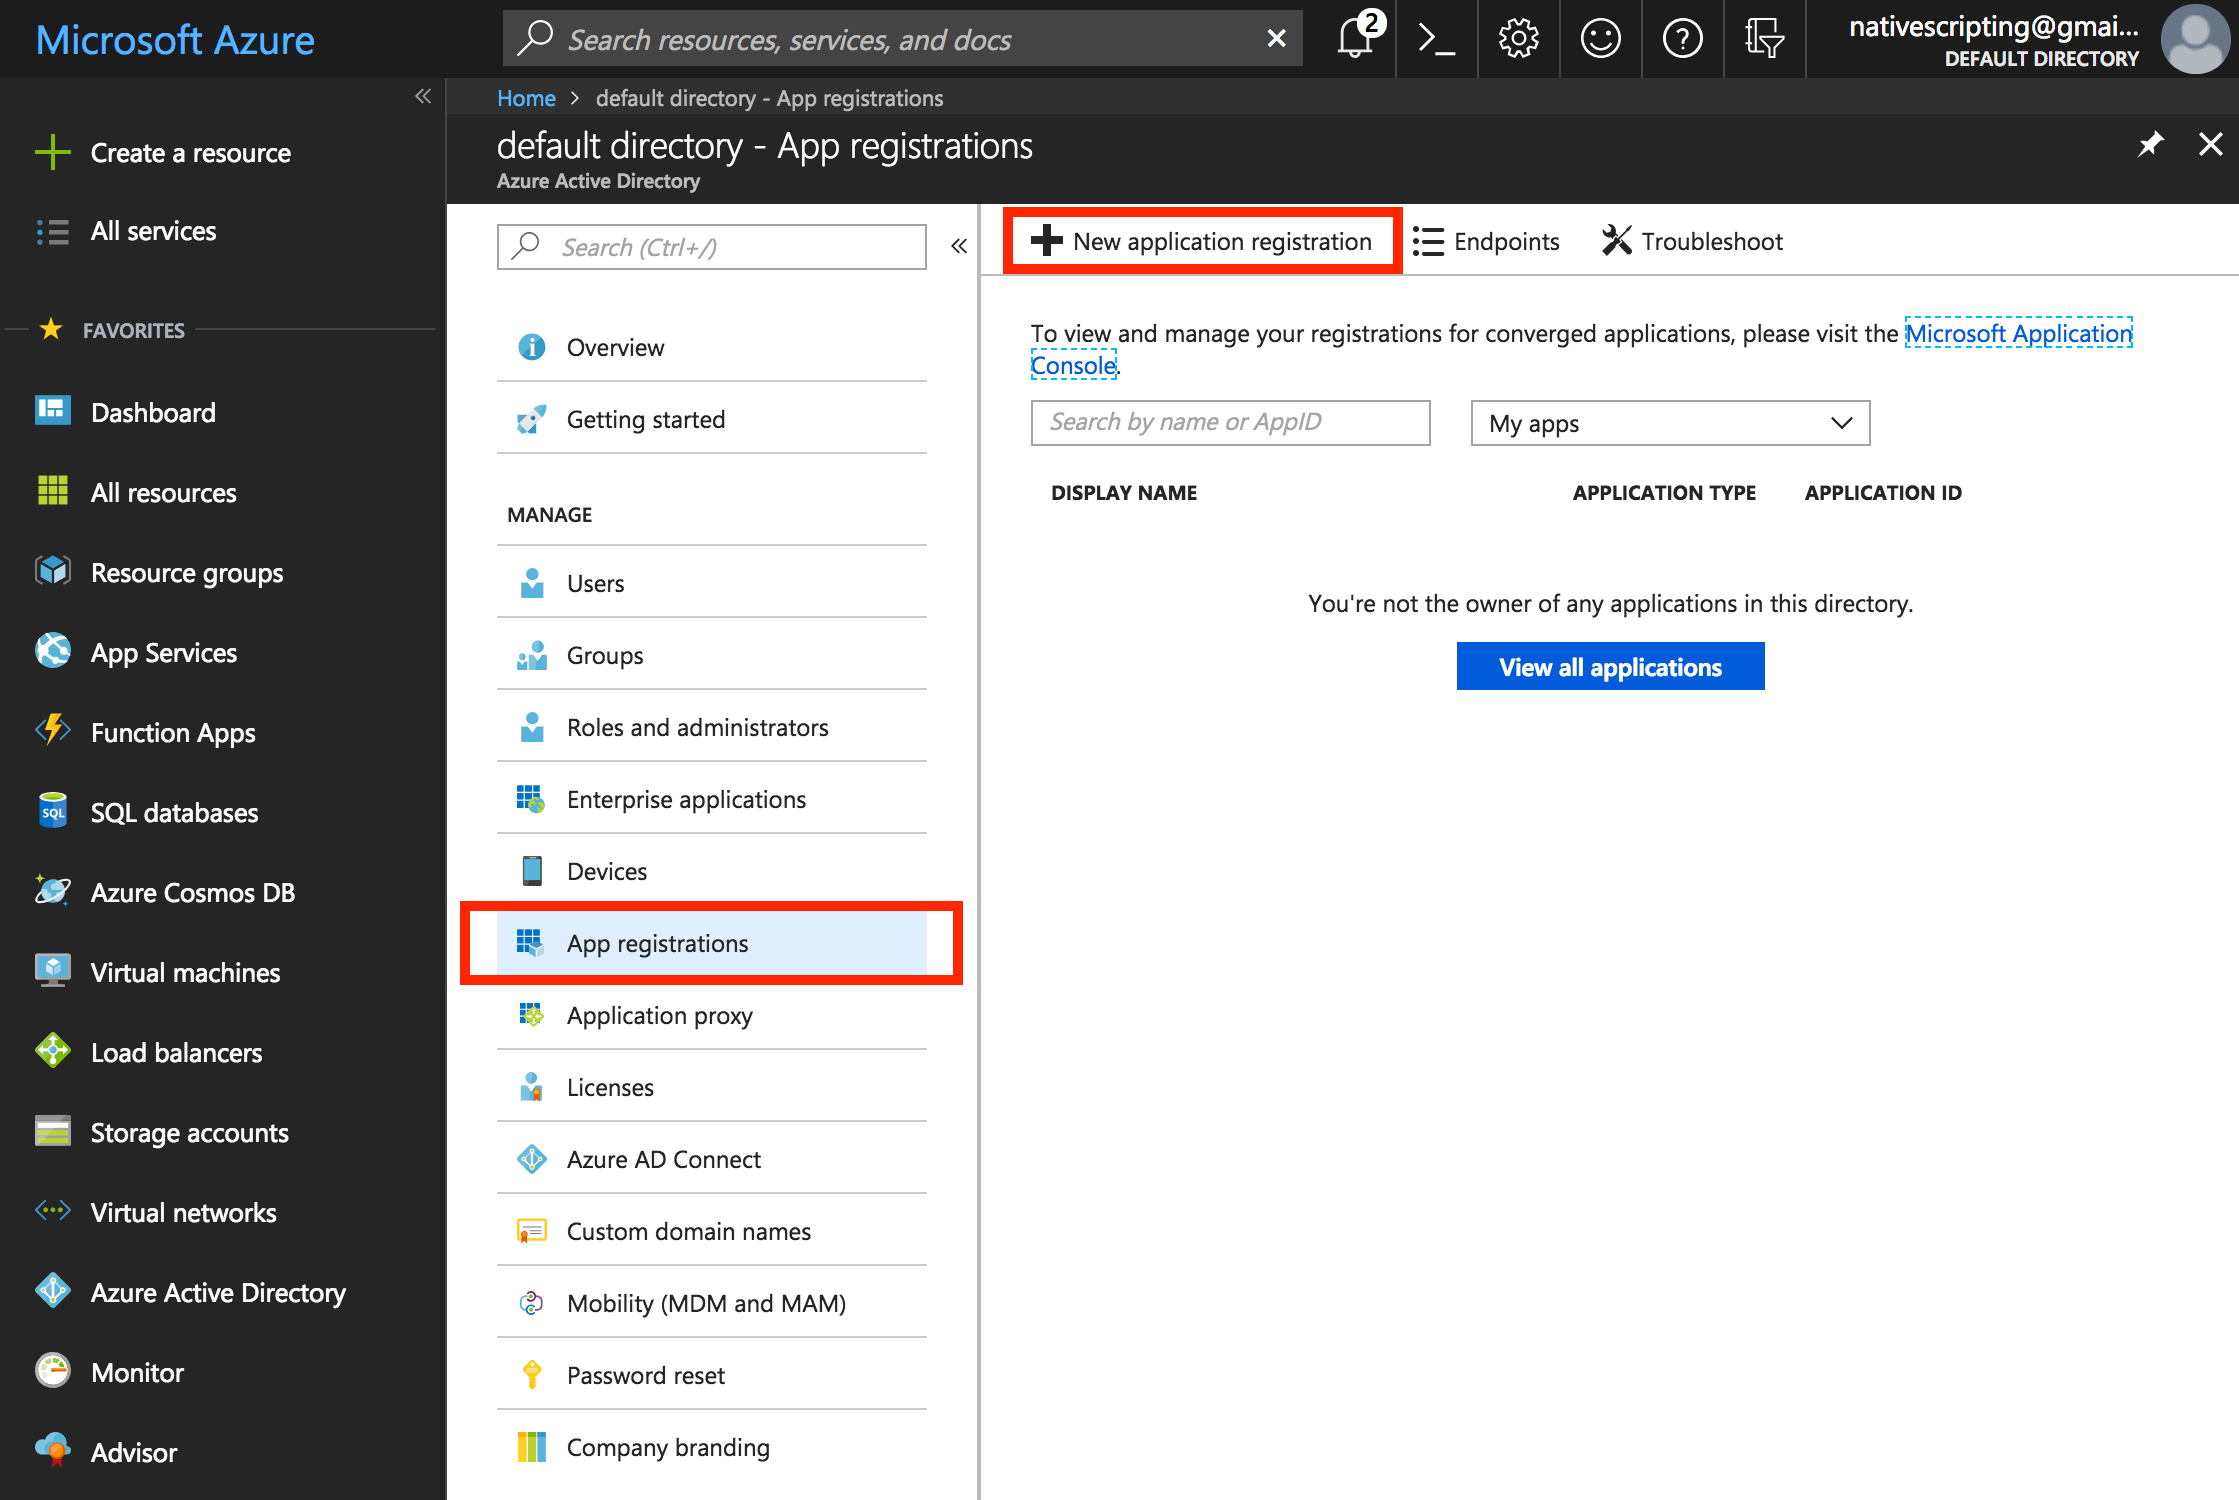
- Enter a name for the application (this can be any name you prefer), choose Web app / API and, for the Sign-on URL, enter https://auth.kinvey.com.

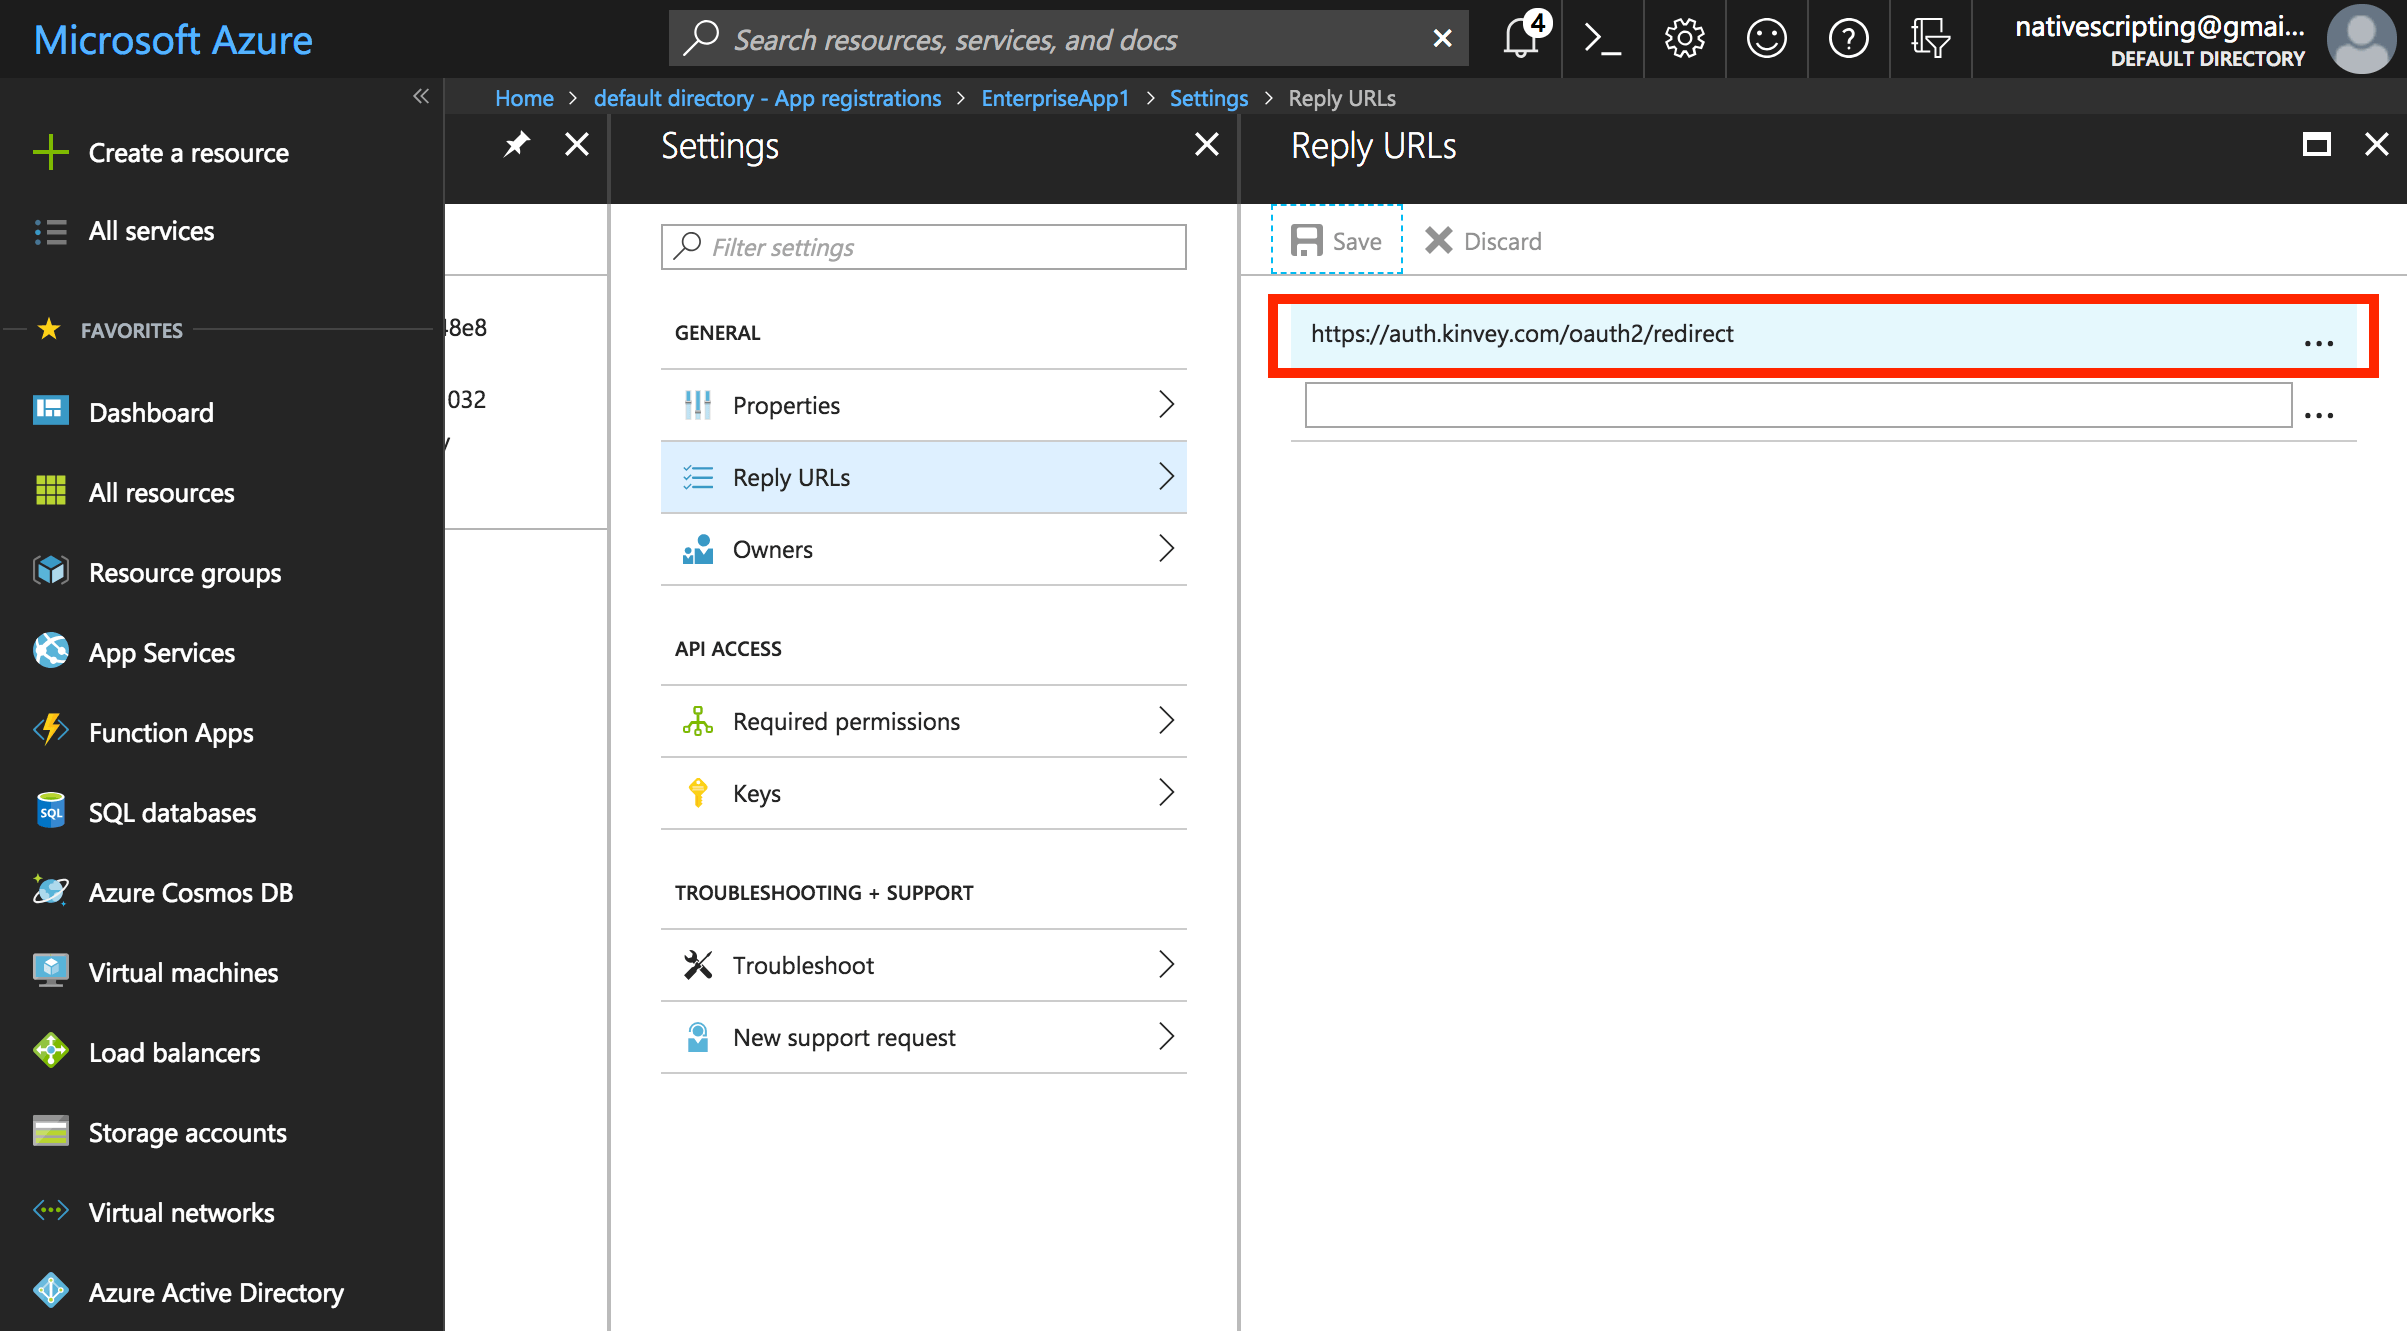
- Once it is created, click on Settings, then choose Reply URLs.
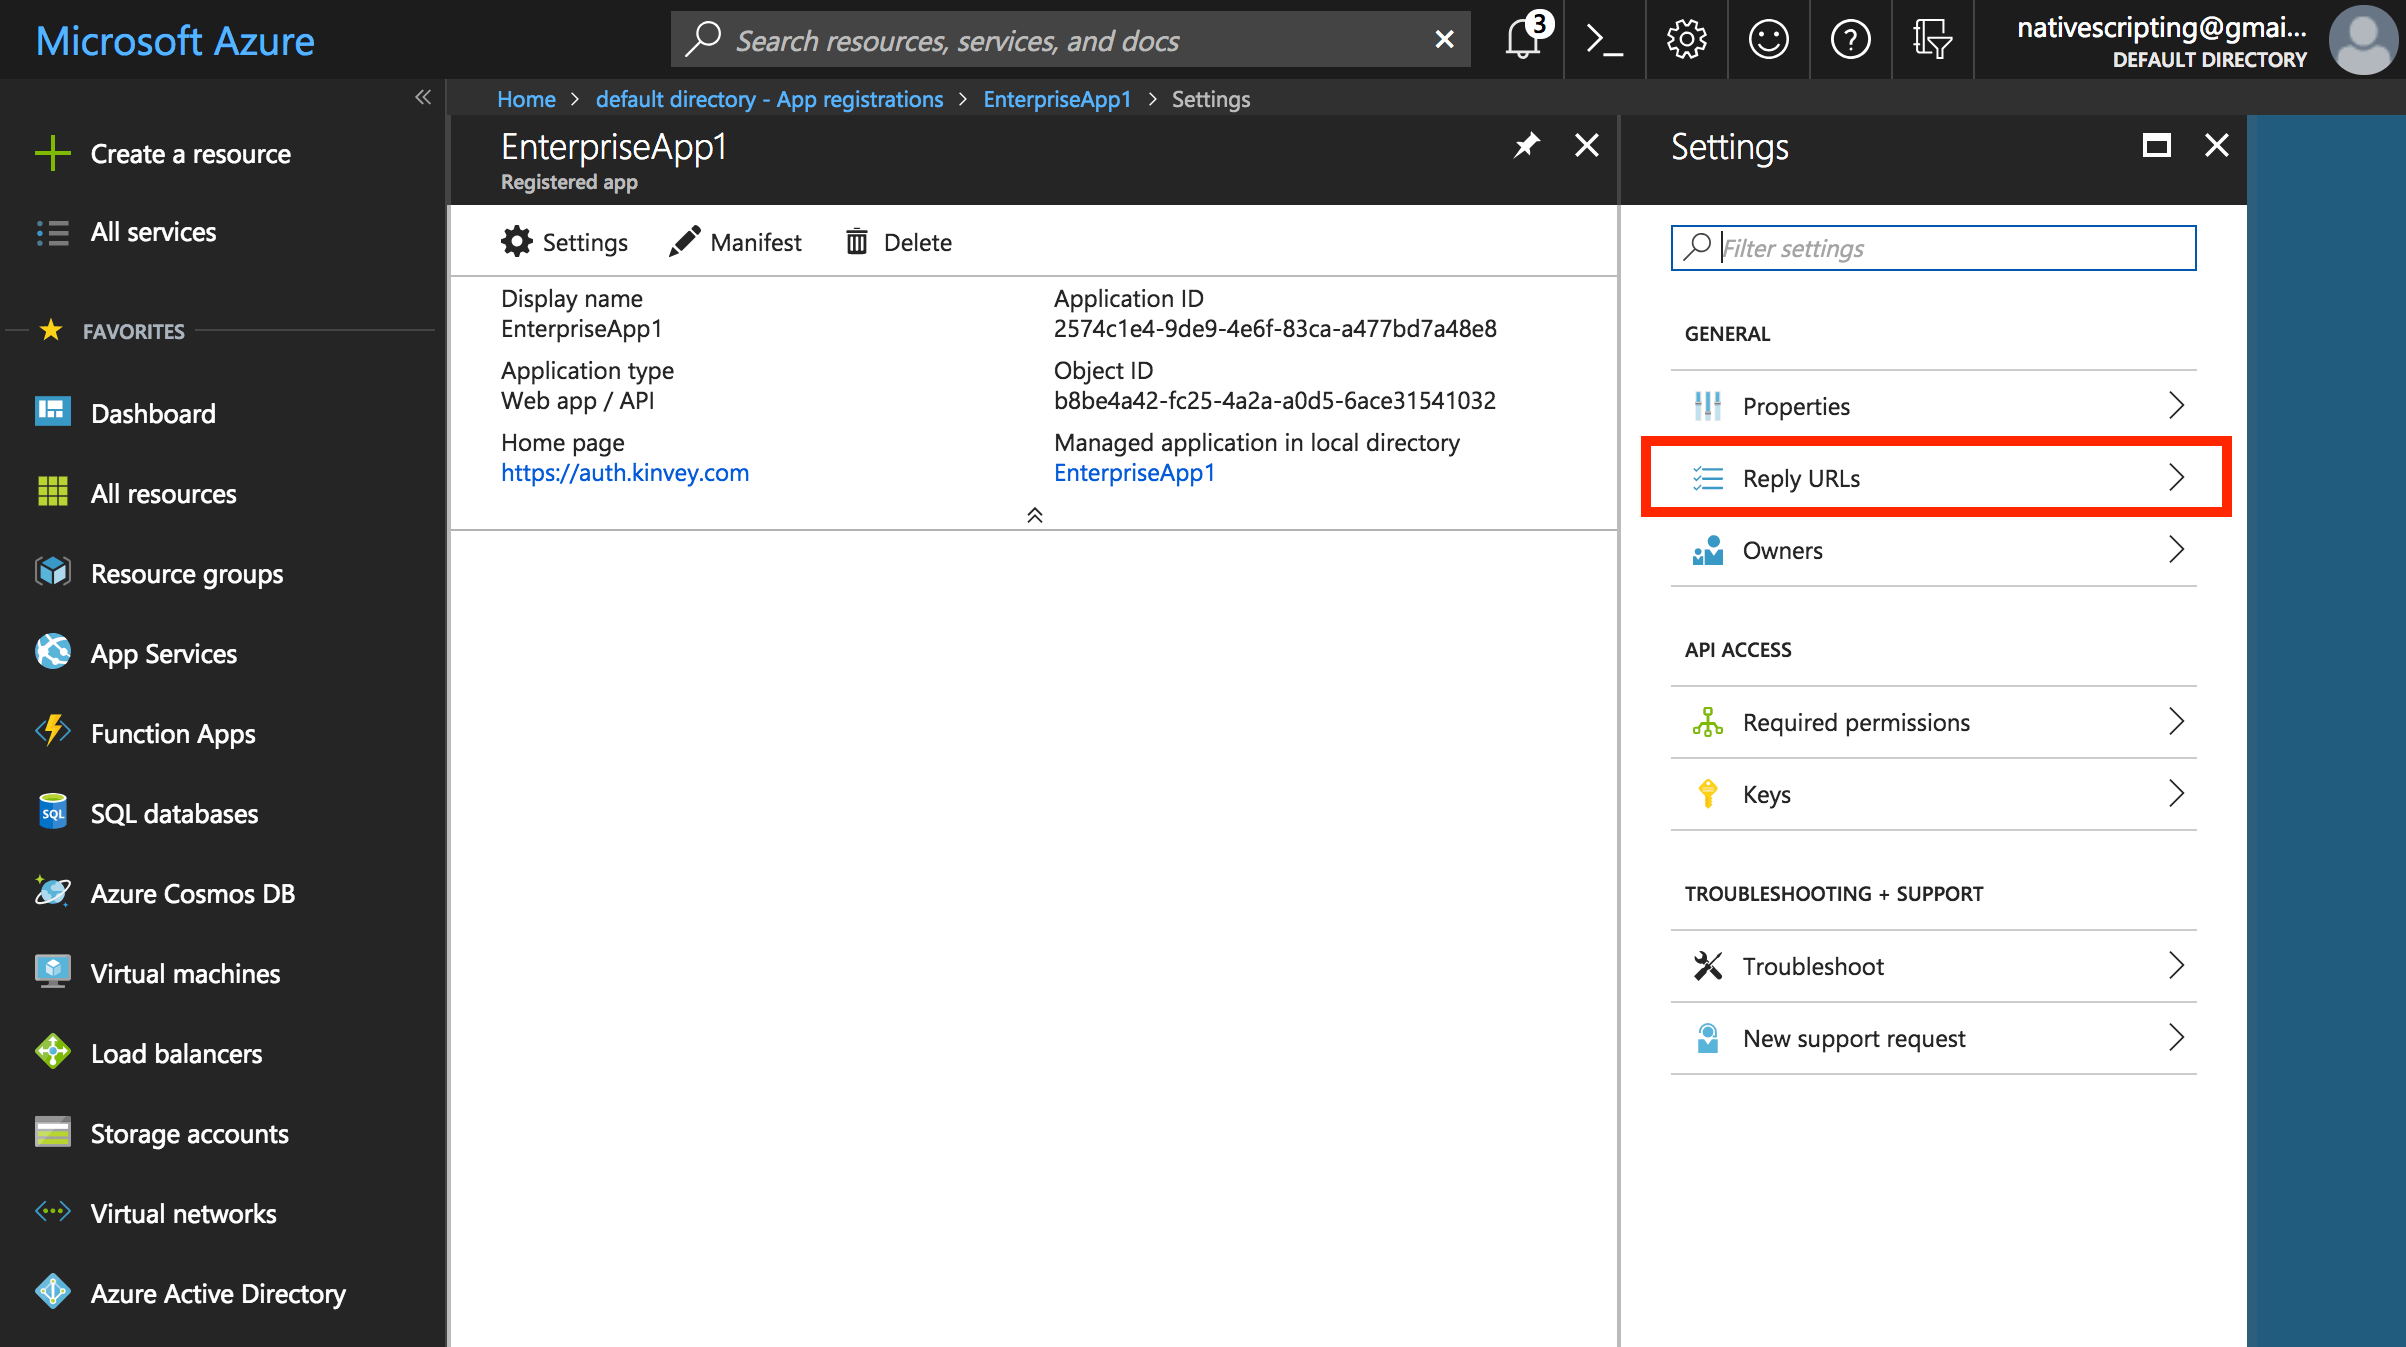
- Enter https://auth.kinvey.com/oauth2/redirect (see the Kinvey docs for additional details). You can replace the existing entry with this new URL.
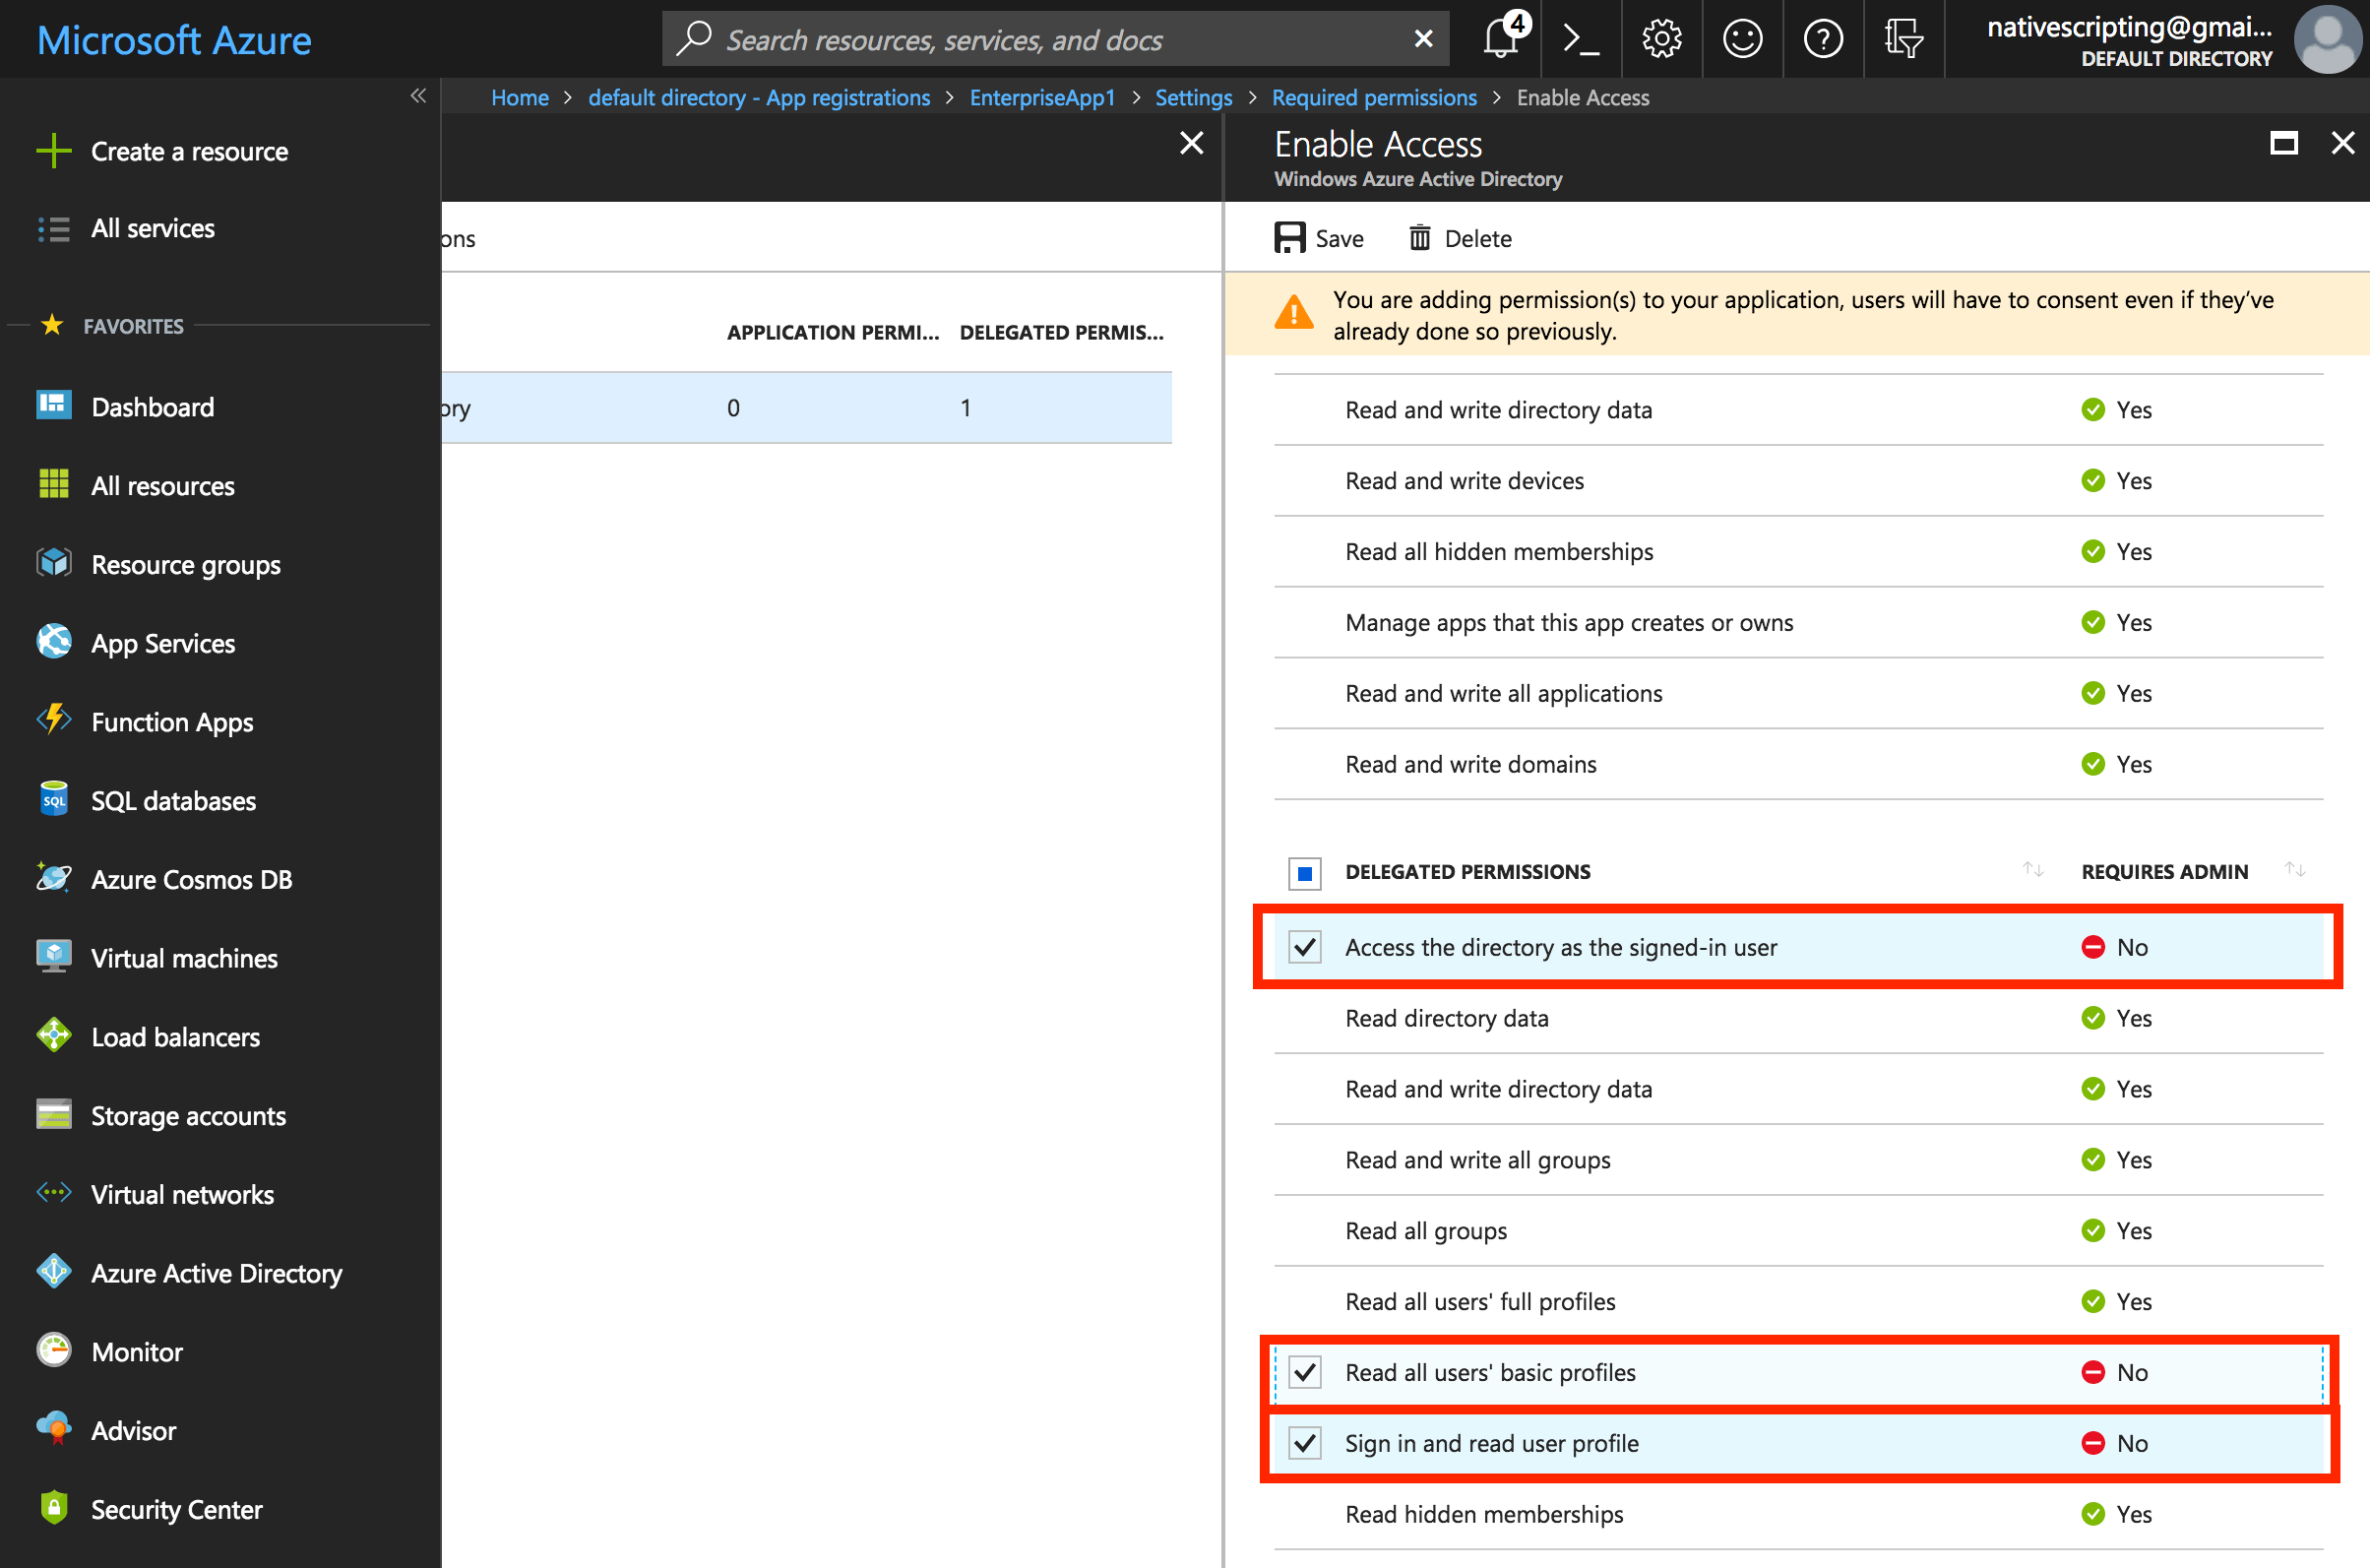
- Back in the application settings, choose Required Permissions and then Windows Azure Active Directory.
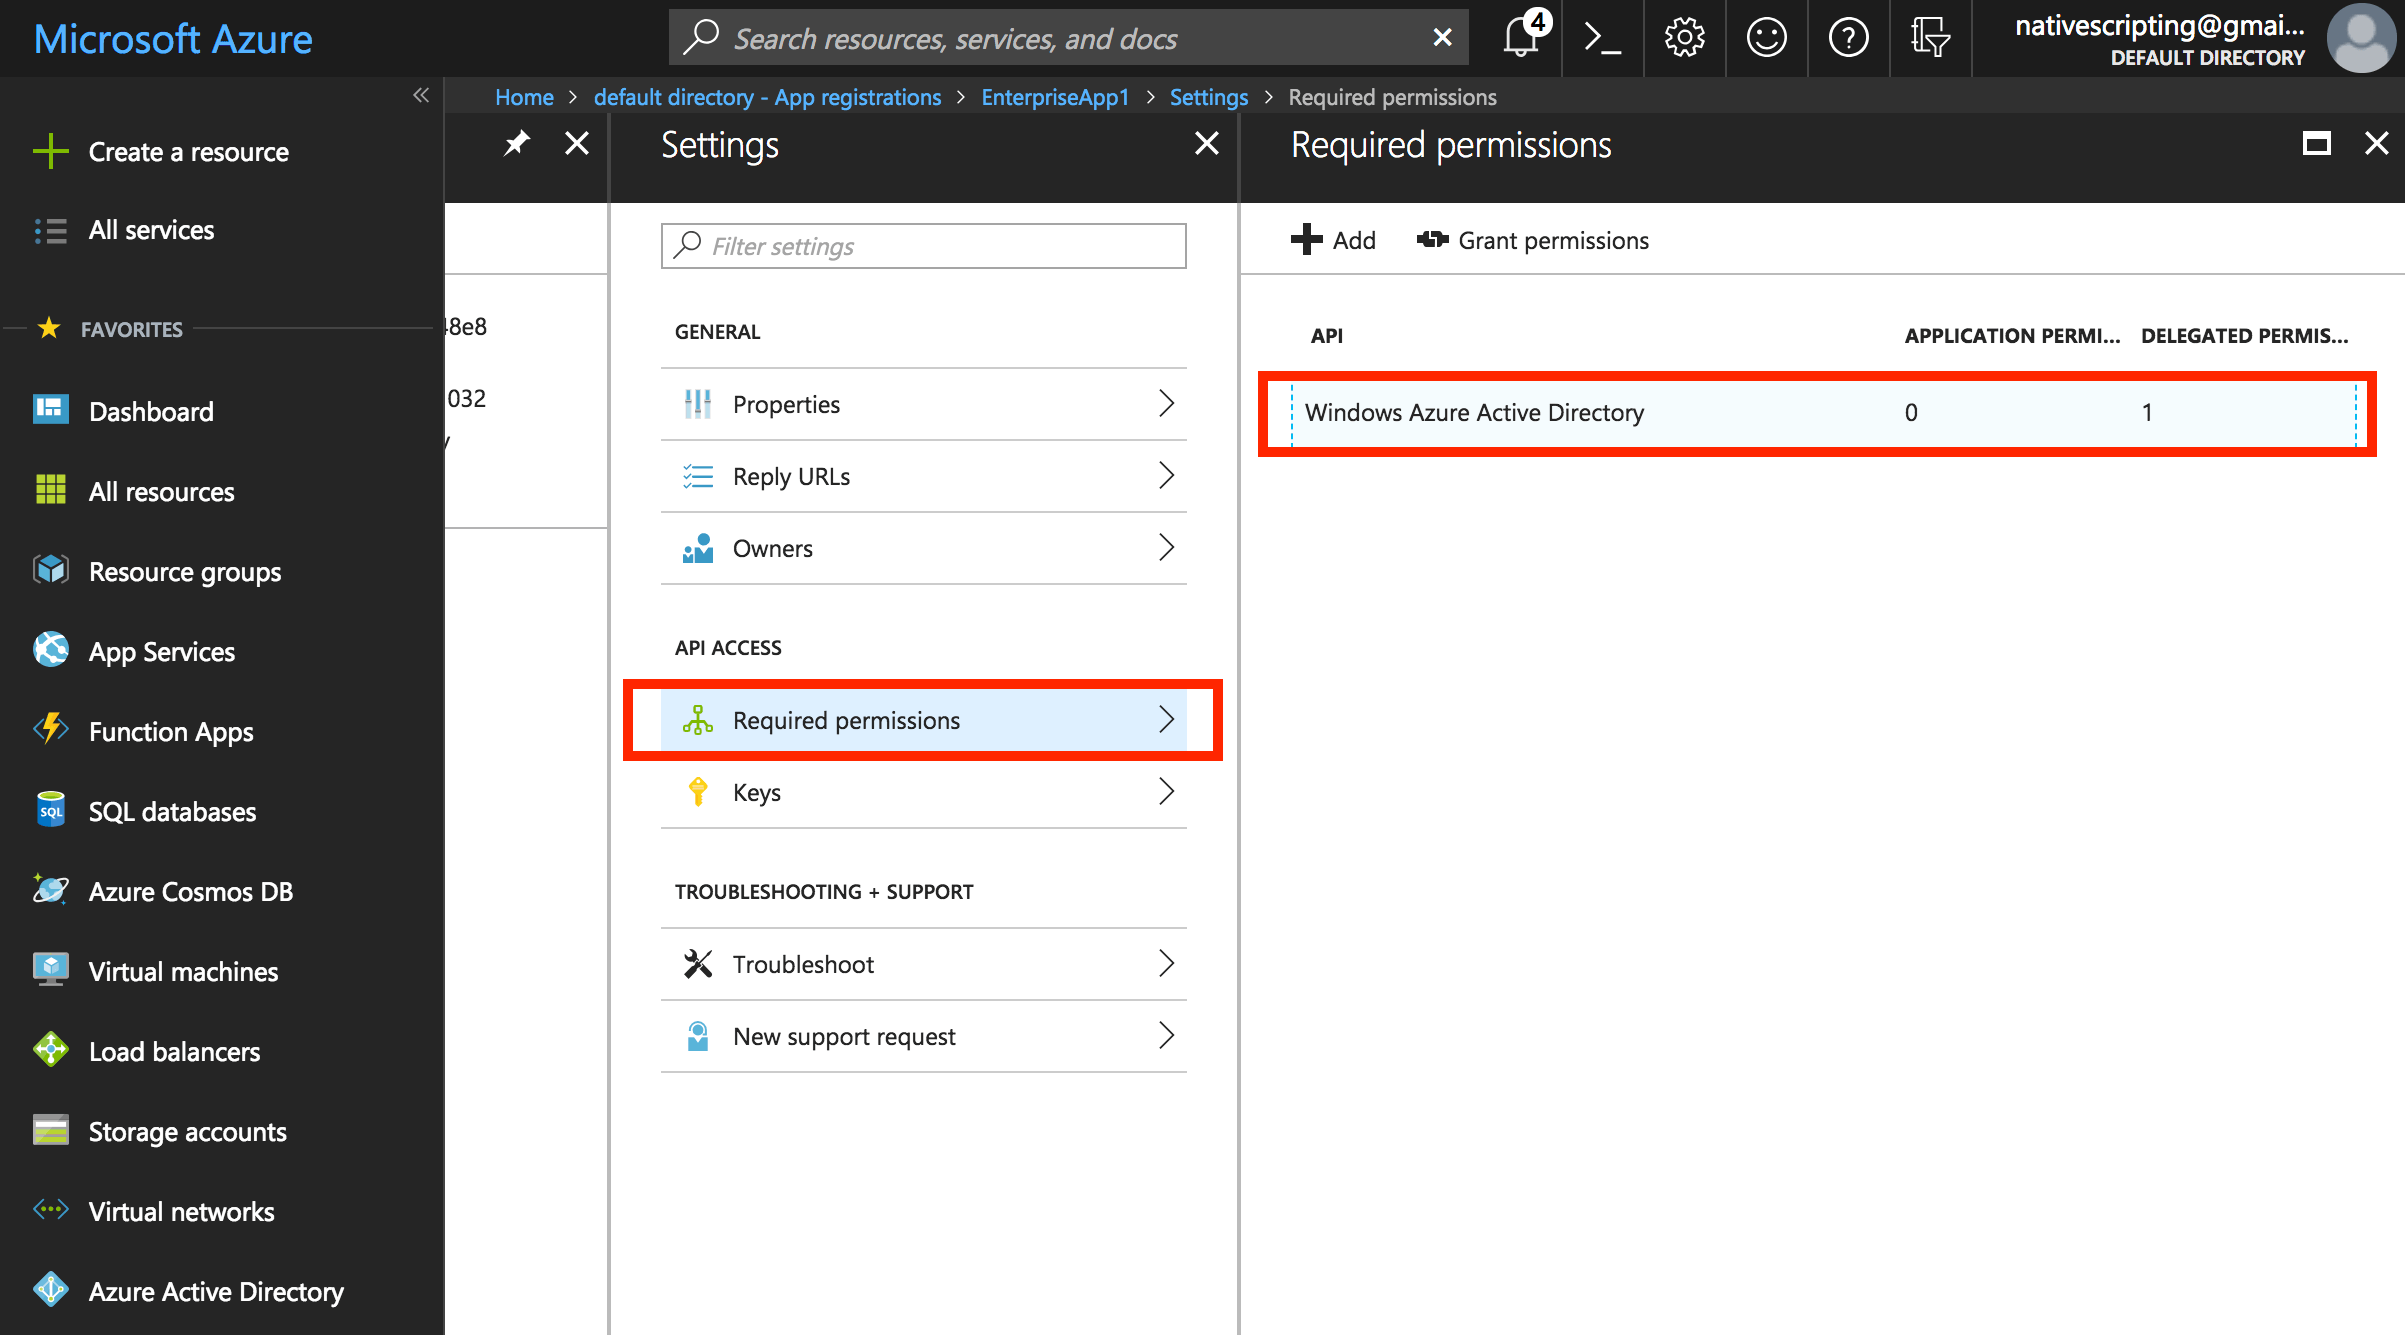
- Click on the first entry in the list, and when the permissions show, enable the following, then save the permissions
- Access the directory as the signed-in user
- Read all users’ basic profiles
- Sign in and read user profile
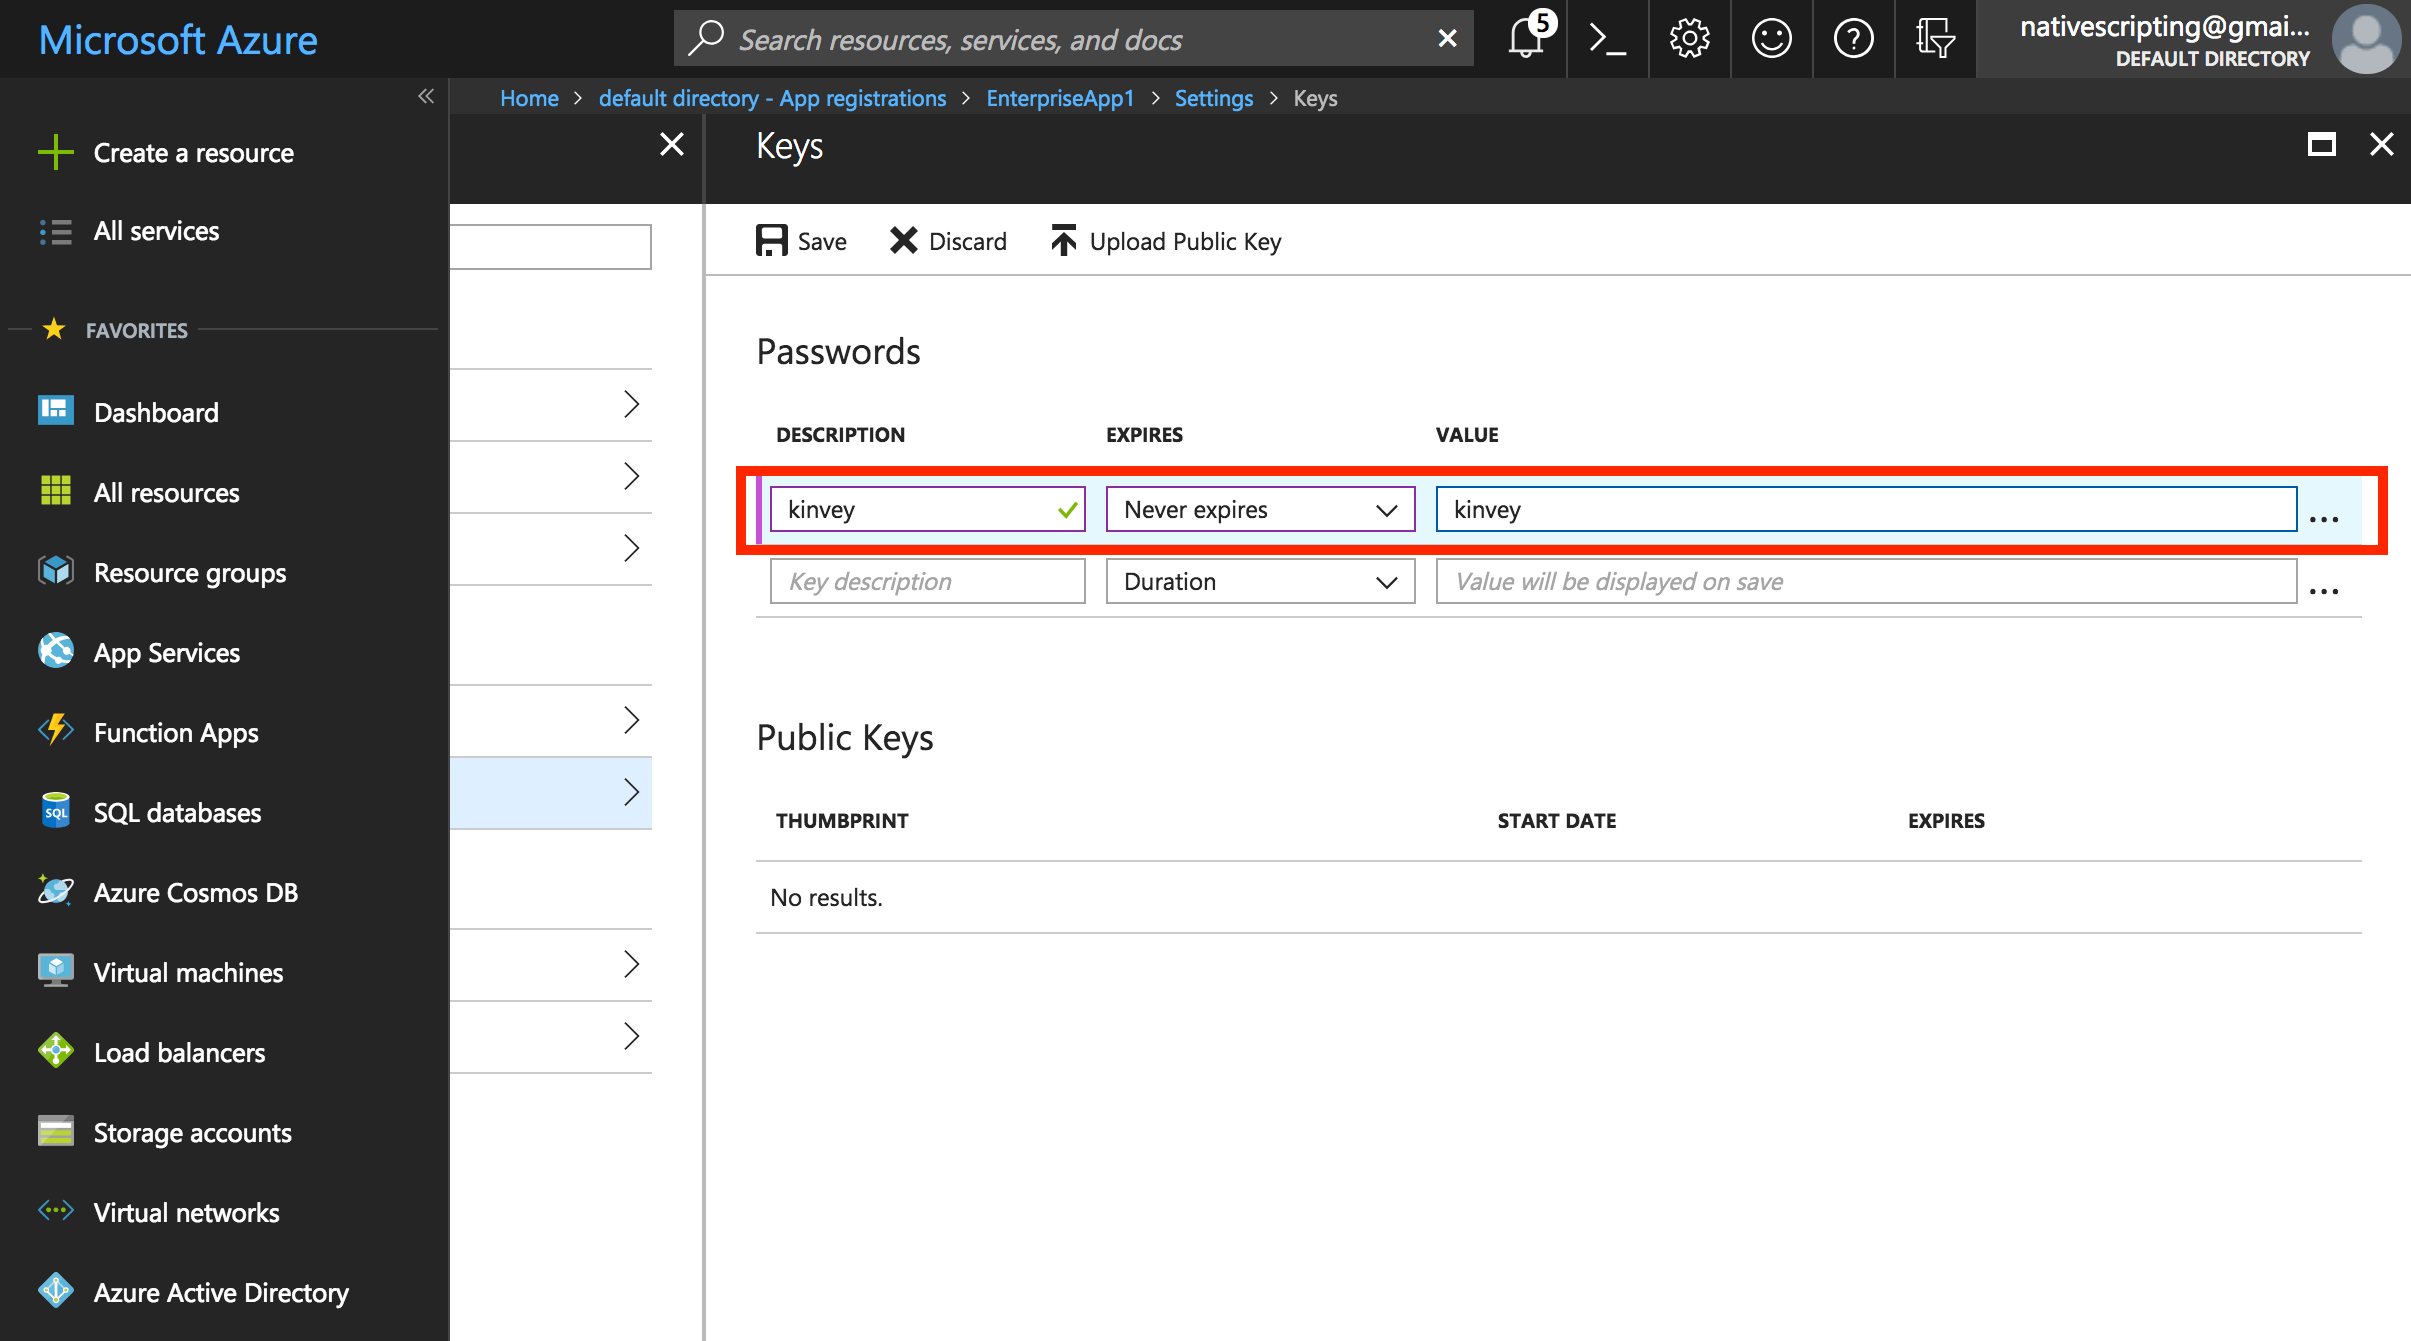
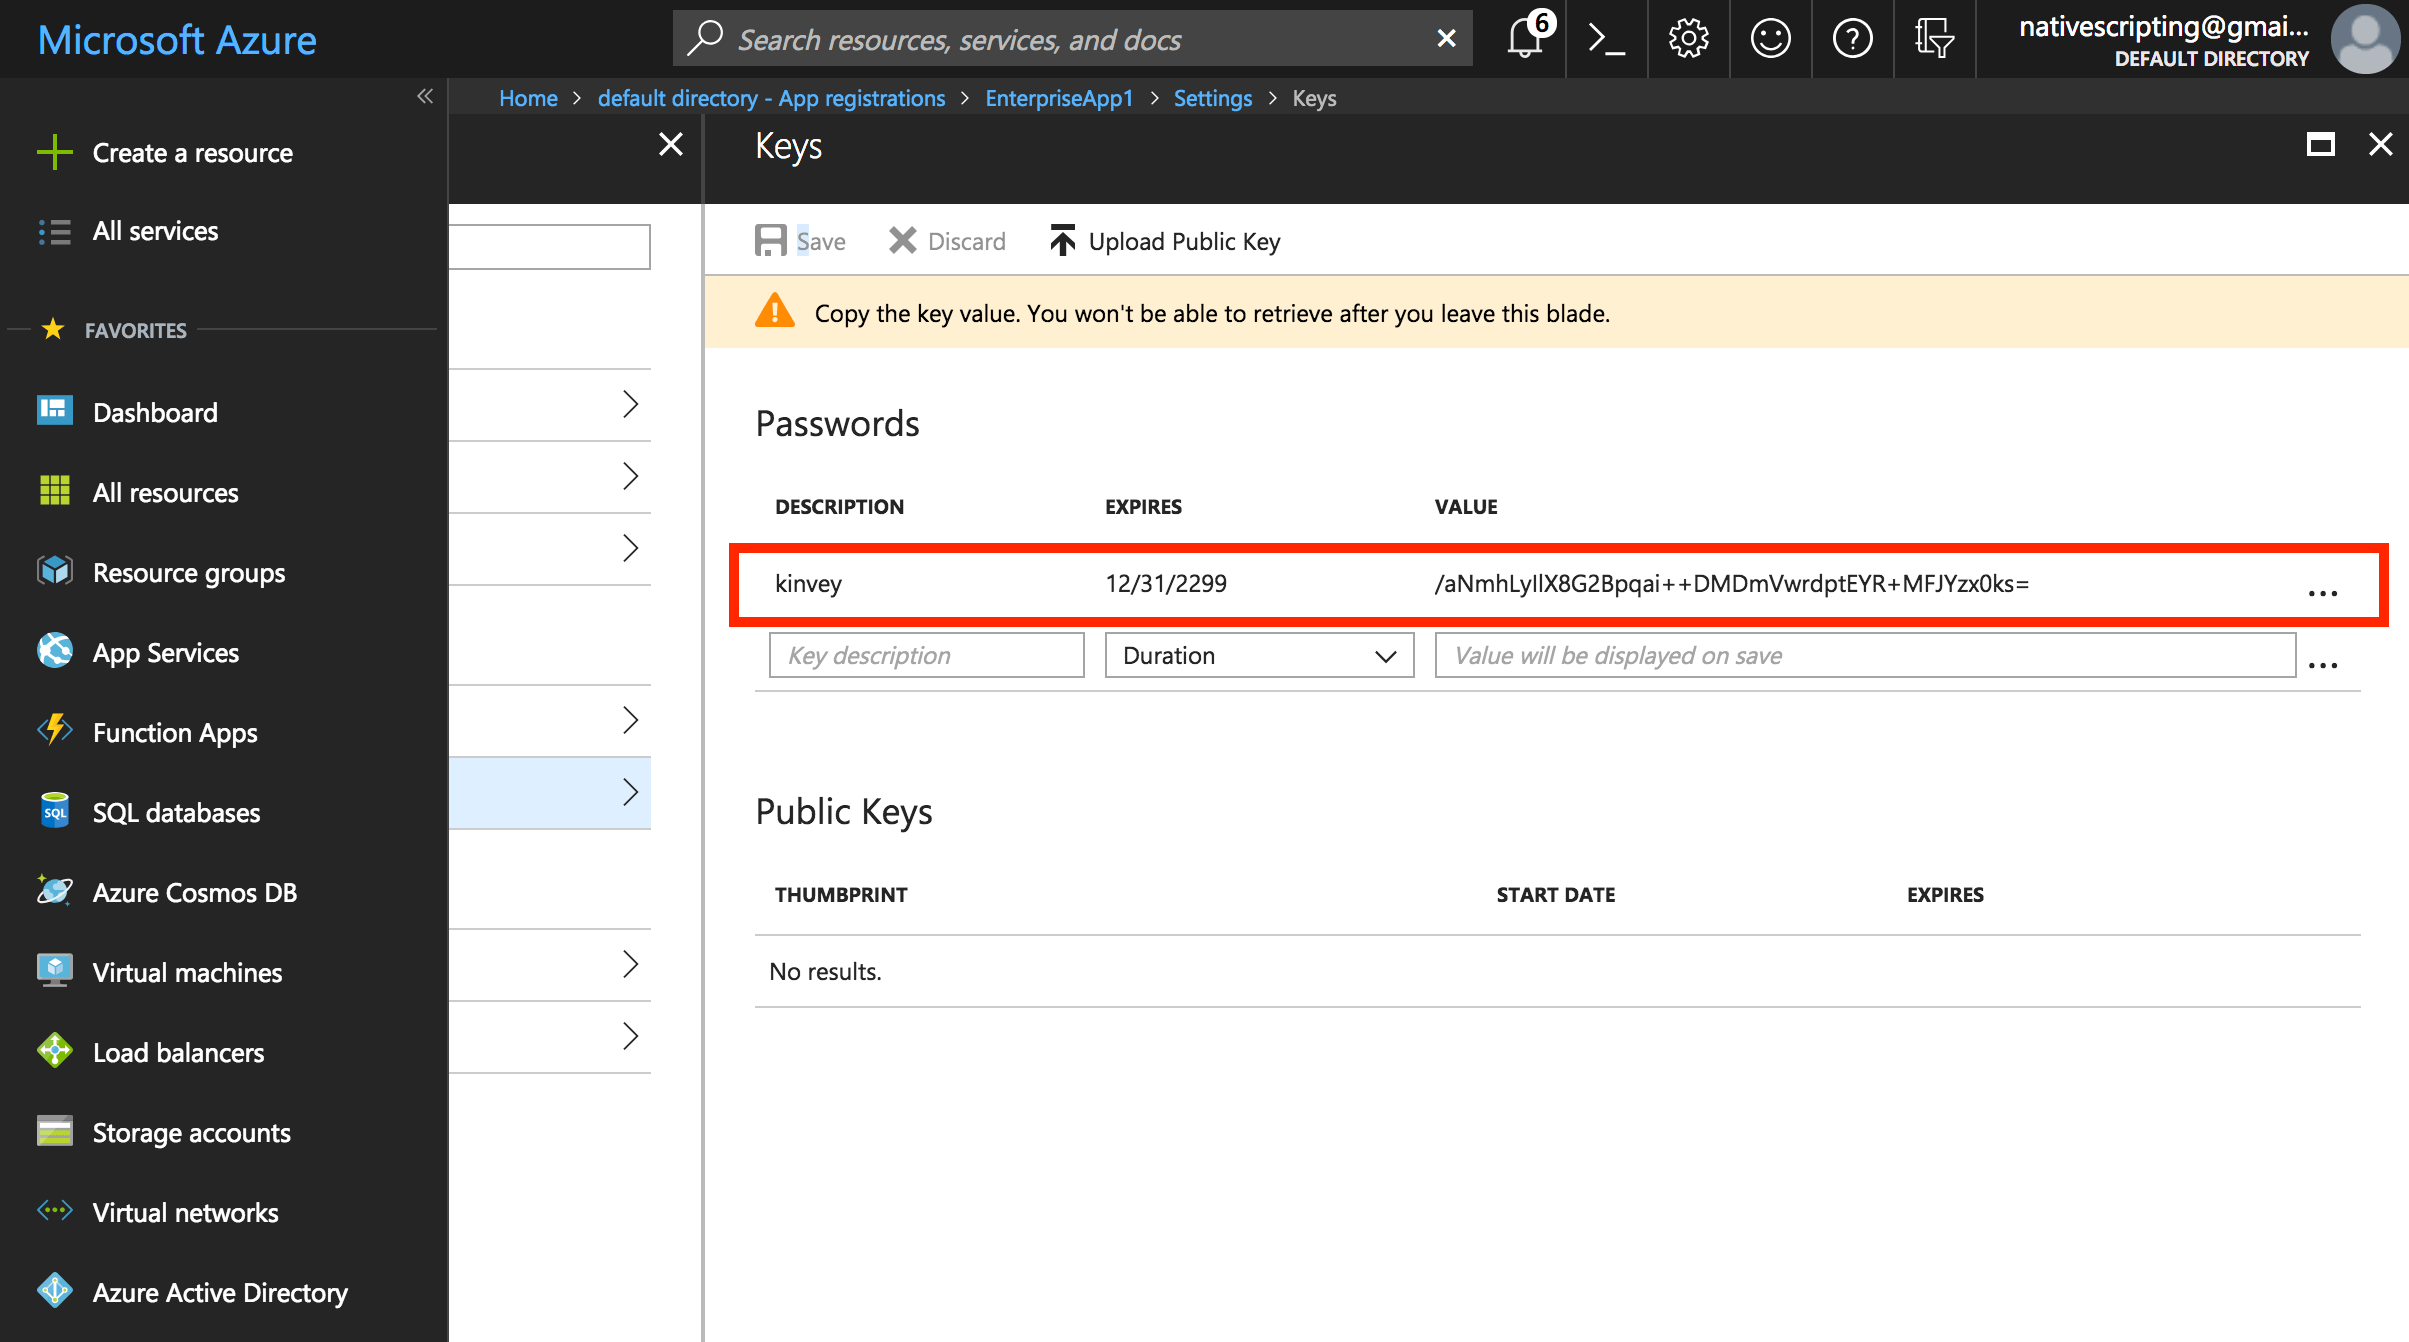
- Back in the application settings again, choose Keys and create a new setting under Passwords. Set the description (this can be any text you prefer), expiration (for example, “never”), and a value. The value will be hashed as soon as you click Save, and it will be completely hidden once you leave this blade, so make sure to copy the key’s value before leaving and paste it in your Word document. You can call this value “Client Secret,” which I’ll explain later.
This is what you'll see after clicking the Save button
Note: For OAuth and OpenID Connect, your admin user login will work as a test. But, in order to test the log in process with SAML Redirect, Azure Active Directory will need a user. To assign a user to this enterprise application, click on “Assign a user for testing” in the quick start or “Users and groups” in the enterprise application sub-navigation. For testing purposes, you could add yourself.
Whew, that was quite the setup. Now we just need to save off some of our Azure AD settings for use on the client side. Navigate back to the top level Azure Active Directory blade in the portal.
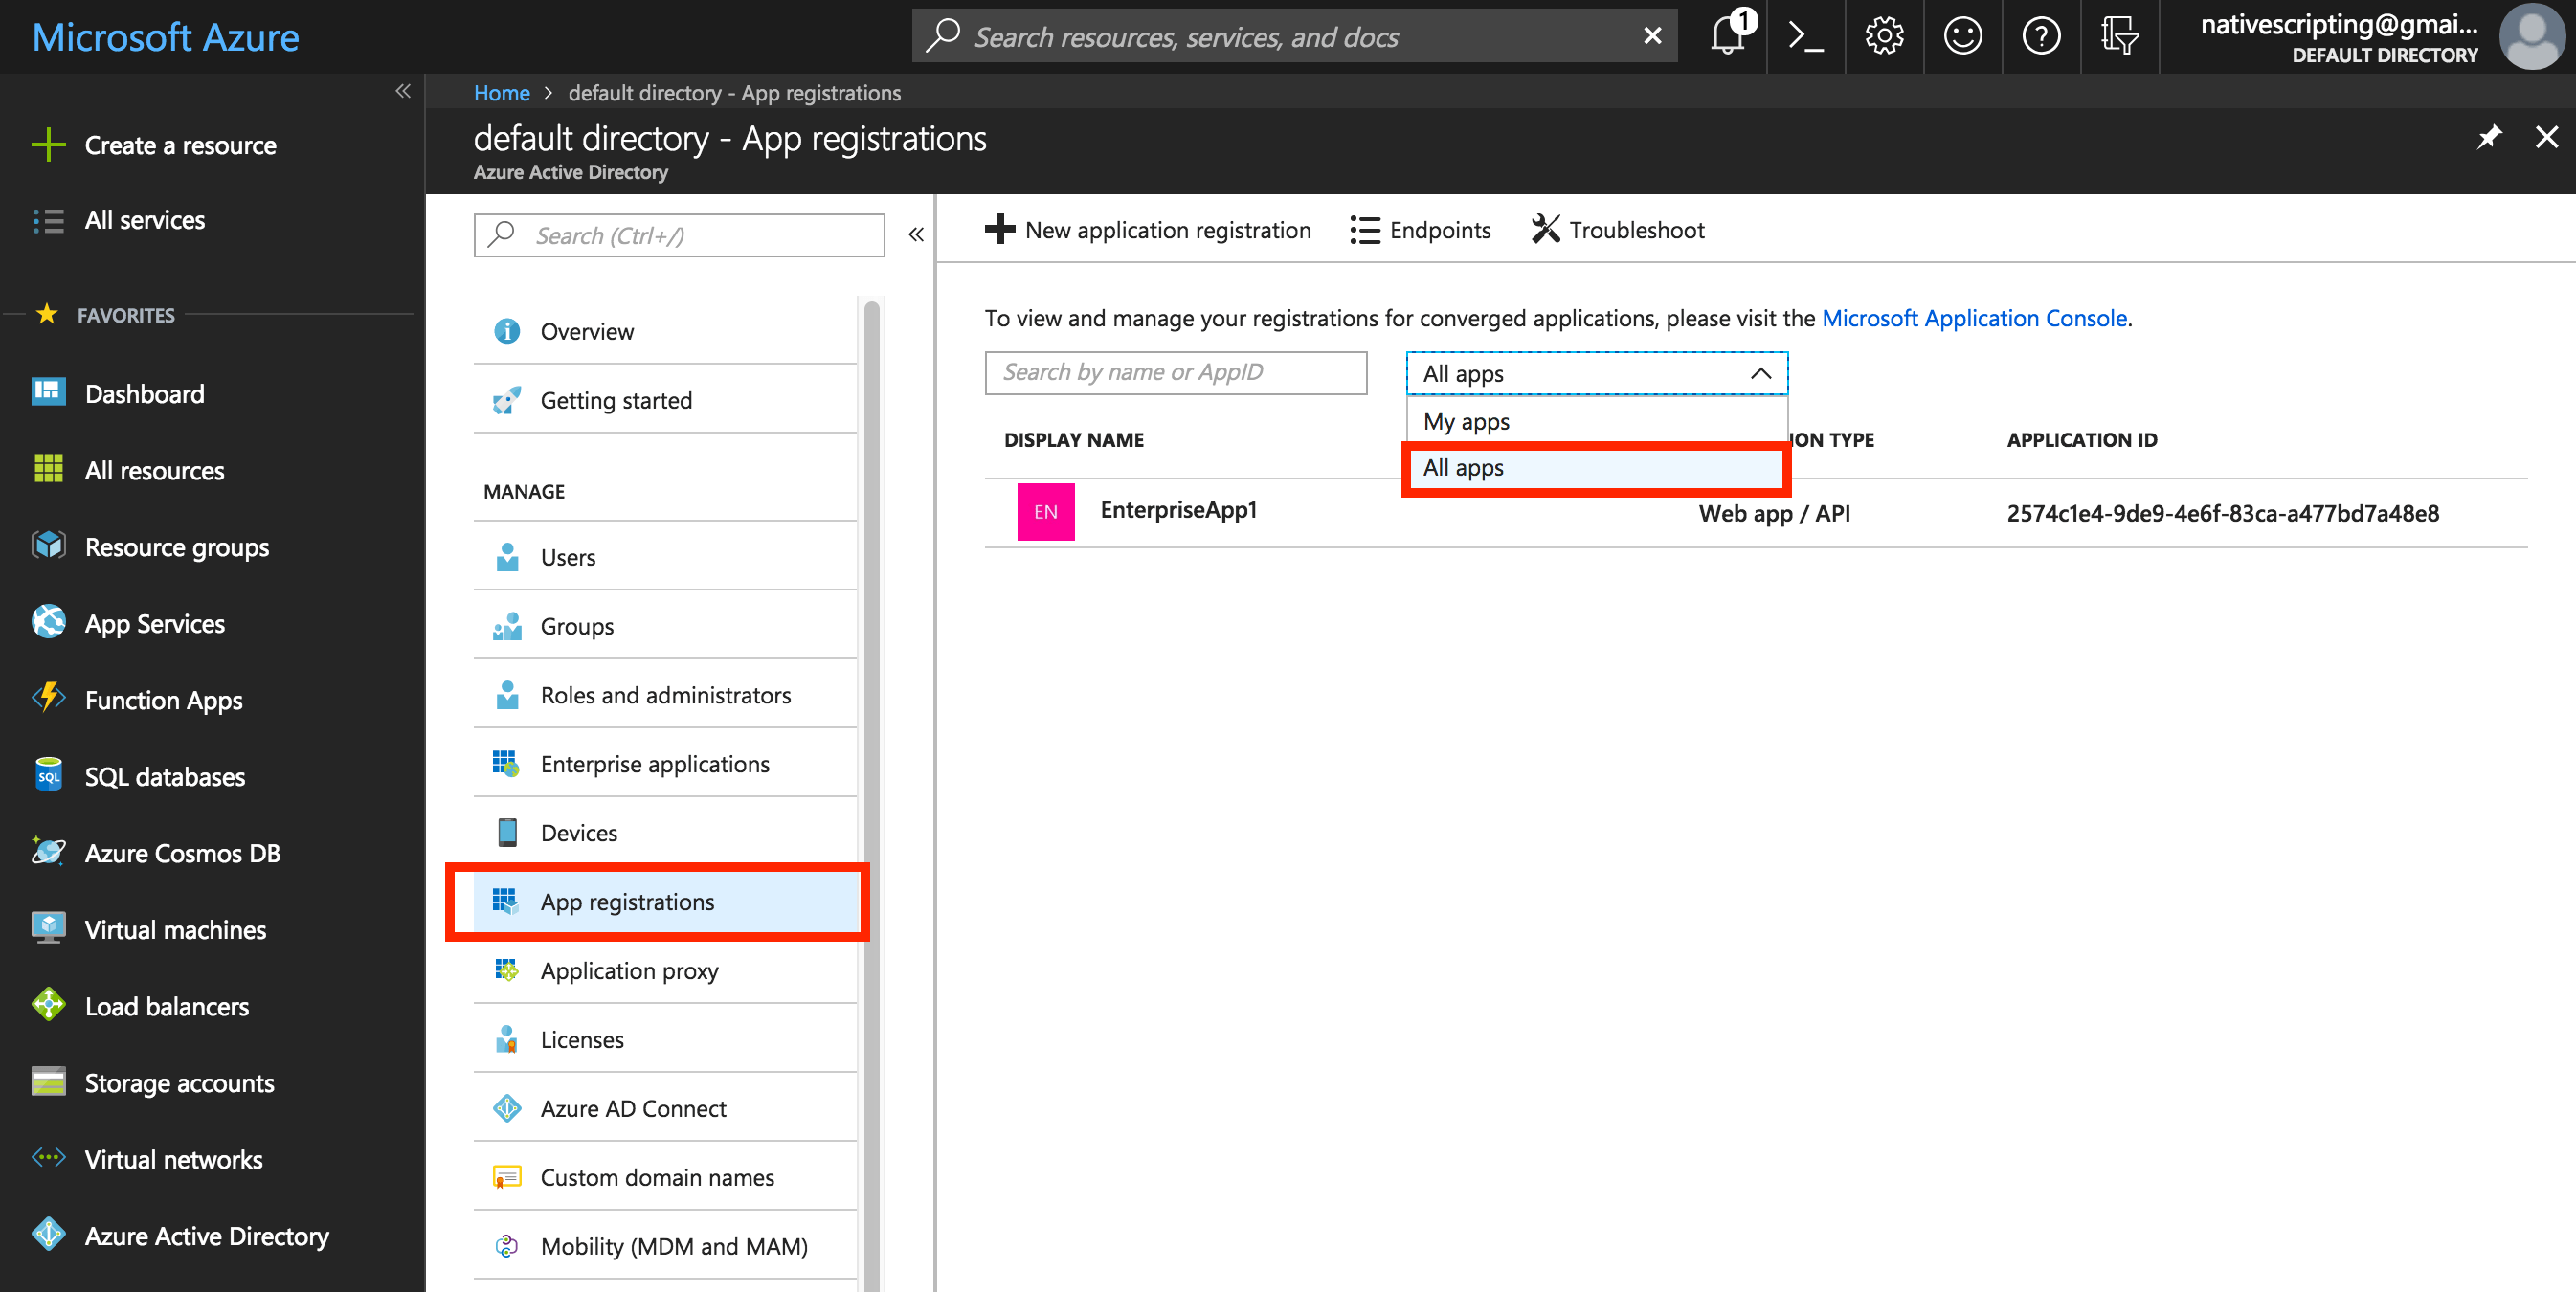
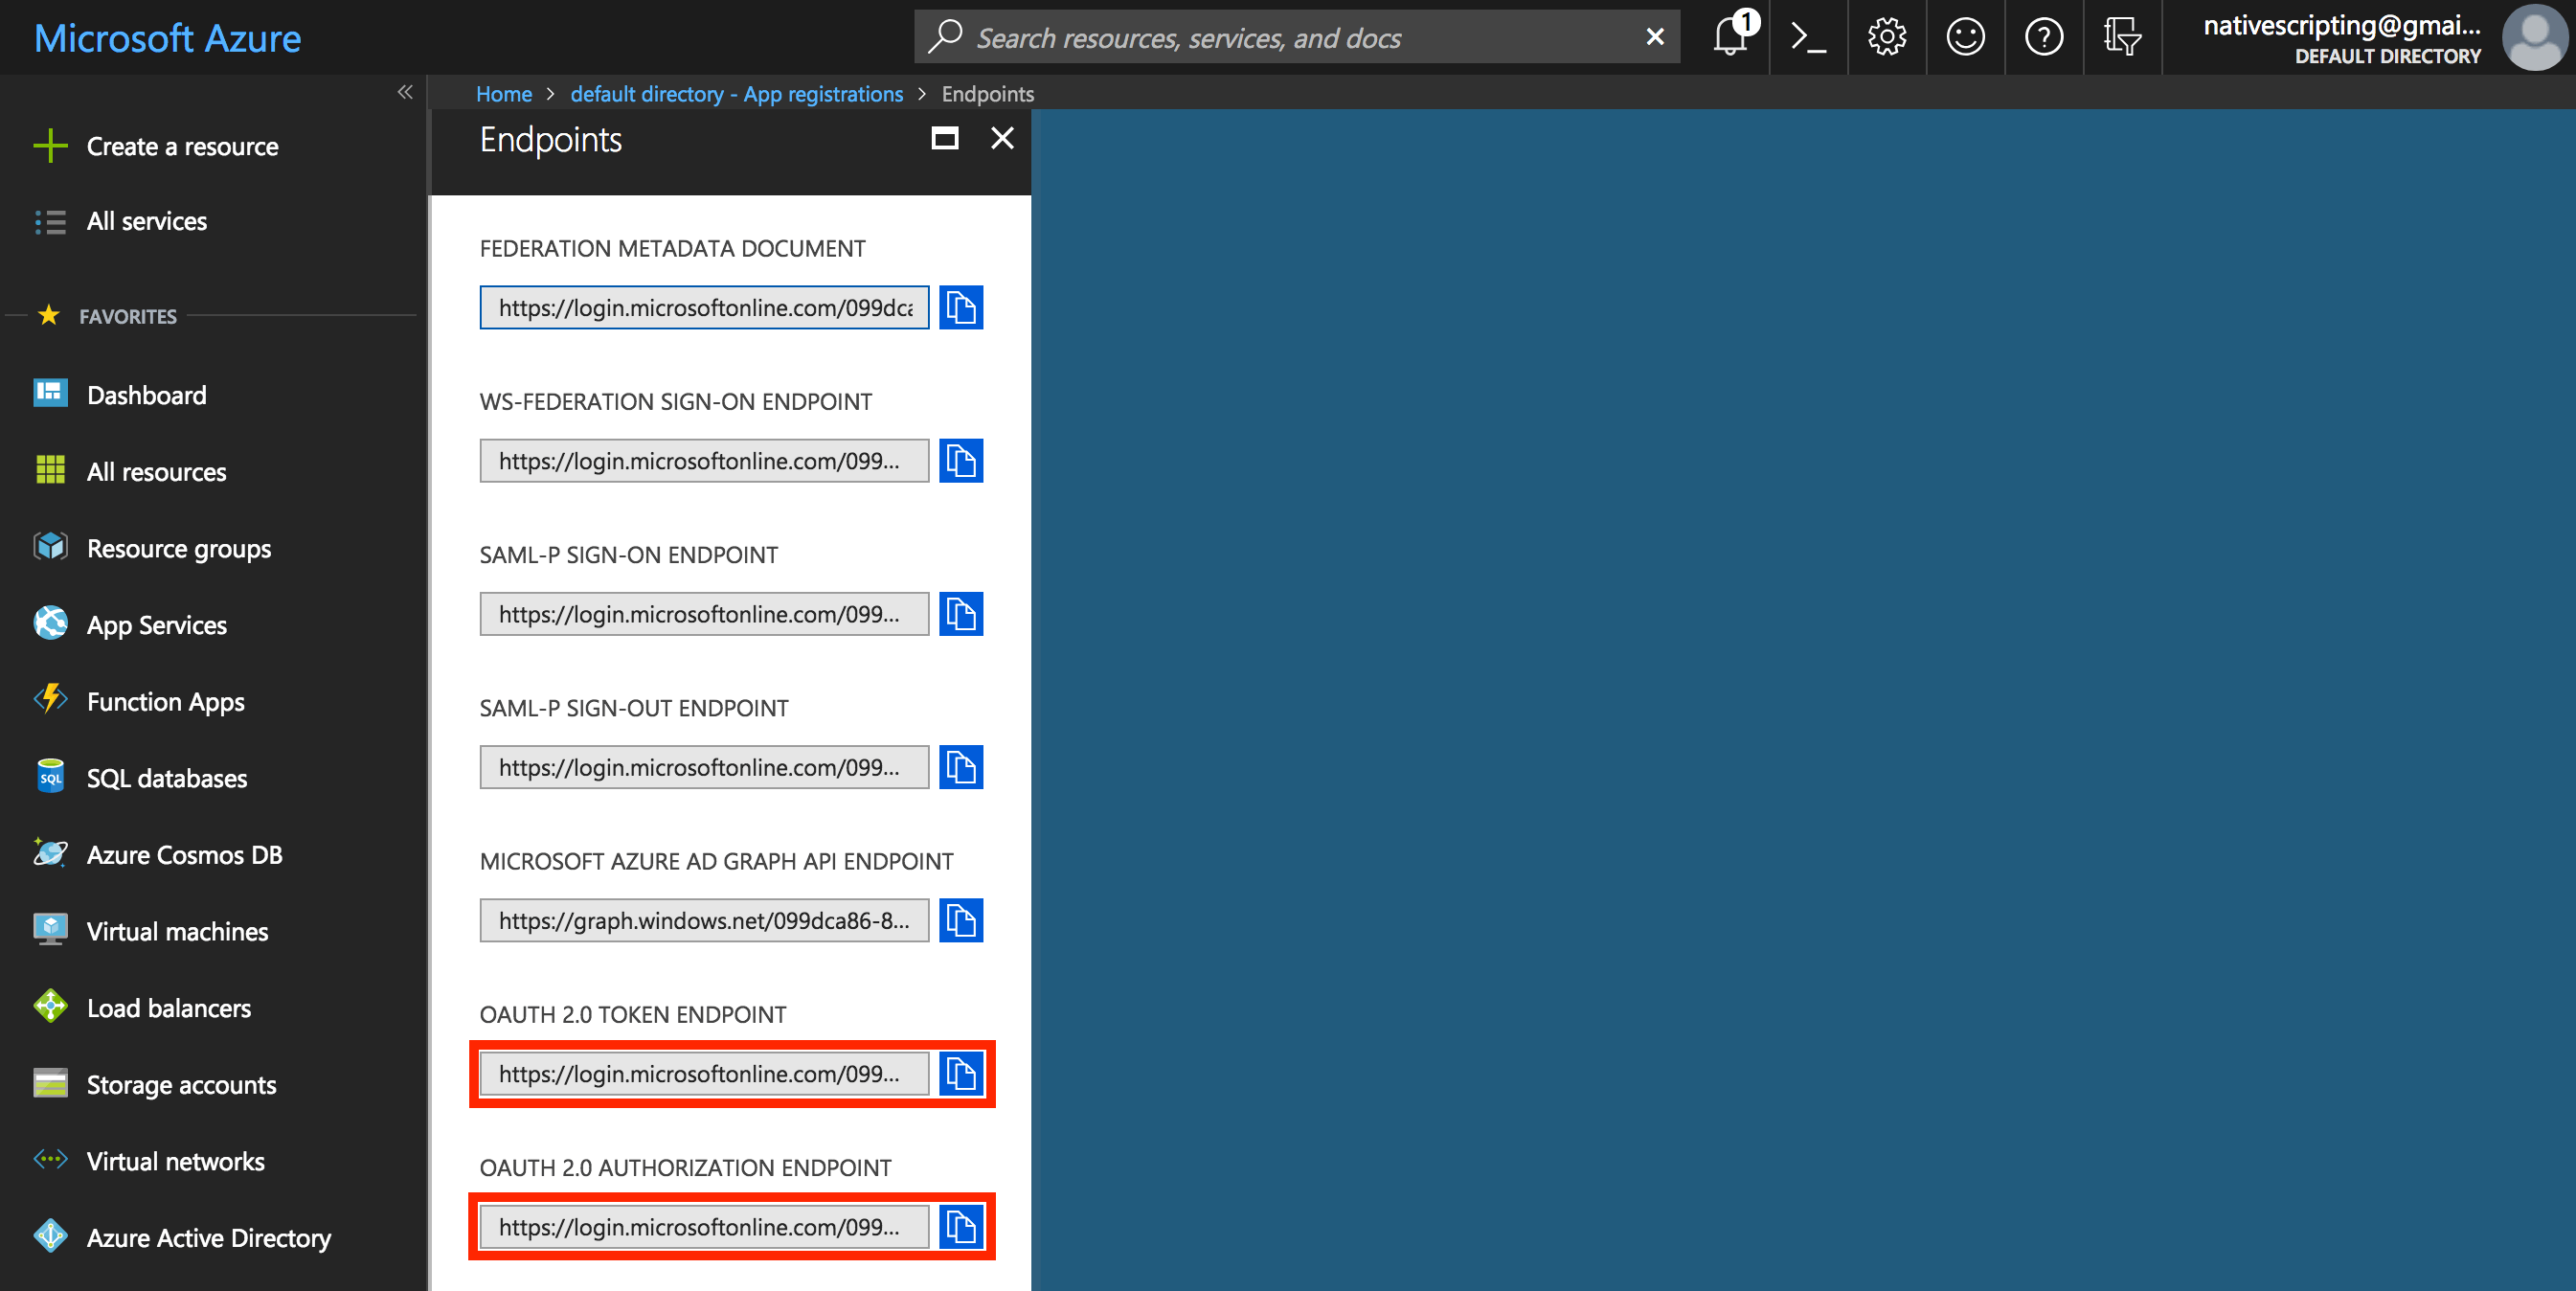
Select App registrations, and then select All Apps from the dropdown. You should see the app we’ve registered (EnterpriseApp1) in the list of apps. Copy its Application ID GUID value and save it in your Word document. You can call this value “ClientID.”
Click on Endpoints and copy both the OAuth 2.0 Token Endpoint and the OAuth 2.0 Authorization Endpoint. Paste the OAuth 2.0 Token into your Word document and call it “Provider URI,” then paste the OAuth 2.0 Authorization Endpoint into your Word document and call it “Grant Endpoint.”
Let’s continue with the mobile app setup next.
Mobile Setup
There are two approaches to authenticating with Azure AD from your iOS and Android apps that we will consider in lieu of writing your own custom Objective C, Swift, Java, or Kotlin code for communicating with Azure AD (aka roll your own). Both of the following approaches eliminate the need to roll your own, however, the second approach goes a step further to smooth out the differences between iOS and Android as well, and provides you a clean simple way to configure authentication using the configuration over code approach.
Approach 1: ADAL
Azure AD provides the Active Directory Authentication Library, or ADAL, for iOS and Android clients that need to access protected resources.
You can read the quick start guides for each at these URLs:
Azure AD iOS getting started
Azure AD Android getting started
If you think that using the ADAL libraries for your iOS and Android apps looks like a challenge in it of itself, then you’re not alone. Even after abstracting away all the HTTP communication details into the ADAL libraries, the task to implement these on each mobile platform requires multiple teams with specific platform knowledge. That’s why we’re going to use Kinvey to simplify this for us.
Approach 2: Kinvey NativeScript SDK
Using NativeScript together with our Kinvey SDK is by far the simplest approach to add authentication to a native mobile app, and do so for both iOS and Android at the same time. I’ll show you how to bootstrap a brand new NativeScript app using a tool called NativeScript Sidekick, which is available as a free download.
NativeScript Sidekick gives you the ability to connect to enterprise authentication providers via OAuth 2.0. Let’s look at the various data points NativeScript Sidekick needs to make the connection.
Note: It’s assumed that you already have a working iOS or Android environment set up on your machine. If you are on a Mac, then you’ll be able to build for iOS, but if you’re on Windows or Linux, you can build for Android locally and use Sidekick to build for iOS in the cloud.
- Start up NativeScript Sidekick and click on the plus button, or the Create App button. You will see the Create App screen where you can select from a plain JavaScript, TypeScript or Angular project. Then you can select the Enterprise Auth template. Give your app a name and specify the folder where you want the project created. Once you’ve had some fun picking different options on this screen, click create to actually generate your app.
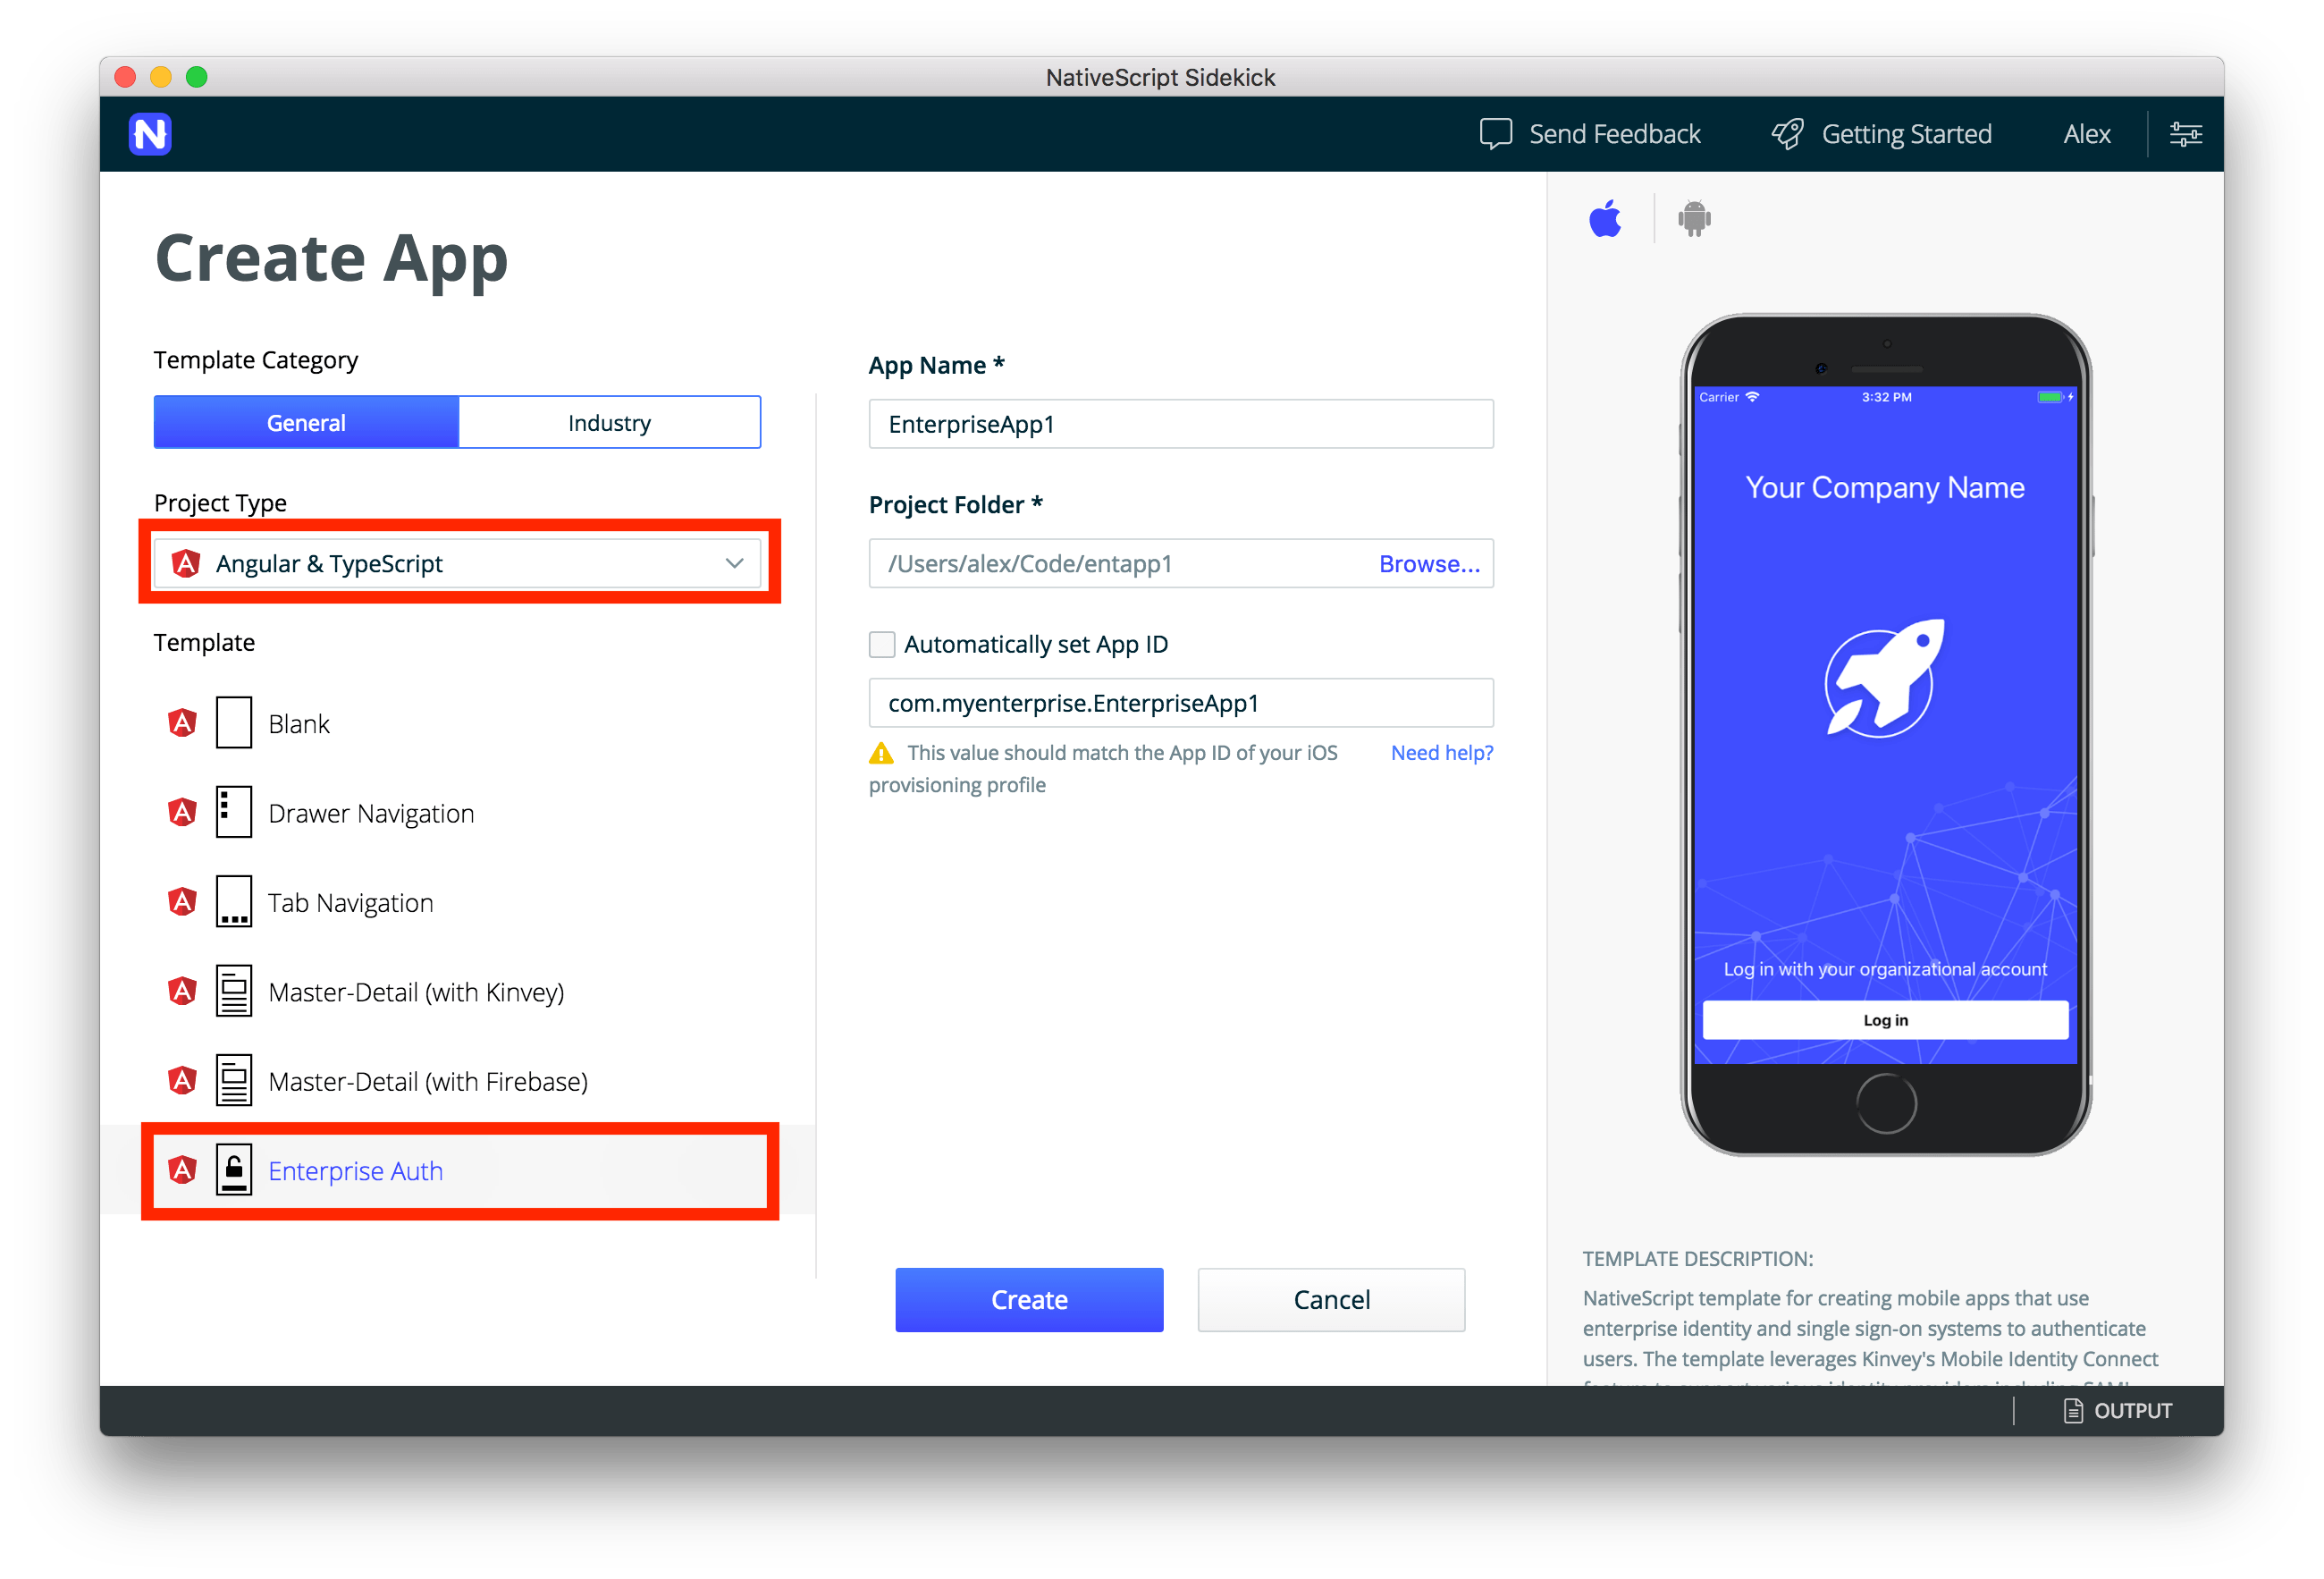
At this point, you have a functional native app that you can actually run on a simulator or a real device. But if you want to log in using your Azure AD credentials, then we have a couple more steps to complete.
- Click on the services tab and select the authentication method you want to use. In our case we will use OAuth 2.
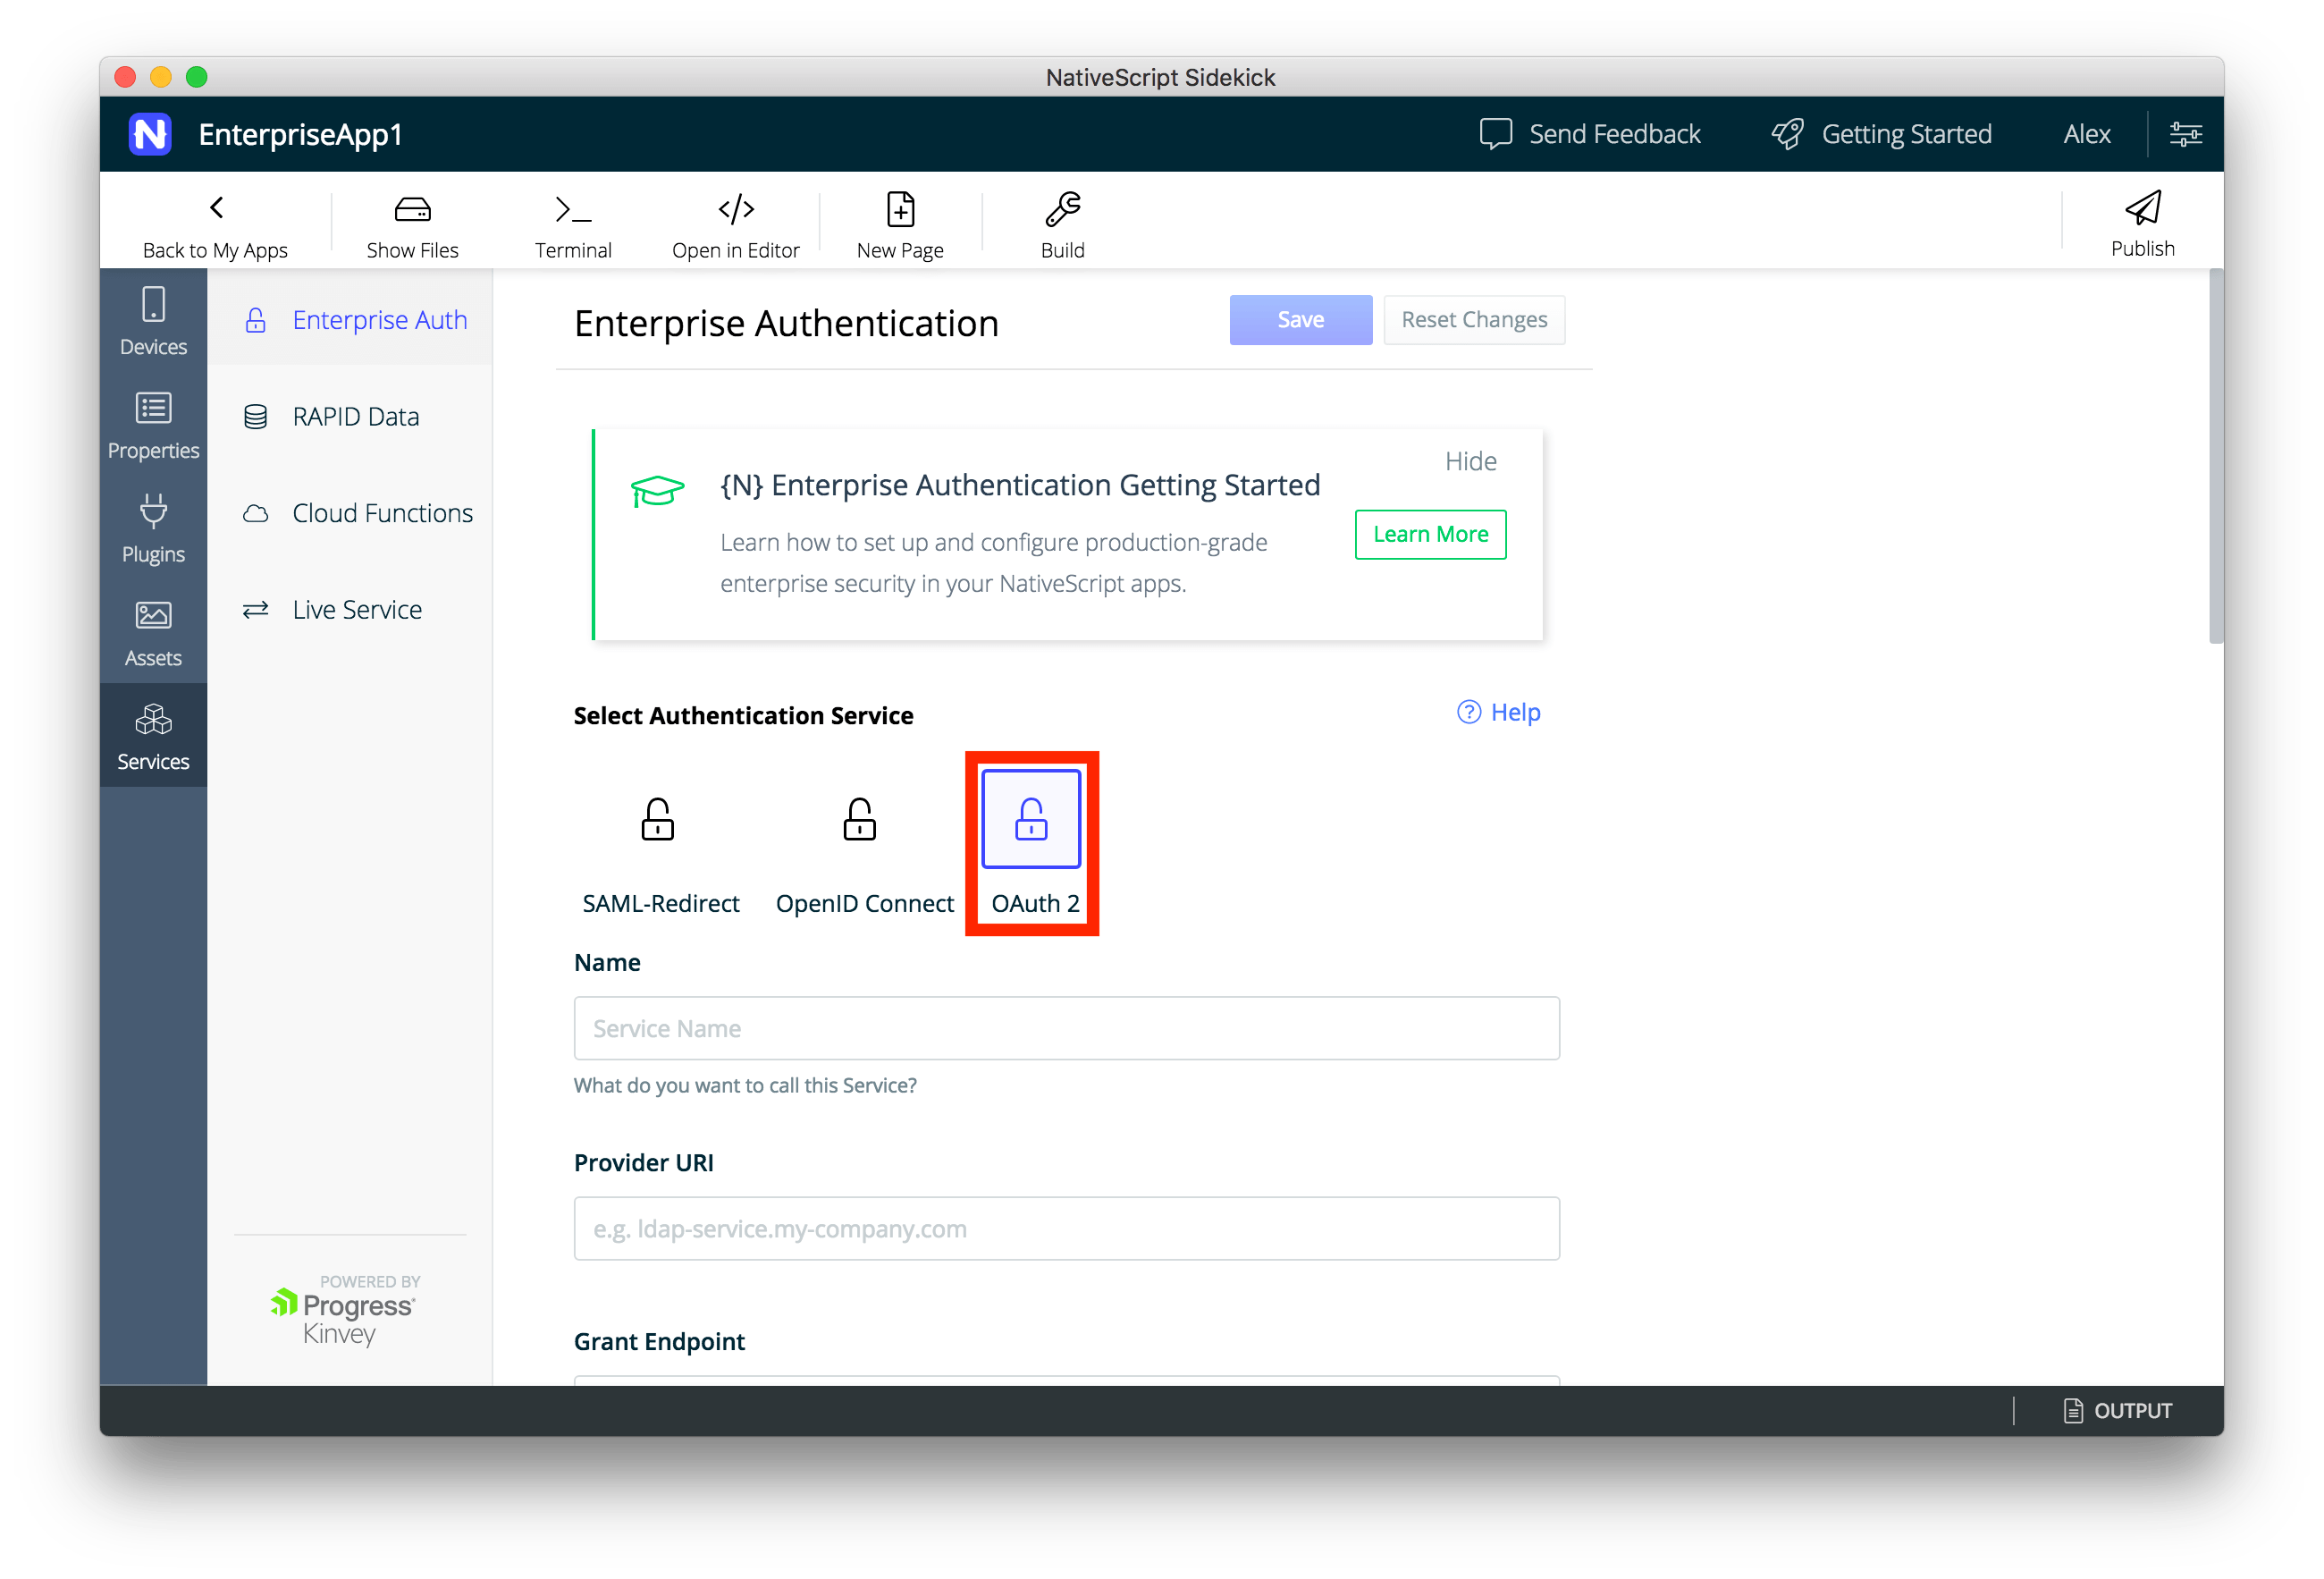
- Here is where your saved Word document with all the values you pasted from the Azure setup we did earlier comes in handy. For OAuth 2, there are a few values that need to be filled in in order to set up your Kinvey service to work with Azure AD.
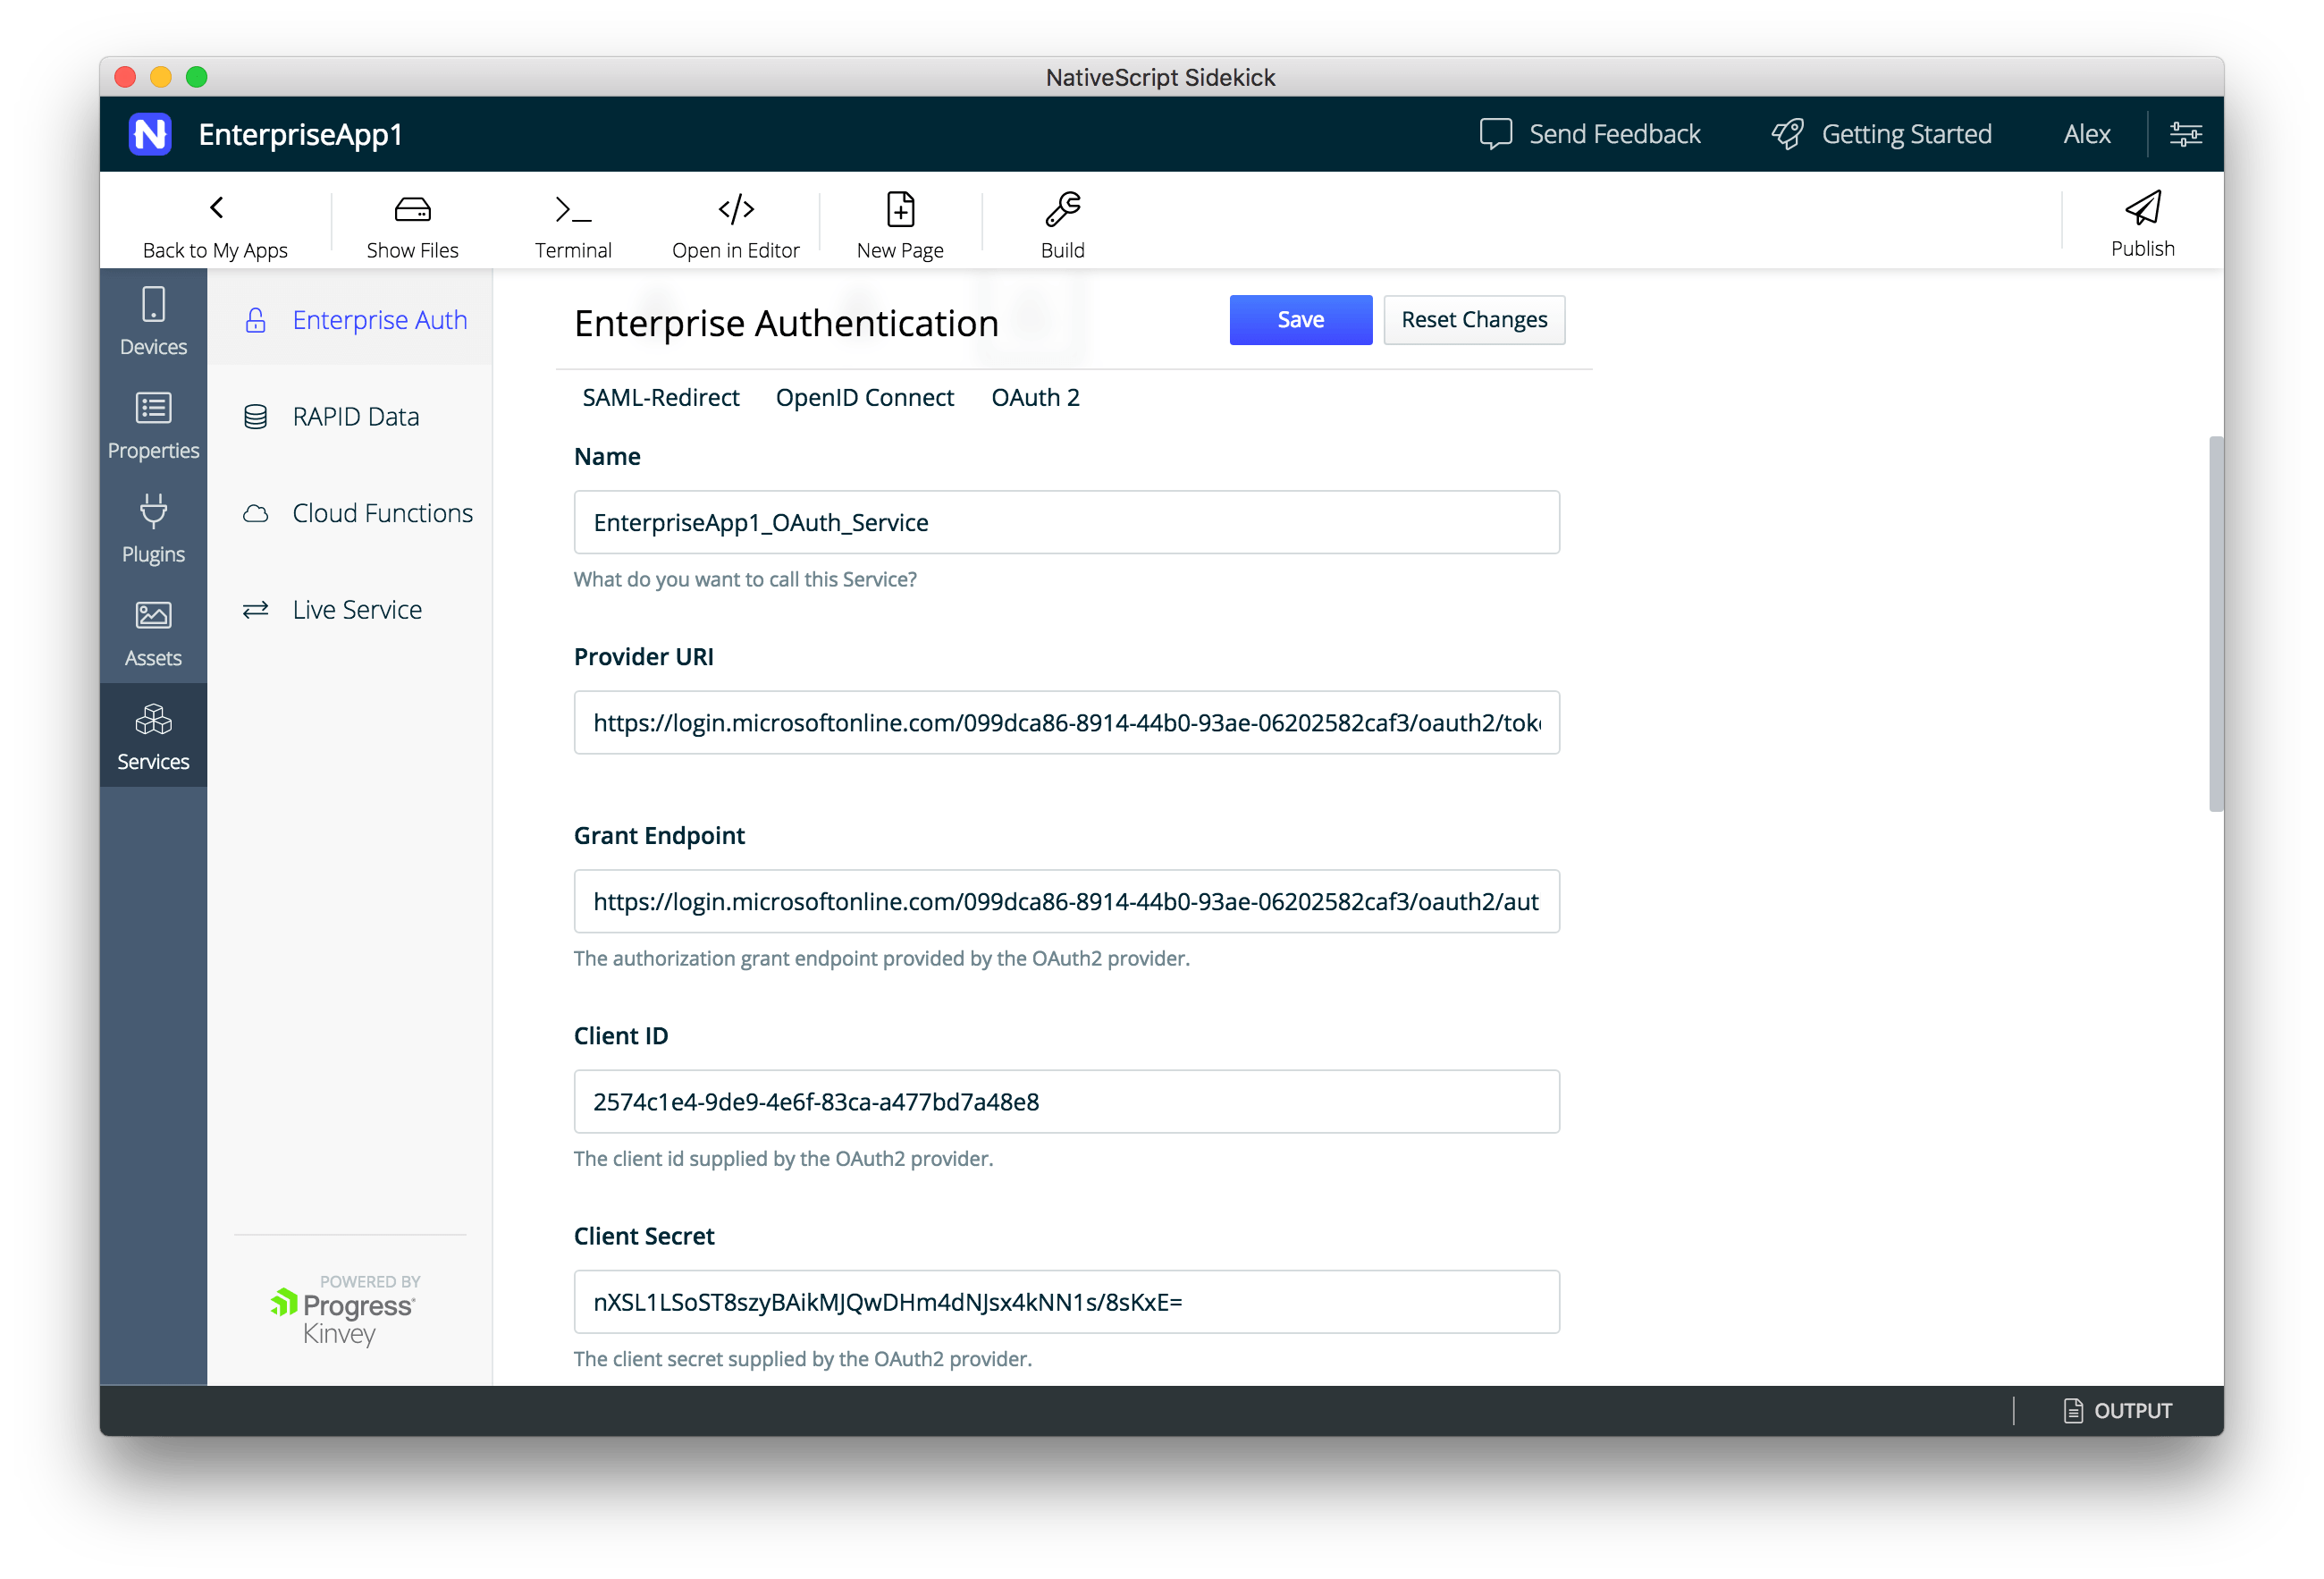
- Name—this can be any name you like for the service. I chose EnterpriseApp1_OAuth_Service.
- Provider URI—this is the value coming from the OAuth 2.0 Token Endpoint (also in should be in your Word doc)
- Grant Endpoint—this is the value coming from the OAuth 2.0 Authorization Endpoint (in your Word doc)
- Client ID—this was the generated Application ID in your Azure AD app registration
- Client Secret—this was the first key that we saved in the previous section (I told you that Word doc would come in handy)
- The rest of the fields can pretty much be left alone except one. For the Scope field enter the following (including spaces):
openid profile email
Leave the User ID Attribute and User ID Endpoint fields blank, and leave the Include client id and secret switches set to “No.”
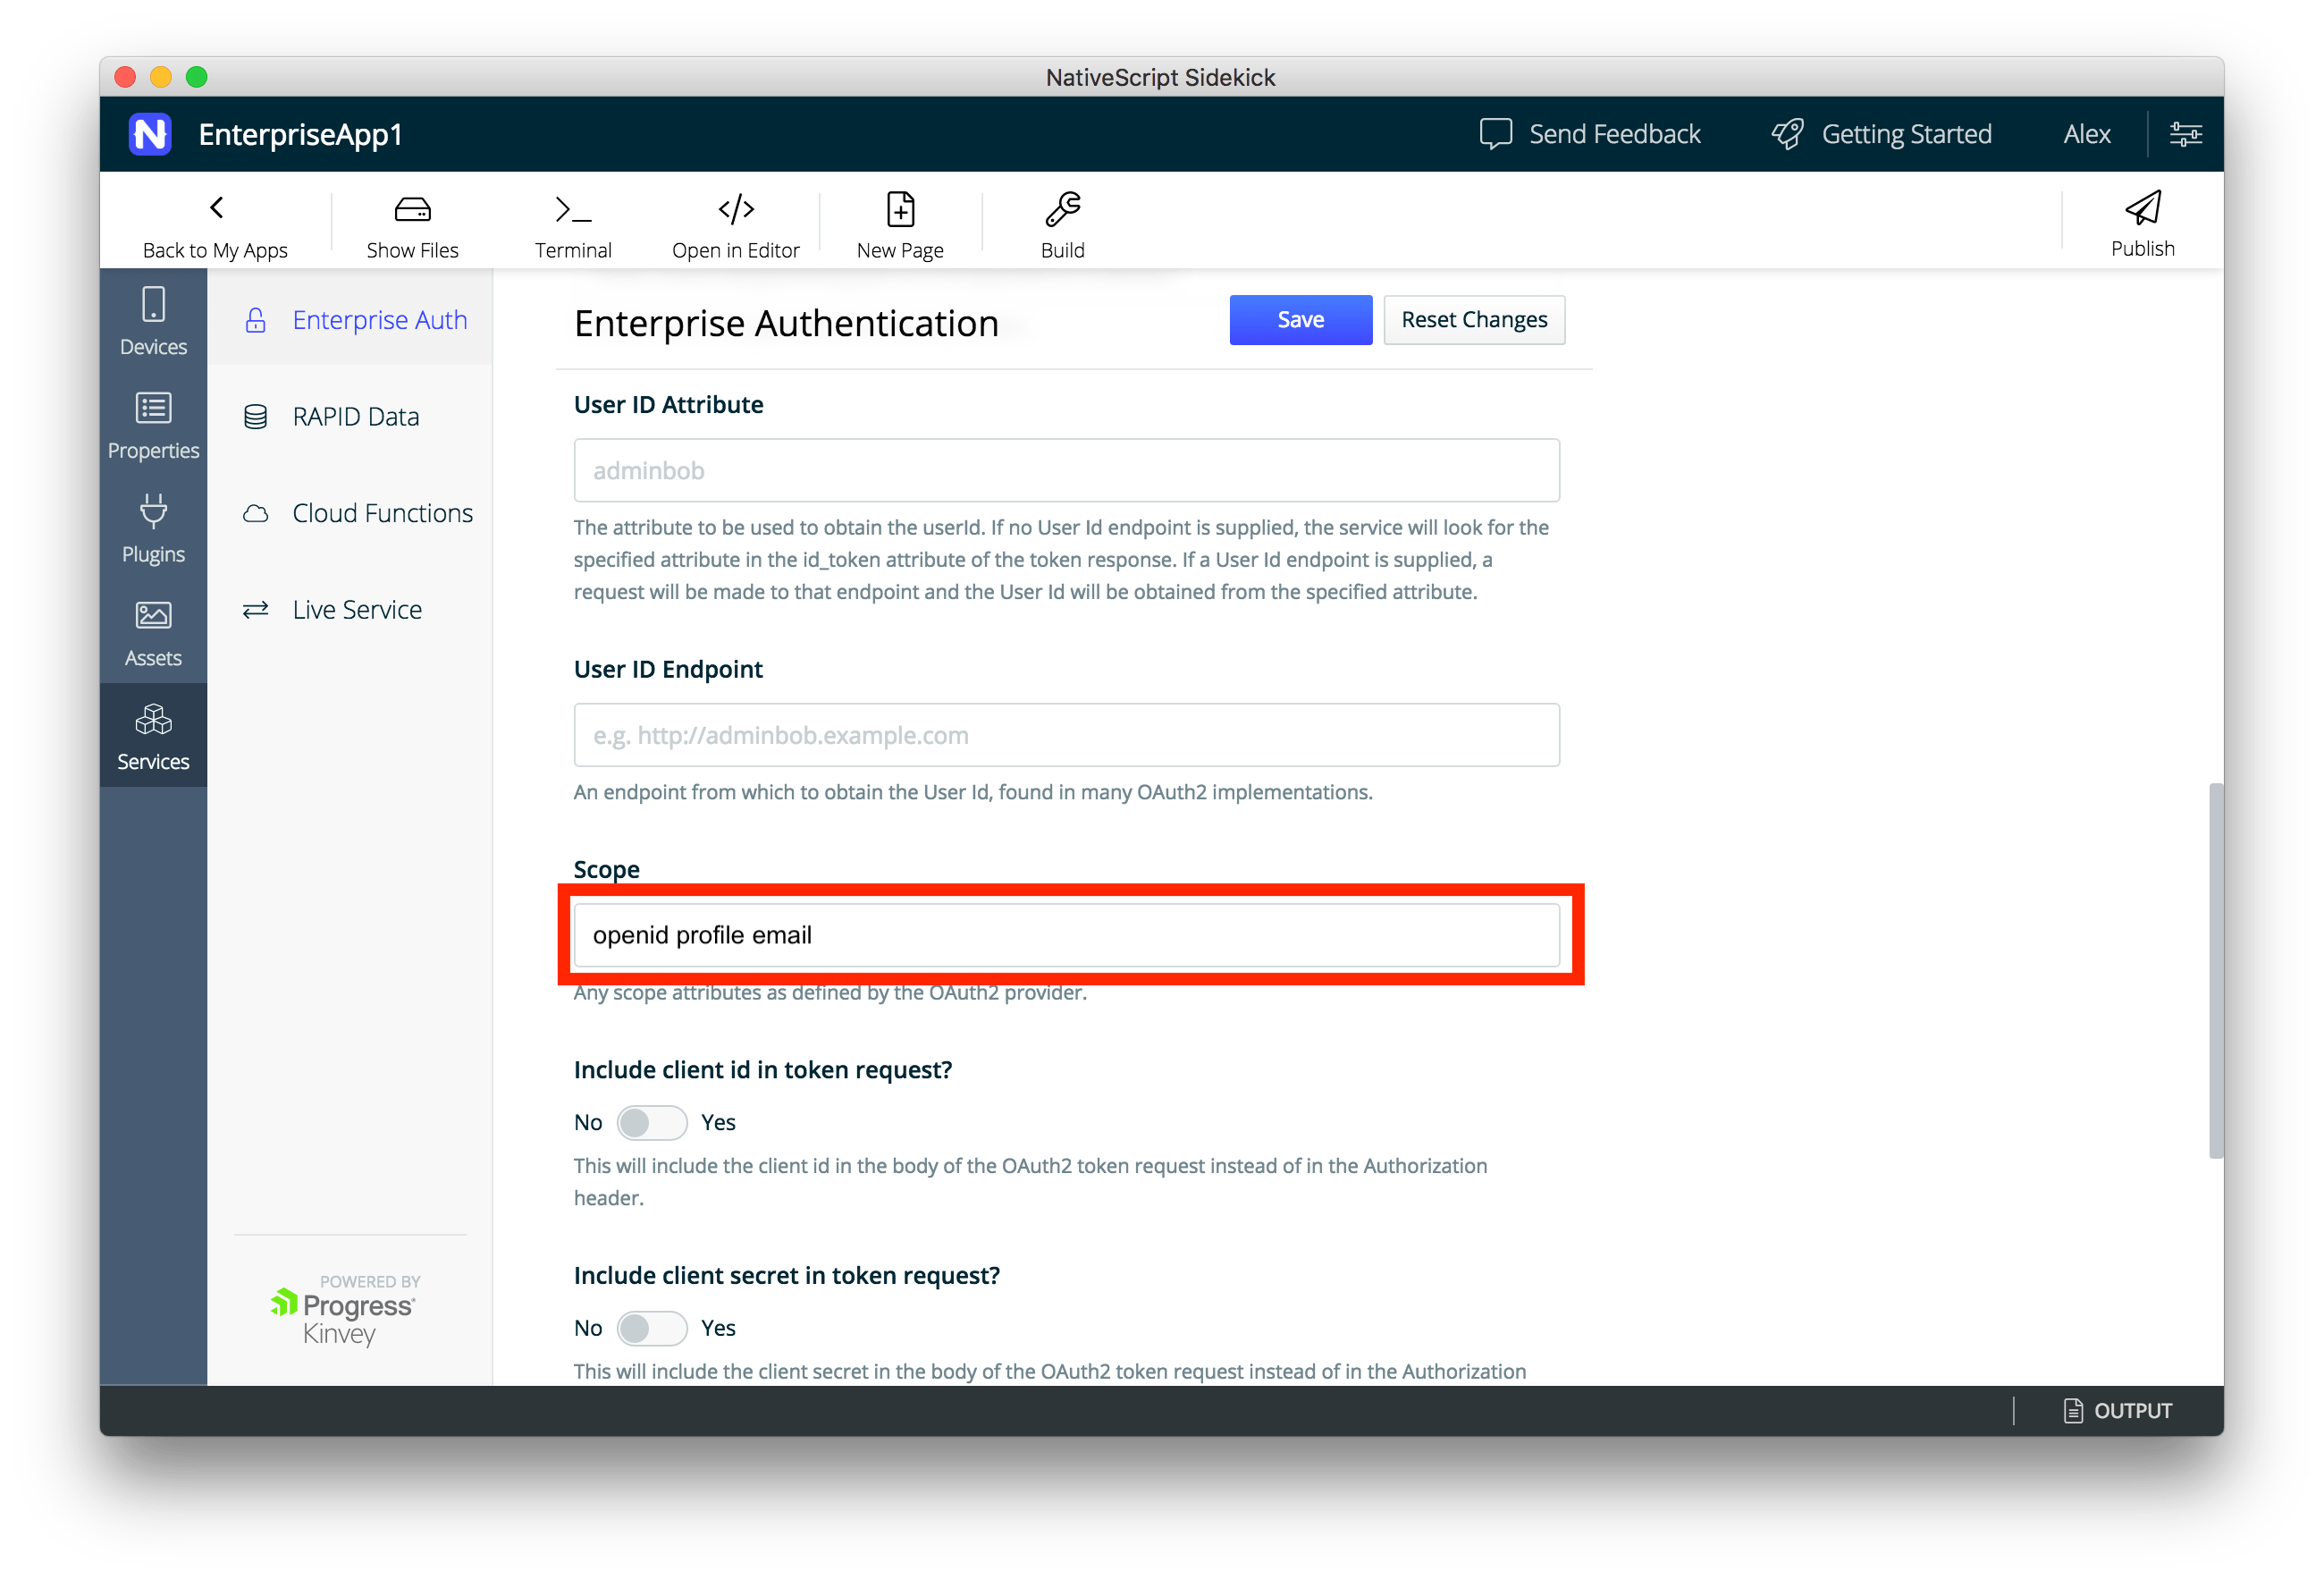
- Don’t forget to save your service configuration. Click the blue Save button and wait a few seconds while the service is registered in the cloud and your settings are saved.
Nothing else needs to be done to have Android support. If you’ve followed all the steps so far, you will already have your Android app configured since NativeScript creates cross platform native apps using the same JavaScript codebase, and the Kinvey NativeScript SDK handles the authentication and authorization flows for you automatically for both platforms behind the scenes.
- Now we just need to launch the app on a device or simulator and log in using our Azure AD credentials. Check out more information on launching your app from Sidekick.
After Sidekick deploys your new app to your device you should see an app that looks like this
When you tap the Log in button, if all went well, you should be prompted to authenticate with Azure Active Directory. Enter your Microsoft account username and password to login. Since this is a Microsoft screen hosted by Microsoft, there is no need to worry about your credentials going anywhere else or being stored on any other servers, which is what OAuth is designed to do.
You can read more about the Kinvey NativeScript SDK here.
Kinvey Services
Behind the scenes, NativeScript Sidekick created a Kinvey service for you in the cloud and registered a new app with the Azure AD configuration that we’ve specified. This can be edited at any time should you need to just by loggin into your Kinvey console.
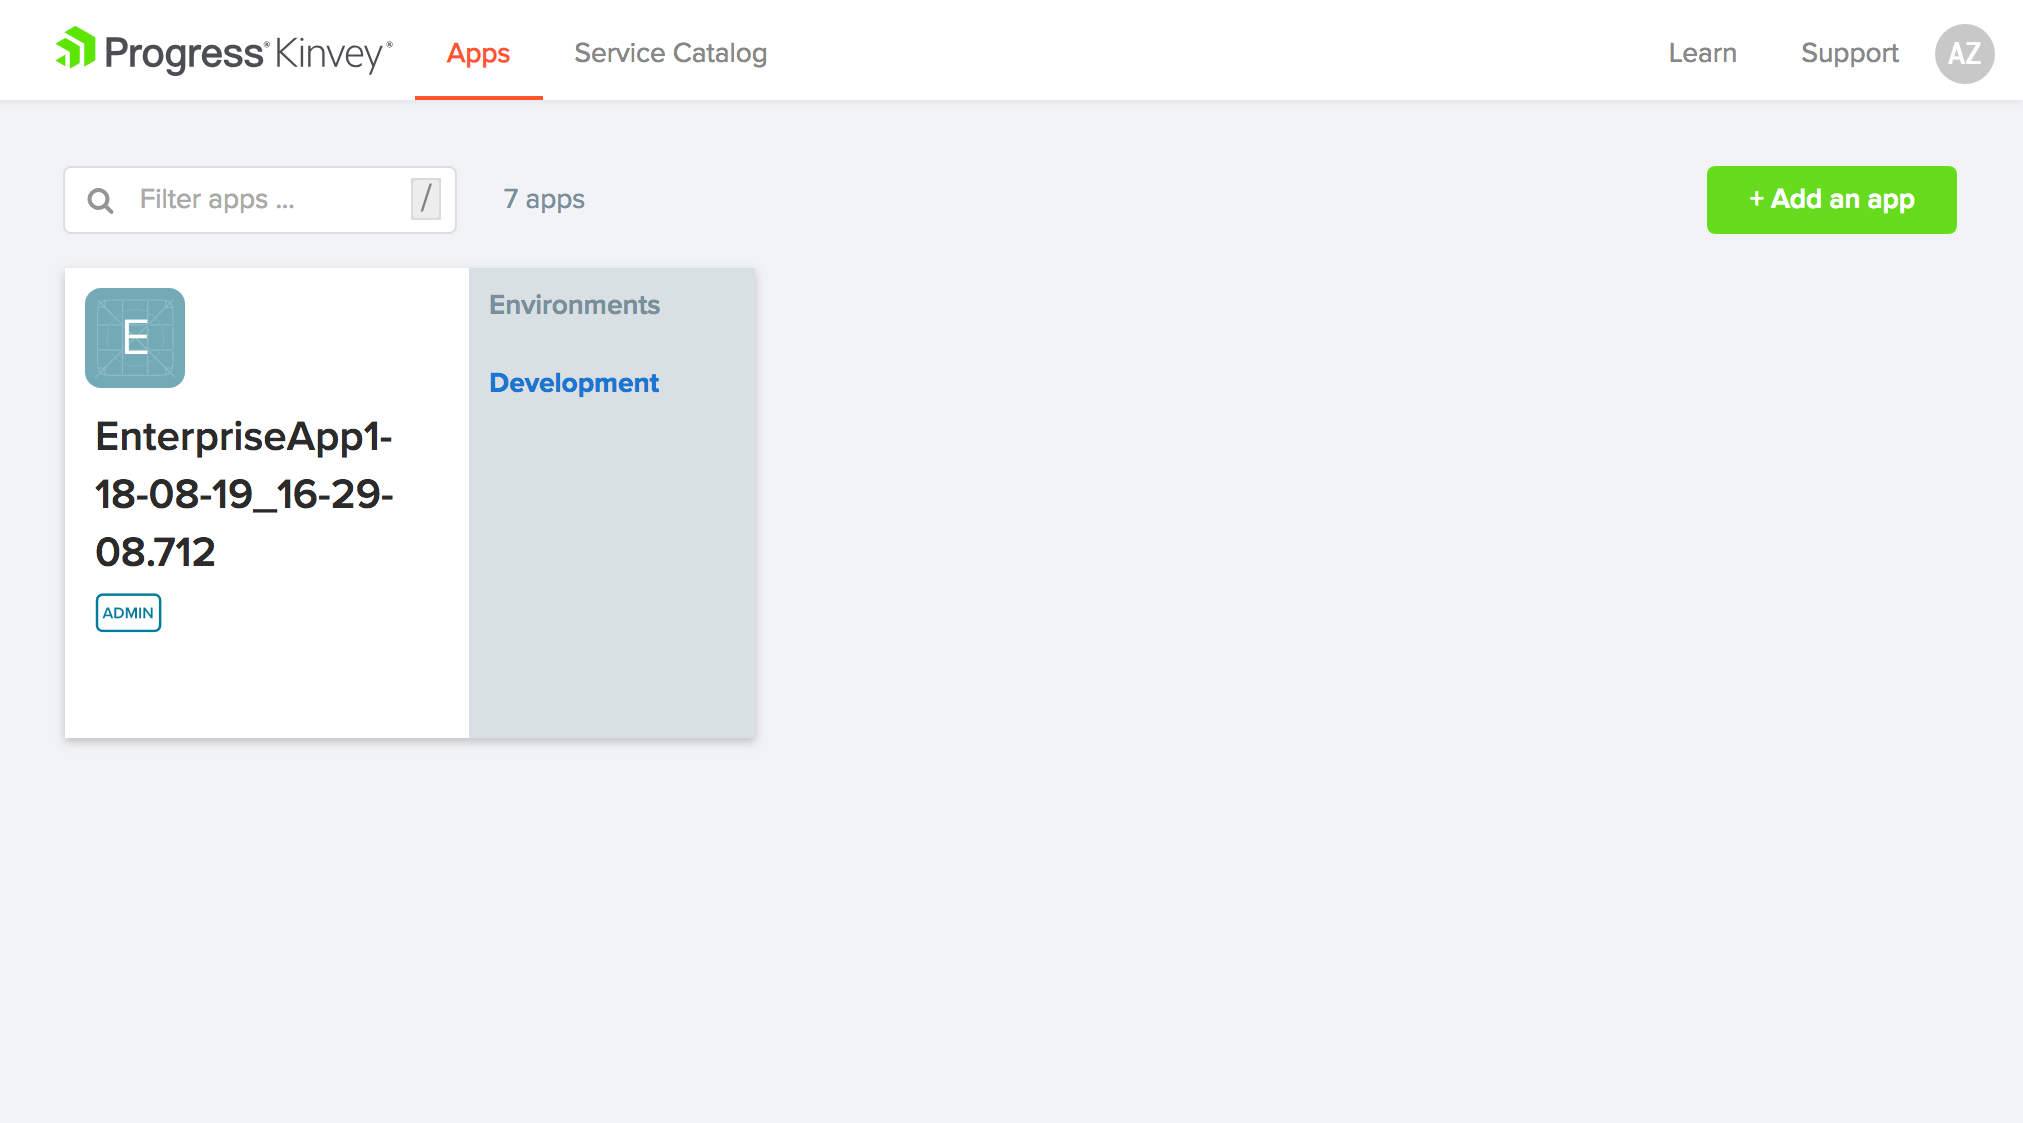
Go to Console and log in with your Telerik account that you’ve used for Sidekick. You will see a list of your registered apps here.
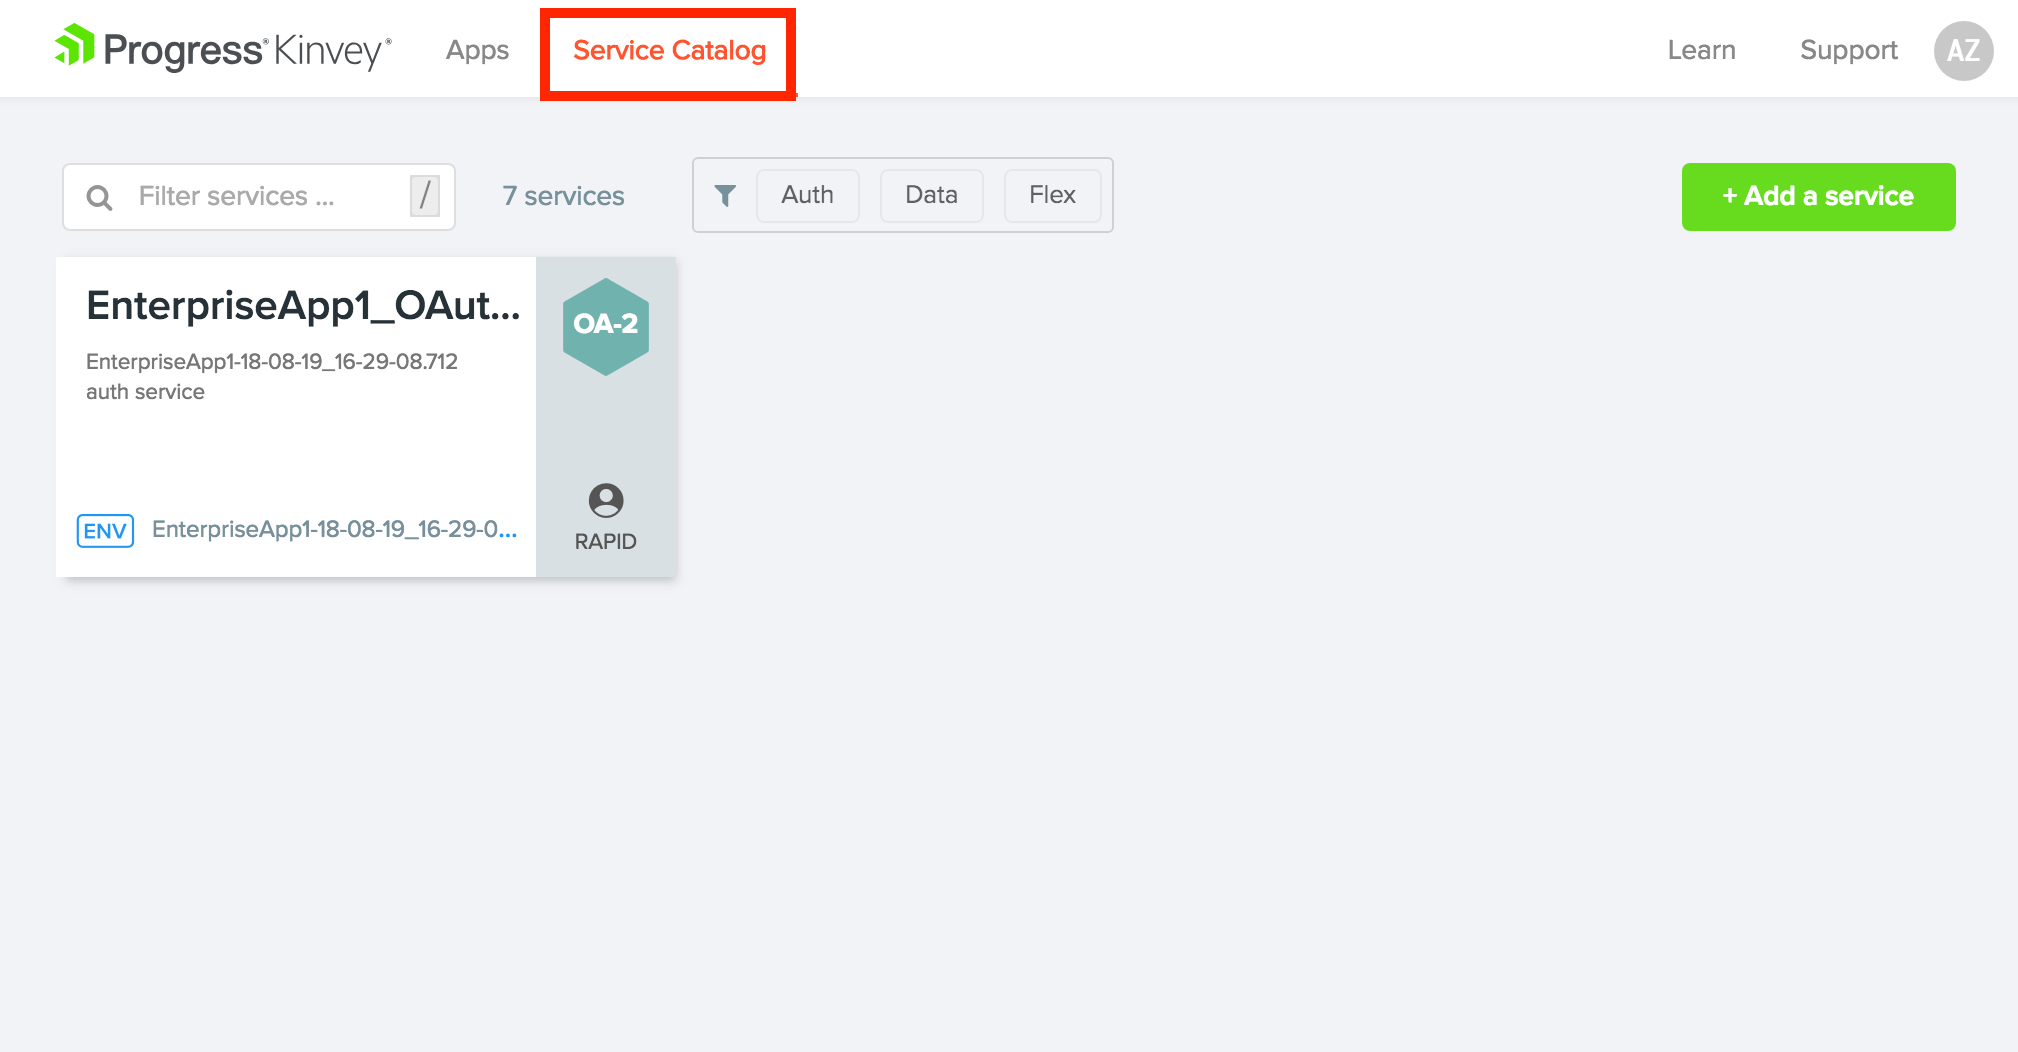
Click on Service Catalog to see a list of the services registered for you. You will see our EnterpriseApp1_OAuth_Service listed here.
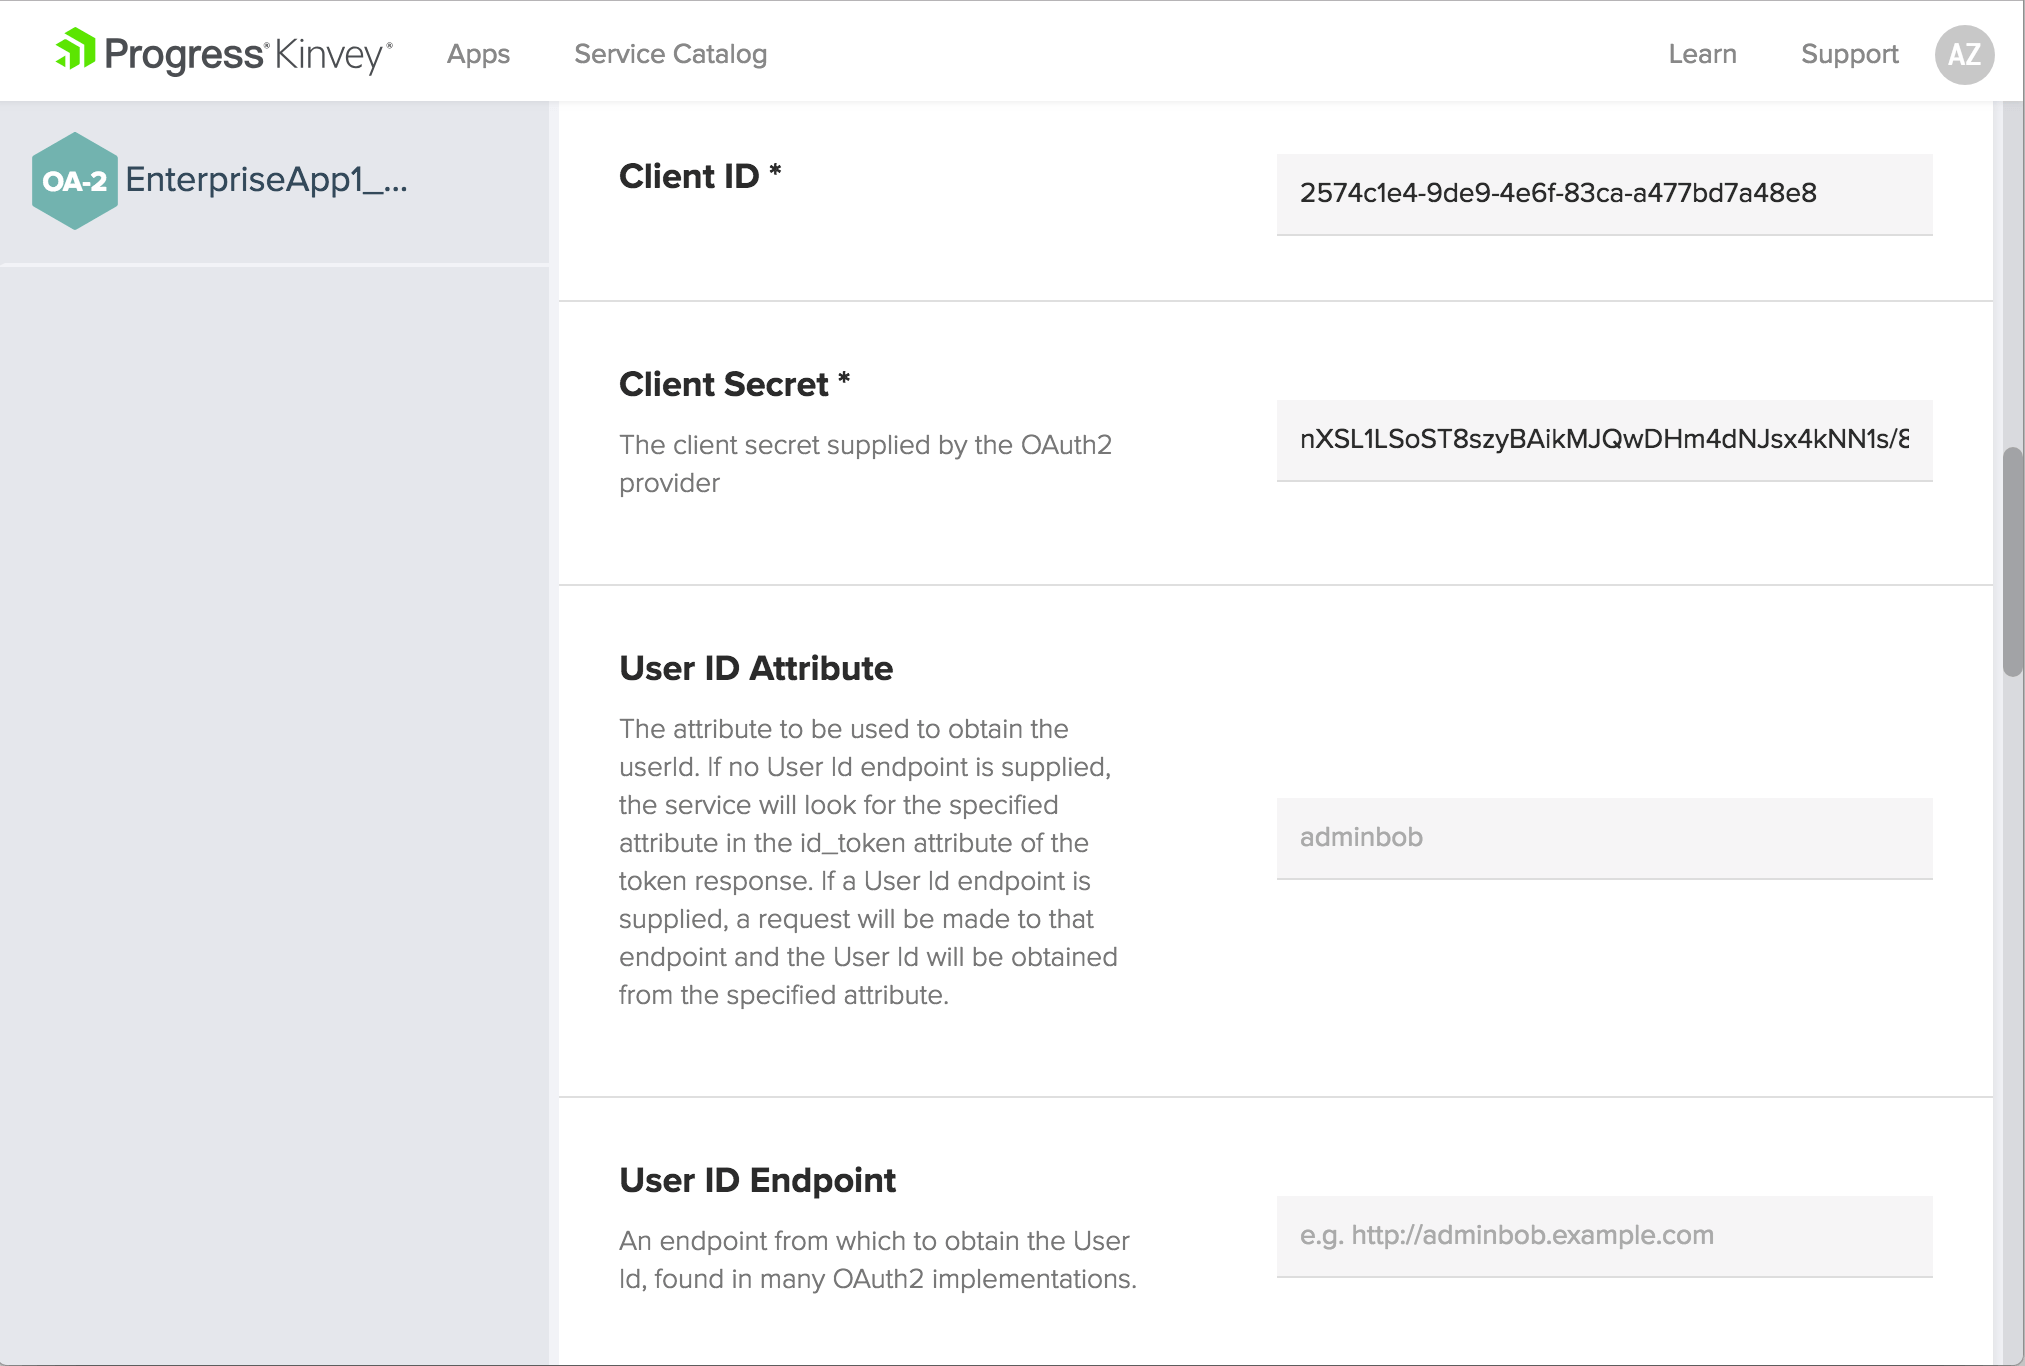
When you click on the EnterpriseApp1_OAuth_Service service, you’ll see all the Azure AD configuration details that we’ve filled in using Sidekick. You can edit these fields here if anything changes on the Azure side and you need to resync your configuration.
Should you find yourself in a situation where you need another type of auth service configuration not mentioned in this article, you can simply set up a new service instance in your Kinvey console using any of the options listed below. From the console, choose the Mobile Identity Connect option from the left-hand navigation. Then click the “Add Auth Service” button. From there you will see the OAuth option discussed in this article as well as many others.
Over the last six years, Kinvey’s Backend as a Service platform has been used by hundreds of thousands of developers to build rich, engaging apps using their various features, including data and file storage, user authentication and authorization, push notifications, email, custom functions and triggers, 3rd-party data connectivity, analytics, operational intelligence and compliance. Every Kinvey backend service is exposed to front-end developers via SDKs so that they can write their apps without having to think about API protocols, and instead just call methods in the programming language of their choice.
The newest addition to this set is our NativeScript SDK, which offers not only the enterprise authentication and authorization services that we covered in this article, but also data services—you can read about that here.
Wrap Up
The preceding steps describe how to set up a brand new NativeScript app and add Kinvey NativeScript SDK to it. However, you can just as easily extend an existing NativeScript app or any native mobile app with Kinvey Mobile Identity Connect services.
Next Steps
Sign up for the NativeScript Enterprise Auth video course that takes you through the entire setup, from Azure AD to Kinvey Services to your iOS and Android apps.
More Resources
- Kinvey Mobile Identity Connect NativeScript Guide
- Kinvey Mobile Identity Connect iOS Guide
- Kinvey Mobile Identity Connect Android Guide
- Start a free trial of Kinvey
Continue reading...