
C
Chandra Sekhar Mondeti
Guest
Learn how to create an awesome system of engagements using an existing system of records with DataDirect Cloud OData.
Open Data Protocol (OData) is a REST-based protocol for querying and updating data. It provides a standard for exposing resources as Uniform Resource Identifiers (URIs) and an API for querying the resources with simple HTTP message. DataDirect Cloud OData services support OData requests for a variety of data sources and provides quick and easy data access for all kinds of applications.
.gif?sfvrsn=0)
Steps to Create and Expose Data Sources as OData
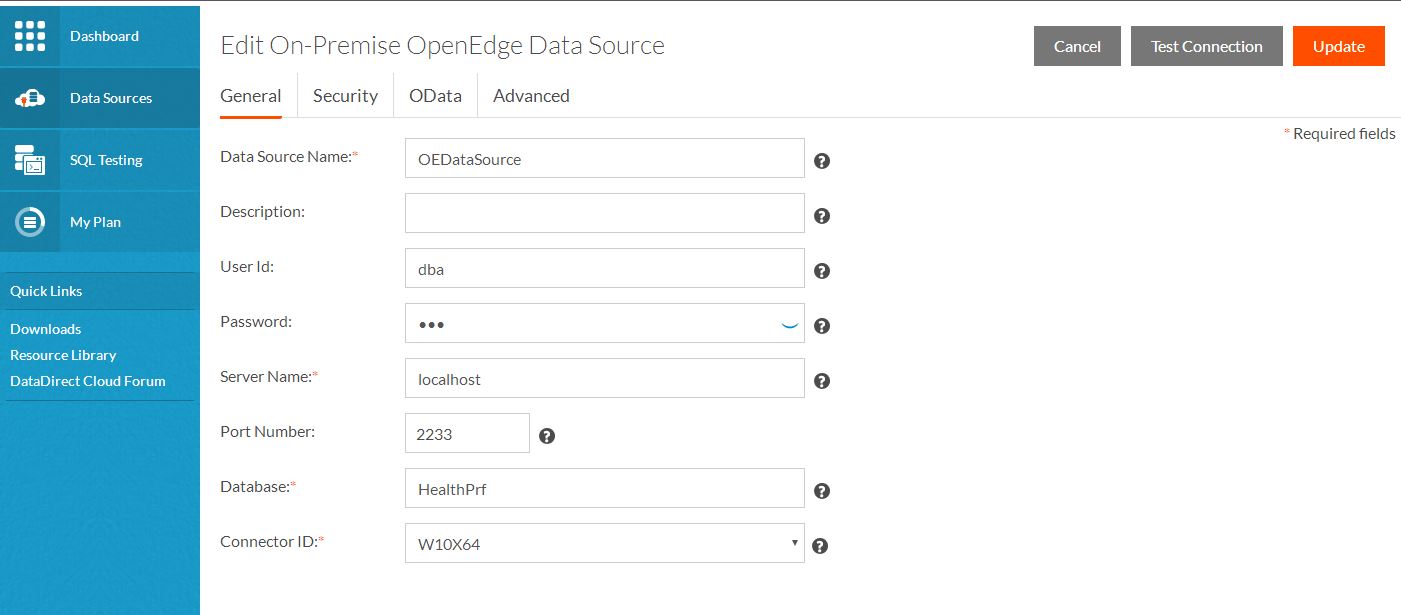
Exposing your data from DataDirect Cloud as OData is very easy and simple. First, log in to your DataDirect Cloud account and go to the Data Sources page. Select a data source and provide the connection details. Then, choose OpenEdge Data Source with an On-Premise installation. Give the data source a name—let’s say, OEDataSource—and enter the remaining connection details.
Once the data source has been created and the connection has been successfully established, we can start creating the required tables.
Create Tables for the Data Source
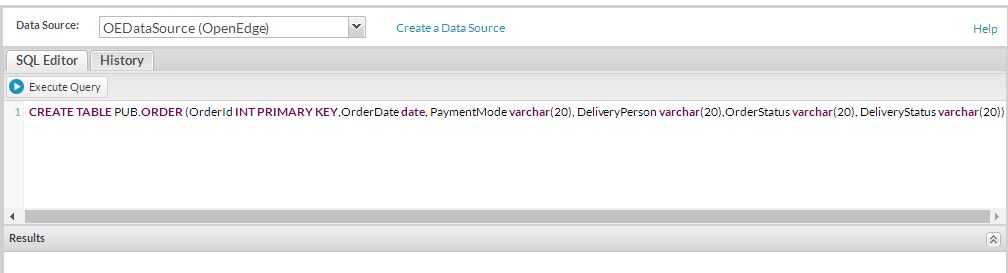
DataDirect Cloud provides a SQL Editor that you can use you can start writing and executing SQL queries. To create tables, simply go to SQL Testing and select the data source created above (OEDataSource) from the data source drop-down list, write down the SQL queries and execute them.
For this blog, we have created two tables. The list maintaining the order list says “Order,” and the list for maintaining order details says “OrderDetails,” with one too many relationships.
Create Queries
CREATE TABLE PUB.ORDER (OrderId INT PRIMARY KEY,OrderDate date, PaymentMode varchar(20), DeliveryPerson varchar(20),OrderStatus varchar(20), DeliveryStatus varchar(20))
CREATE TABLE PUB.ORDERDETAILS (Id INT PRIMARY KEY,OrderId INT,ProductName varchar(30),amount INT,NoOfUnits INT, FOREIGN KEY (OrderId) REFERENCES PUB.ORDER(OrderId))
Insert Queries
insert into PUB.ORDER (ORDERID,orderdate,paymentmode,orderstatus) values (2,'2016-7-23','CashOnDelivery','ReadyToDeliver')
insert into PUB.ORDERDETAILS (Id, ORDERID,productname,amount,noofunits) values (3,2,'TV',50000,2)
Once the tables are created, we need to enable OData access for the tables we just created, ‘ORDER’and ‘ORDERDETAILS’.
Enabling OData Access for Tables from DataDirect Cloud
To enable OData access for the tables, DataDirect Cloud provides a Schema Configuration feature that you can use to select the tables and columns that you want to expose. DataDirect Cloud also generates an OData schema map in JSON format for better readability and understandability.
To enable OData access for both the ‘ORDER’ and ‘ORDERDETAILS’ tables, go to the created data source (OEDataSource), under OData tab click on ‘Configure Schema’ button. In the ‘Configure schema’ page, select schema in which you have created tables. Select the ‘ORDER’ and ‘ORDERDETAILS’ tables and the columns which you want to expose through OData. Once the required tables are selected, click on ‘Save & Close’ to save the configuration. You can validate/crosscheck your saved configuration with the generated schema map in JSON format.


Test Whether the Tables are Exposed as OData
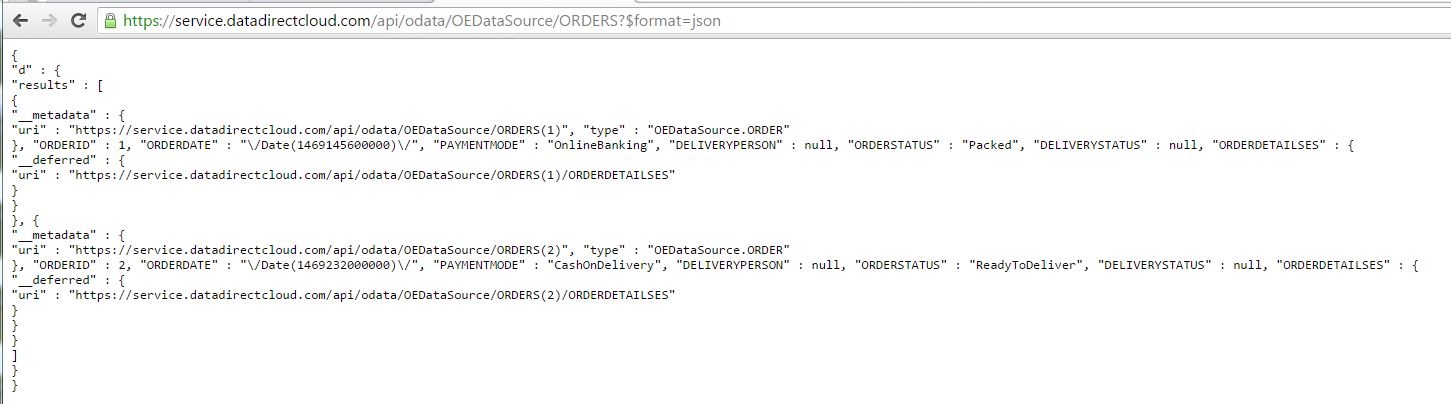
Hit the OData access URL, which will something look like below.
OData Access URL: https://service.datadirectcloud.com/api/odata/<DatasourceName>

When you hit the service URL in the browser or any REST client, it will fetch all the tables exposed through OData.
When you hit the service URL with the table name at the end, it will fetch the table data.
Using the OData feature, you can create a variety of applications such as web, mobile and desktop applications. In this blog, we consume the OData to build a mobile application using Telerik Platform.
Using the Exposed OData Services
Let’s see how to build a mobile app that uses the exposed DataDirect Cloud OData service. For this purpose, we will build a hybrid mobile app using Telerik AppBuilder.
Log in to your Telerik Platform Enterprise Edition and create a Hybrid application.
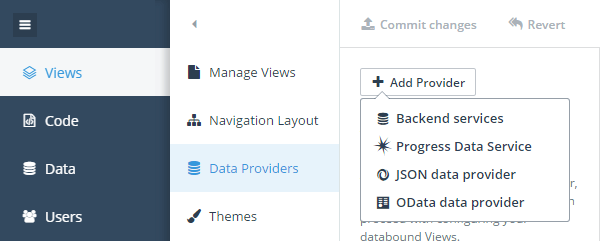
In Views, go to Data Providers and Add OData Data Provider and provide the data URL.
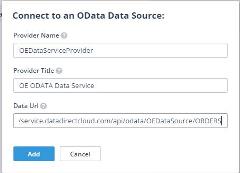 Once the OData Data Provider is added, you can start developing your mobile application views.
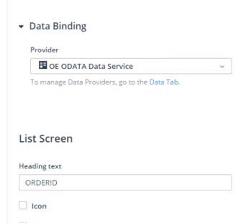
Create a new view. In Data Binding, set the data provider to the OData data provider that you just created. In the Heading Text, give the column name you want to show as heading text in the view—say for example, OrderID. Add few other columns in the view. I have added paymentmode.
 If you try to run the application in the simulator, you will not see anything on the screen, as you are not yet authorized to access the service. In Code, open the related view index.js file and provide your DataDirect Cloud credentials to access the service and set the datatype to JSON.
dataSourceOptions = {
type: 'OData',
transport: {
read: {
url: dataProvider.url,
dataType: "json",
beforeSend: function (req) {
req.setRequestHeader ("Authorization", "Basic " + btoa("<UserName>"+ ":" + "<Password>"));
},
}
},
}
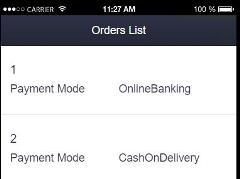
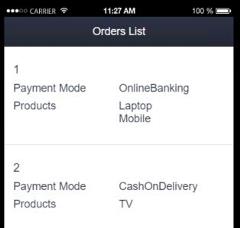
Now, run your application and you should be able to see the mobile view with data exposed using OData.
 It's not uncommon for developers to want to access related tables data. You can make use of the expand option of OData to do so. The expand option, when specified, will fetch the related resources to be included in line with the retrieved resources.
Say you want to retrieve related OrderDetails data of an Order, we can make use of a OData query option “expand” to retrieve the related OrderDetails records too.
transport: {
read: {
url: dataProvider.url,
dataType: "json",
beforeSend: function (req) {
req.setRequestHeader ("Authorization", "Basic " + btoa("<UserName>"+ ":" + "<Password>"));
},
data:{
$expand: "ORDERDETAILSES",
},
}
},
If you access the OData access URL with the expand option and the OrderDetails resource, you will see the related tables data too.
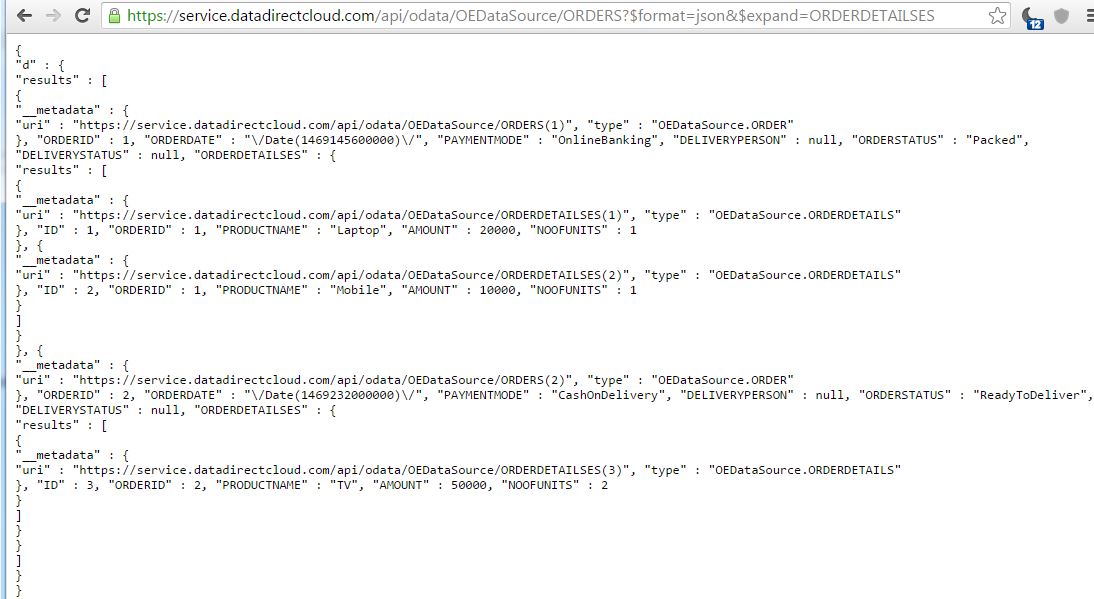
If you want to retrieve multiple tables, you can access them using a comma-separated resource name. However, DataDirect Cloud supports retrieving data only up to one level, you cannot expand to more than one resource.
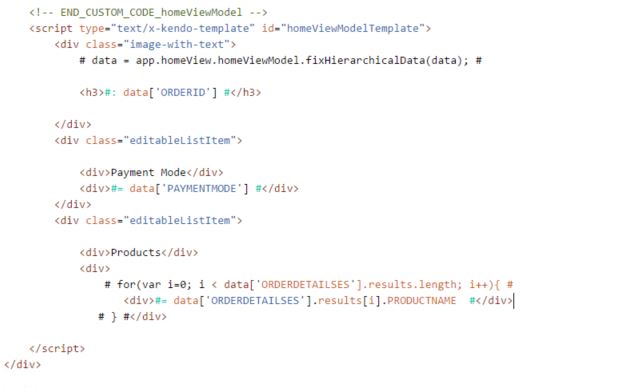
If you want to show the Product Names (which are in the OrderDetails table) in the list view, you can access it using data[‘ORDERDETAILSES’].results[0].PRODUCTNAME, which will only show the first Product Name. To show all the Product Names of the Order, you can make use of a for loop as shown.
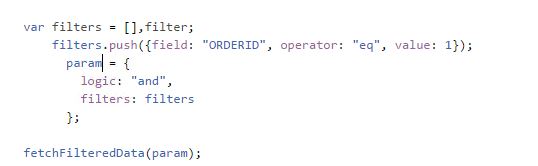
There will be many scenarios in which you want to filter the data while fetching. You can make use of filters on a particular field, for example: I want to filter based on Order Id and want to retrieve the data of Order whose OrderId is 1.
All Finished!
In short, it's very easy and simple to expose your data as OData using DataDirect Cloud and build applications by consuming OData. Get OData on any device, on any platform and start maximizing the potential of your data today!
Expose Your Data as OData
This blog was written by Chandra Sekhar Mondeti, with additional information and input from Anil Gaddalapati, a QA Engineer at Progress.
Continue reading...
Open Data Protocol (OData) is a REST-based protocol for querying and updating data. It provides a standard for exposing resources as Uniform Resource Identifiers (URIs) and an API for querying the resources with simple HTTP message. DataDirect Cloud OData services support OData requests for a variety of data sources and provides quick and easy data access for all kinds of applications.
Steps to Create and Expose Data Sources as OData
- Create a data source in DataDirect Cloud
- Create tables in the data source
- Enable OData access to the tables created
Exposing your data from DataDirect Cloud as OData is very easy and simple. First, log in to your DataDirect Cloud account and go to the Data Sources page. Select a data source and provide the connection details. Then, choose OpenEdge Data Source with an On-Premise installation. Give the data source a name—let’s say, OEDataSource—and enter the remaining connection details.
Once the data source has been created and the connection has been successfully established, we can start creating the required tables.
Create Tables for the Data Source
DataDirect Cloud provides a SQL Editor that you can use you can start writing and executing SQL queries. To create tables, simply go to SQL Testing and select the data source created above (OEDataSource) from the data source drop-down list, write down the SQL queries and execute them.
For this blog, we have created two tables. The list maintaining the order list says “Order,” and the list for maintaining order details says “OrderDetails,” with one too many relationships.
Create Queries
CREATE TABLE PUB.ORDER (OrderId INT PRIMARY KEY,OrderDate date, PaymentMode varchar(20), DeliveryPerson varchar(20),OrderStatus varchar(20), DeliveryStatus varchar(20))
CREATE TABLE PUB.ORDERDETAILS (Id INT PRIMARY KEY,OrderId INT,ProductName varchar(30),amount INT,NoOfUnits INT, FOREIGN KEY (OrderId) REFERENCES PUB.ORDER(OrderId))
Insert Queries
insert into PUB.ORDER (ORDERID,orderdate,paymentmode,orderstatus) values (2,'2016-7-23','CashOnDelivery','ReadyToDeliver')
insert into PUB.ORDERDETAILS (Id, ORDERID,productname,amount,noofunits) values (3,2,'TV',50000,2)
Once the tables are created, we need to enable OData access for the tables we just created, ‘ORDER’and ‘ORDERDETAILS’.
Enabling OData Access for Tables from DataDirect Cloud
To enable OData access for the tables, DataDirect Cloud provides a Schema Configuration feature that you can use to select the tables and columns that you want to expose. DataDirect Cloud also generates an OData schema map in JSON format for better readability and understandability.
To enable OData access for both the ‘ORDER’ and ‘ORDERDETAILS’ tables, go to the created data source (OEDataSource), under OData tab click on ‘Configure Schema’ button. In the ‘Configure schema’ page, select schema in which you have created tables. Select the ‘ORDER’ and ‘ORDERDETAILS’ tables and the columns which you want to expose through OData. Once the required tables are selected, click on ‘Save & Close’ to save the configuration. You can validate/crosscheck your saved configuration with the generated schema map in JSON format.
Test Whether the Tables are Exposed as OData
Hit the OData access URL, which will something look like below.
OData Access URL: https://service.datadirectcloud.com/api/odata/<DatasourceName>
When you hit the service URL in the browser or any REST client, it will fetch all the tables exposed through OData.
When you hit the service URL with the table name at the end, it will fetch the table data.
Using the OData feature, you can create a variety of applications such as web, mobile and desktop applications. In this blog, we consume the OData to build a mobile application using Telerik Platform.
Using the Exposed OData Services
Let’s see how to build a mobile app that uses the exposed DataDirect Cloud OData service. For this purpose, we will build a hybrid mobile app using Telerik AppBuilder.
Log in to your Telerik Platform Enterprise Edition and create a Hybrid application.
In Views, go to Data Providers and Add OData Data Provider and provide the data URL.
Create a new view. In Data Binding, set the data provider to the OData data provider that you just created. In the Heading Text, give the column name you want to show as heading text in the view—say for example, OrderID. Add few other columns in the view. I have added paymentmode.
dataSourceOptions = {
type: 'OData',
transport: {
read: {
url: dataProvider.url,
dataType: "json",
beforeSend: function (req) {
req.setRequestHeader ("Authorization", "Basic " + btoa("<UserName>"+ ":" + "<Password>"));
},
}
},
}
Now, run your application and you should be able to see the mobile view with data exposed using OData.
Say you want to retrieve related OrderDetails data of an Order, we can make use of a OData query option “expand” to retrieve the related OrderDetails records too.
transport: {
read: {
url: dataProvider.url,
dataType: "json",
beforeSend: function (req) {
req.setRequestHeader ("Authorization", "Basic " + btoa("<UserName>"+ ":" + "<Password>"));
},
data:{
$expand: "ORDERDETAILSES",
},
}
},
If you access the OData access URL with the expand option and the OrderDetails resource, you will see the related tables data too.
If you want to retrieve multiple tables, you can access them using a comma-separated resource name. However, DataDirect Cloud supports retrieving data only up to one level, you cannot expand to more than one resource.
If you want to show the Product Names (which are in the OrderDetails table) in the list view, you can access it using data[‘ORDERDETAILSES’].results[0].PRODUCTNAME, which will only show the first Product Name. To show all the Product Names of the Order, you can make use of a for loop as shown.
There will be many scenarios in which you want to filter the data while fetching. You can make use of filters on a particular field, for example: I want to filter based on Order Id and want to retrieve the data of Order whose OrderId is 1.
All Finished!
In short, it's very easy and simple to expose your data as OData using DataDirect Cloud and build applications by consuming OData. Get OData on any device, on any platform and start maximizing the potential of your data today!
Expose Your Data as OData
This blog was written by Chandra Sekhar Mondeti, with additional information and input from Anil Gaddalapati, a QA Engineer at Progress.
Continue reading...