
T
Thierry Ciot
Guest
We'll take a look behind the scenes to better understand Kendo UI Builder templates, which help you build beautiful OpenEdge web experiences in Angular.
In my first post on Kendo UI Builder templates, we learned about the distinct items necessary to compose a custom view at design-time and at run-time. In this blog, we will explore what goes on behind the scenes in order to improve our understanding; also, we will learn how to use HTML in view properties and how to support internationalization.
Reminder: If you have not done it when reading the first post, you can download the sample custom-hello-world-v1 from this github repository to follow along.
Module Metadata File
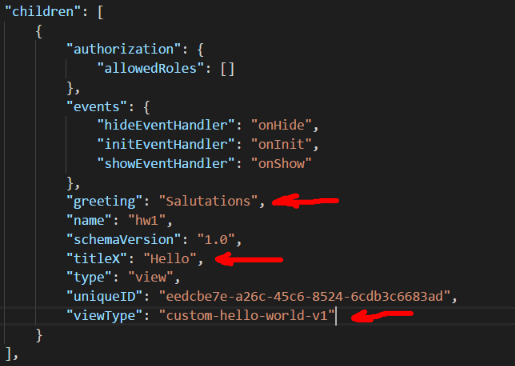
When we add the custom view to the module, an entry is created in the module metadata file.
You can check this by opening the module file in meta\modules. For example, for a module called “HelloWorld”, we open meta\modules\HelloWorld.json.
In the children property we find greeting and titleX. Also, notice how viewType is assigned to custom-hello-world-v1.
Here is an extract:
Design-Time Process
Here are the steps that take place at design-time (when selecting the view in Kendo UI Builder):
Here is a graphical representation (operations in italic on the left and results on the right):
Design-time Process Diagram
Reminder: Kendo UI Builder does not pass mouse or keyboard events to the design-time view. So, when designing your view, you do not have to worry about user interactions.
Generate Runtime Process
When we click on the generate button, a similar process is followed. The main difference is that the output does not get rendered as HTML in Kendo UI Builder but instead is saved on the file system in the app/src sub-directory, and of course, the output is dependent on the target framework.
Run-time Process Diagram
Using HTML in View Properties
In the previous blog post we used simple strings for the title and greeting properties. But what if we want to use an HTML string that contains HTML tags, HTML entities as well as single and double quotes, for example: <i class="fa fa-thumbs-up"></i> <b>Hello me</b>
This is achieved like so:
Note about EJS processing: <%- greeting %> outputs the greeting value. <%- greeting.replace(/"/g, '\\"') %> calls the JavaScript function replace on the greeting string value before outputting it. In EJS, we can use JavaScript expressions where we need them.
To give this a try, in KUIB, enter: <i class="fa fa-thumbs-up"></i> <b>Hello</b> for the greeting property.
You should see:

Note: The thumb up icon is rendered using font awesome, which Kendo UI Builder bundles automatically. For more information check out the font awesome gallery.
The need to escape double quotes is not limited to using HTML strings. Any string property can potentially contain them. So, it is recommended to escape double quotes for all string properties. That’s what we are doing with the title property.
Translation
generator/index.js has an entry point getTranslation. This lets us specify which properties to add to the translation file.
When we specify:
const translation = {
label: view.label || view.name,
title: view.titleX,
greeting: view.greeting
};
When we use the Generate function, Kendo UI Builder creates three entries in the default translation file (app\src\translations\translations.default.json).
Notice how we specify titleX for getting at the property value for title. This is because the value is resolved from the name of the property in the definition file.
All returned key/value pairs are created, in the default translation file, under the specific view key as illustrated in picture below:
Conclusion
This blog has taken a view of what goes on behind the scenes. This knowledge should help when troubleshooting problems. In particular, it is useful to refer to the run-time or design-time diagrams to isolate at which step of the process the problem may lie.
In a future post (which will cover an upcoming sample custom-hello-world-v3) we will put this knowledge into practice by augmenting the model used at design-time and at run-time.
But before we reach this point, the next step (covering sample custom-hello-world-v2) is to look into how to do event handling. Stay tuned.
Continue reading...
In my first post on Kendo UI Builder templates, we learned about the distinct items necessary to compose a custom view at design-time and at run-time. In this blog, we will explore what goes on behind the scenes in order to improve our understanding; also, we will learn how to use HTML in view properties and how to support internationalization.
Reminder: If you have not done it when reading the first post, you can download the sample custom-hello-world-v1 from this github repository to follow along.
Module Metadata File
When we add the custom view to the module, an entry is created in the module metadata file.
You can check this by opening the module file in meta\modules. For example, for a module called “HelloWorld”, we open meta\modules\HelloWorld.json.
In the children property we find greeting and titleX. Also, notice how viewType is assigned to custom-hello-world-v1.
Here is an extract:
Design-Time Process
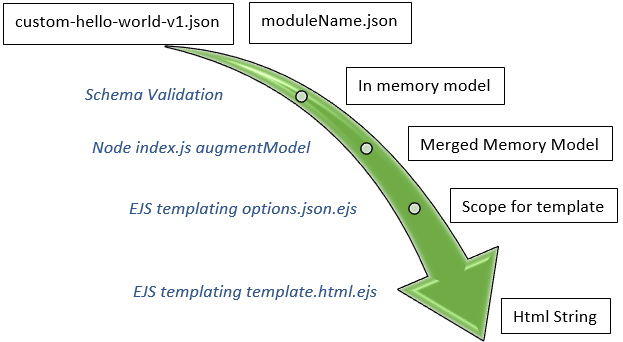
Here are the steps that take place at design-time (when selecting the view in Kendo UI Builder):
- The definition file (templates\views\custom-hello-world-v1\custom-hello-world-v1.json) is validated using JSON Schema and read into an in-memory representation of the model.
- An in-memory model is created using values from meta\modules\HelloWorld.json.
- The model is augmented by calling augmentModel from custom-hello-world-v1\design-time\generator\index.js (in our case, we didn’t augment the model with any property).
- design-time\options.json.ejs is resolved using merged memory model and a scope is created for resolving expressions ( i.e. {{ myVariable }} ) in design template.html.
- The design-time template (design-time\template.html.ejs) is compiled using this merged memory model created in step three as an input parameter and the scope created in step four to resolve {{variables}}.This produces a string containing the HTML for the design-time view.
- The HTML string is inserted to the design-time panel in Kendo UI Builder.
Here is a graphical representation (operations in italic on the left and results on the right):
Design-time Process Diagram
Reminder: Kendo UI Builder does not pass mouse or keyboard events to the design-time view. So, when designing your view, you do not have to worry about user interactions.
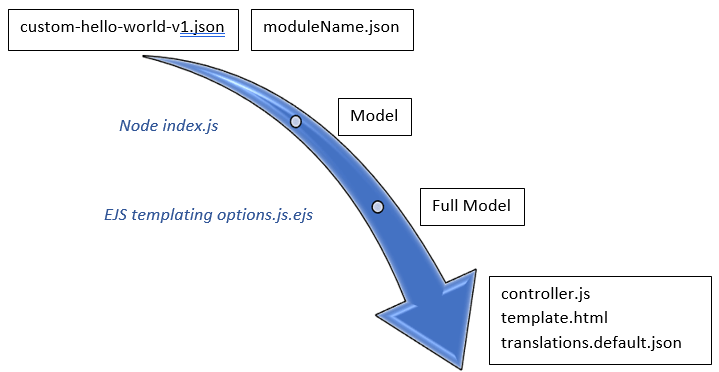
Generate Runtime Process
When we click on the generate button, a similar process is followed. The main difference is that the output does not get rendered as HTML in Kendo UI Builder but instead is saved on the file system in the app/src sub-directory, and of course, the output is dependent on the target framework.
Run-time Process Diagram
Using HTML in View Properties
In the previous blog post we used simple strings for the title and greeting properties. But what if we want to use an HTML string that contains HTML tags, HTML entities as well as single and double quotes, for example: <i class="fa fa-thumbs-up"></i> <b>Hello me</b>
This is achieved like so:
- We do not want the HTML tags to be rendered explicitly but rather we want them to be interpreted as HTML.
In the design-time temple (template.html.ejs), we use a different EJS syntax to output greeting versus title:- <%- greeting %>: This will not escape HTML. So we will be able to set this property with HTML tags.
- <%= titleX %> will escape HTML.
- As the greeting string will be inserted in generated code, we have to make sure the double quotes, for example in class="fa fa-thumbs-up", do not close the Javascript or Typescript string too early.
In both custom-hello-world-v1\angularjs\options.json.ejs and custom-hello-world-v1\angular\__name__.base.component.ts.ejs we need to escape the double quotes with \”.
See these lines of code:- In options.json.ejs: "greeting": "<%- greeting.replace(/"/g, '\\"') %>"
- In __name__.base.component.ts.ejs:
public greeting: string = "<%- view.greeting.replace(/"/g, '\\"'); %>";
Note about EJS processing: <%- greeting %> outputs the greeting value. <%- greeting.replace(/"/g, '\\"') %> calls the JavaScript function replace on the greeting string value before outputting it. In EJS, we can use JavaScript expressions where we need them.
To give this a try, in KUIB, enter: <i class="fa fa-thumbs-up"></i> <b>Hello</b> for the greeting property.
You should see:
Note: The thumb up icon is rendered using font awesome, which Kendo UI Builder bundles automatically. For more information check out the font awesome gallery.
The need to escape double quotes is not limited to using HTML strings. Any string property can potentially contain them. So, it is recommended to escape double quotes for all string properties. That’s what we are doing with the title property.
Translation
generator/index.js has an entry point getTranslation. This lets us specify which properties to add to the translation file.
When we specify:
const translation = {
label: view.label || view.name,
title: view.titleX,
greeting: view.greeting
};
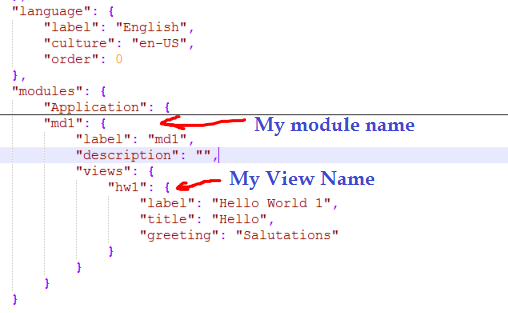
When we use the Generate function, Kendo UI Builder creates three entries in the default translation file (app\src\translations\translations.default.json).
Notice how we specify titleX for getting at the property value for title. This is because the value is resolved from the name of the property in the definition file.
All returned key/value pairs are created, in the default translation file, under the specific view key as illustrated in picture below:
Conclusion
This blog has taken a view of what goes on behind the scenes. This knowledge should help when troubleshooting problems. In particular, it is useful to refer to the run-time or design-time diagrams to isolate at which step of the process the problem may lie.
In a future post (which will cover an upcoming sample custom-hello-world-v3) we will put this knowledge into practice by augmenting the model used at design-time and at run-time.
But before we reach this point, the next step (covering sample custom-hello-world-v2) is to look into how to do event handling. Stay tuned.
Continue reading...