
J
Julien Mansier
Guest
Salesforce is one of the hot data sources for statisticians. With the size and variation of user instances, SAS JMP integration helps make sense of the data.
Overview
SAS JMP is a great tool which enables users to gain quick “Statistical Discovery” of their data and easily create visualizations. Progress has a long partnership with SAS, and we are continuously invested in improving their end-user’s experience—especially ease of use.
Of course, one of the hot data sources available for statisticians today is Salesforce. With the size and variation in users' Salesforce instances, a tool like JMP certainly helps users understand their data. This tutorial is specifically for connecting one’s Salesforce instance into SAS JMP.
By the way, if you use Salesforce, we're hosting a webinar about how to best generate analytics for it next week—join the discussion: SQL or SOQL for Salesforce Analytics.
Requirements and Expected Outcome
Requirements
The two obvious pieces that are required for this tutorial is SAS’ JMP as well as the Progress Salesforce Driver. For the purpose of this tutorial, we will be using the Windows based JMP and the Salesforce ODBC driver. Do keep in mind that it is possible to run the JMP software as we as well as the Progress drivers on different OS flavors and environments. Progress has many tutorials covering these different setups in videos which can be found here.
The download pages for trial versions of the required software:
https://www.progress.com/connectors/salesforce
http://www.jmp.com/en_us/software/try-jmp.html
I am also going to start with the assumption that both the Salesforce driver and SAS JMP are installed with the default settings.
Expected Outcomes
The goal of this tutorial is to enable quick discovery of your Salesforce data utilizing SAS JMP. By the end of this tutorial you should be able to create wonderful data visualizations with your Salesforce data.
Tutorials
Progress Driver Setup
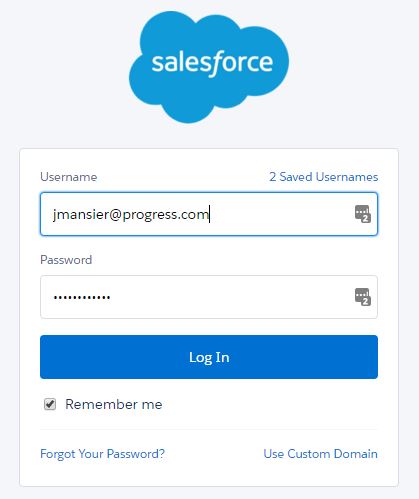
We will begin by setting up the Salesforce driver to your organization or sandbox instance of Salesforce. The first key piece of information we need is your security token. This is required for all applications that accesses the Salesforce API. If you do not have your security token, please follow the steps below, otherwise skip to step 5.
Connecting to SF from JMP
Now we are going to import the Salesforce data into a JMP table. We will then be able to create visualizations.
Consuming Data
In this final section, we will create a simple chart in JMP using the Salesforce data we previously imported.
Try it out Today
Our connectors offer real-time access to Salesforce data via ODBC, JDBC, OData or cloud. These drivers instantly connect from your existing applications to Salesforce and come with ongoing support for the latest quarterly Salesforce updates. Based on your workload, we also leverage multiple Salesforce interfaces for the best experience possible. Give it a test run for free for 15 days!
Try Now
Continue reading...
Overview
SAS JMP is a great tool which enables users to gain quick “Statistical Discovery” of their data and easily create visualizations. Progress has a long partnership with SAS, and we are continuously invested in improving their end-user’s experience—especially ease of use.
Of course, one of the hot data sources available for statisticians today is Salesforce. With the size and variation in users' Salesforce instances, a tool like JMP certainly helps users understand their data. This tutorial is specifically for connecting one’s Salesforce instance into SAS JMP.
By the way, if you use Salesforce, we're hosting a webinar about how to best generate analytics for it next week—join the discussion: SQL or SOQL for Salesforce Analytics.
Requirements and Expected Outcome
Requirements
The two obvious pieces that are required for this tutorial is SAS’ JMP as well as the Progress Salesforce Driver. For the purpose of this tutorial, we will be using the Windows based JMP and the Salesforce ODBC driver. Do keep in mind that it is possible to run the JMP software as we as well as the Progress drivers on different OS flavors and environments. Progress has many tutorials covering these different setups in videos which can be found here.
The download pages for trial versions of the required software:
https://www.progress.com/connectors/salesforce
http://www.jmp.com/en_us/software/try-jmp.html
I am also going to start with the assumption that both the Salesforce driver and SAS JMP are installed with the default settings.
Expected Outcomes
The goal of this tutorial is to enable quick discovery of your Salesforce data utilizing SAS JMP. By the end of this tutorial you should be able to create wonderful data visualizations with your Salesforce data.
Tutorials
Progress Driver Setup
We will begin by setting up the Salesforce driver to your organization or sandbox instance of Salesforce. The first key piece of information we need is your security token. This is required for all applications that accesses the Salesforce API. If you do not have your security token, please follow the steps below, otherwise skip to step 5.
- Login to Salesforce
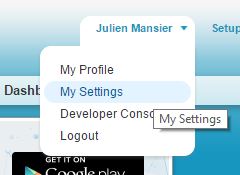
- Go to ‘My settings’
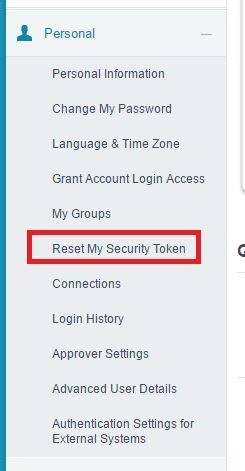
- Expand ‘Personal’ to find ‘Reset My Security Token’
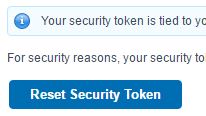
- Select ‘Reset Security Token’. Shortly after, you will receive an email from Salesforce with a new Security Token.
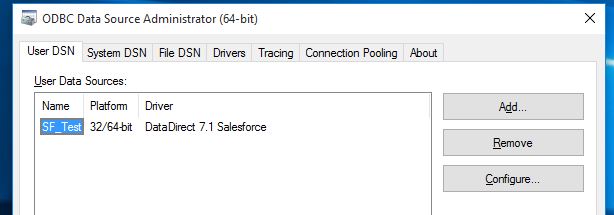
- We will now create an ODBC connection using the Windows built in ODBC Administrator. It is usually easiest to search for the ODBC Administrator. Once opened, click the ‘Add’ button. You’ll notice that I already have the ‘SF_Test’ connection configured.
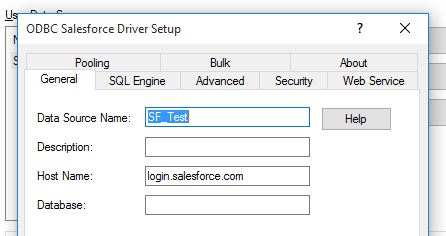
- You can see that the ‘Host Name’ is already filled in with ‘login.salesforce.com.’ This is default and should remain as is. With the ‘Data Source Name,’ you can call it whatever you like.
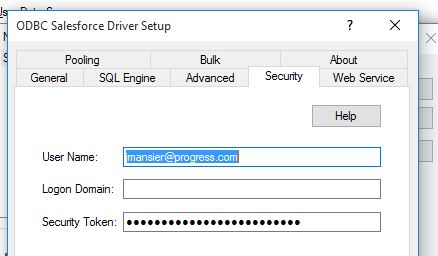
- Next go to the ‘Security’ tab. Insert your Salesforce username and ‘Security Token’
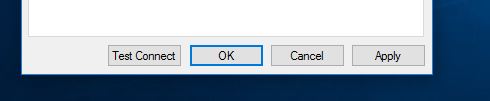
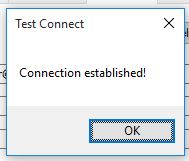
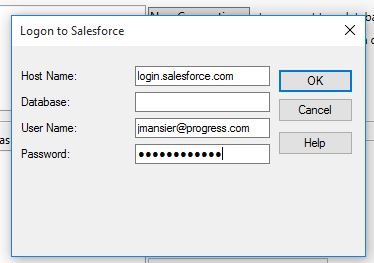
- At this point, we are ready to test the connection. Press ‘Test Connect’
- A ‘Logon to Salesforce’ prompt will popup. You will need to insert your Salesforce password.
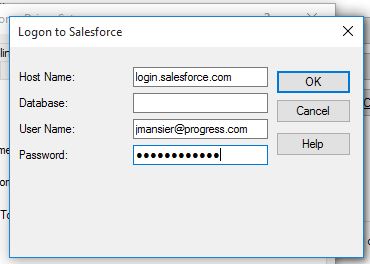
- Hit ‘OK,’ and if the configuration is correct, then a ‘Connection established!’ prompt should appear. At this point we are done with setting up the Salesforce driver.
Connecting to SF from JMP
Now we are going to import the Salesforce data into a JMP table. We will then be able to create visualizations.
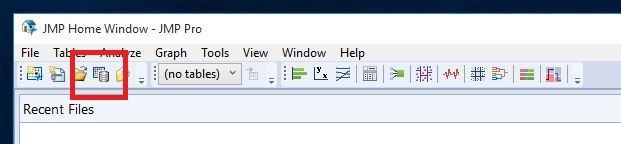
- To begin, please open JMP. Then select the ‘Query Builder’ icon.
- Once the ‘Select Database Connection’ windows appears, select ‘New Connection’
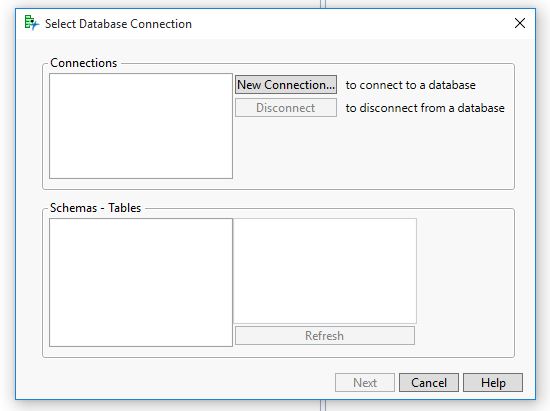
- The popup will have two tabs: ‘File Data Source’ and ‘Machine Data Source.’ We are interested in Machine Data Source. Here you will see the Salesforce driver we created earlier.
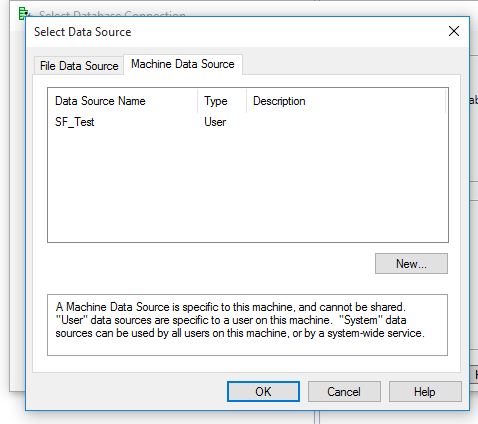
- Select the connection we previously created, and a popup window will appear to insert your password
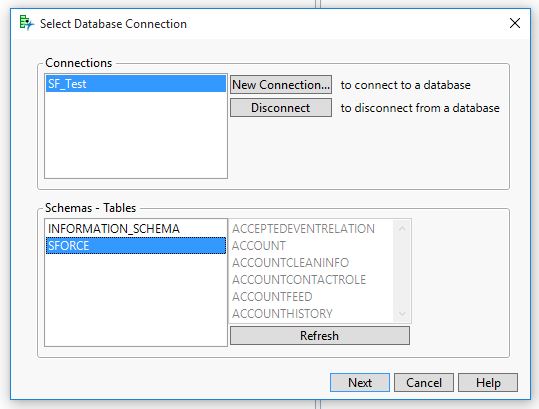
- Once you enter your password and hit ok, you will return to the original ‘Select Database Connection,’ though you will now see the connection we selected. Also you will see the schemas available. By default, it should select ‘SFORCE’ schema. If it is not selected, please select that schema. Once selected, hit ‘Next.’
- You will now see the ‘Select Tables for Query’ window appear. For our simple query, we will only use the ‘ACCOUNT’ table. Drag the ‘ACCOUNT’ from the ‘Available Tables’ list and drop it into the ‘Primary’ section.
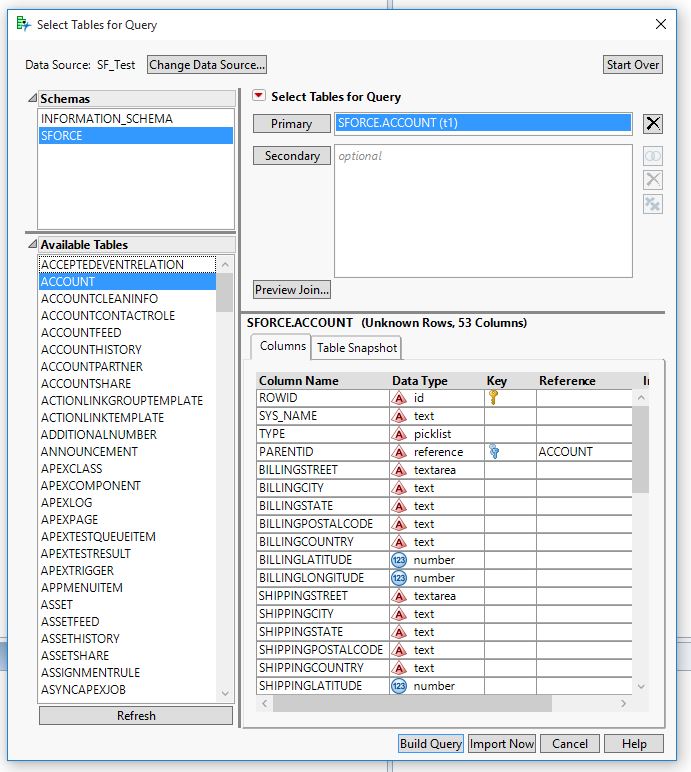
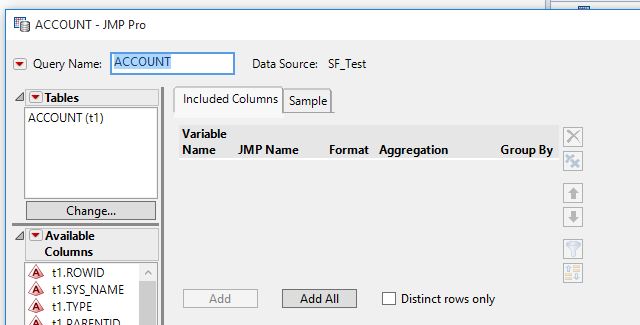
- An ‘ACCOUNT’ window will appear with query name as well as the data source we selected
- From here, select ‘Add All,’ which will add all of the columns within the select table
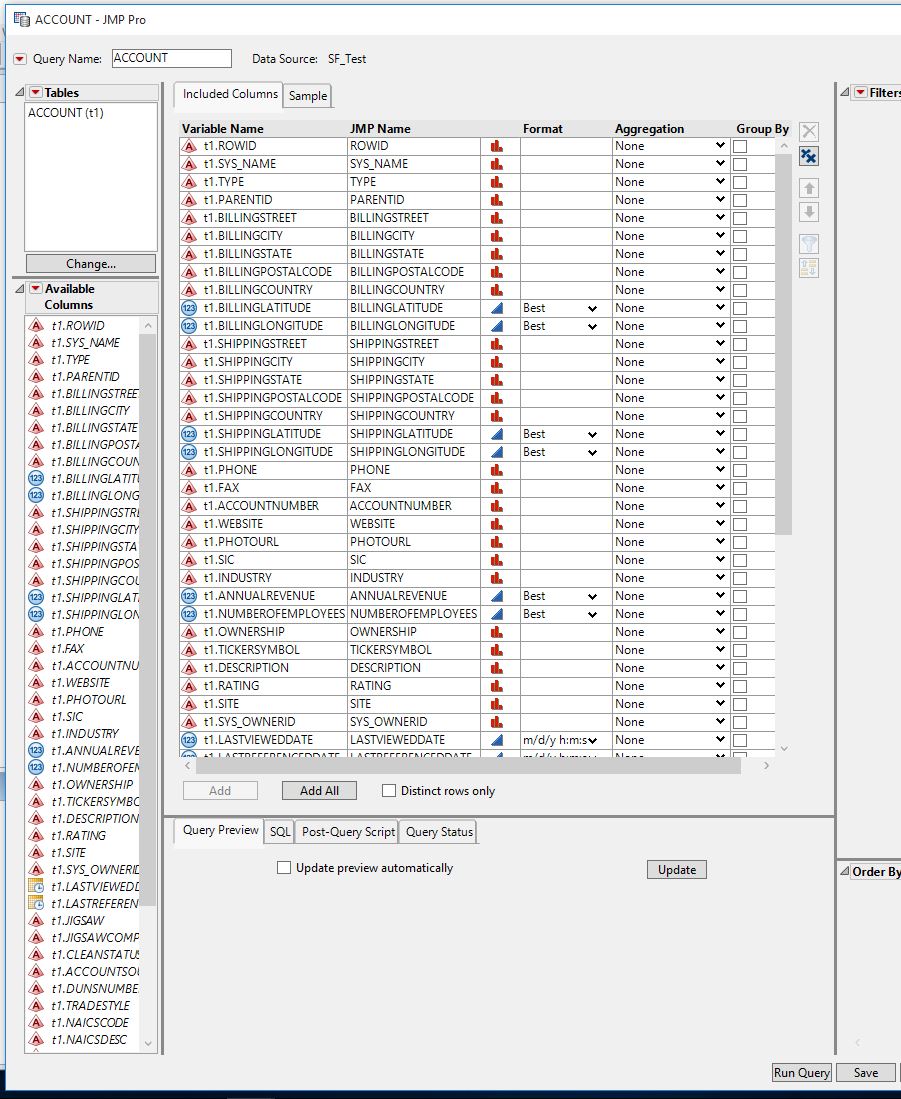
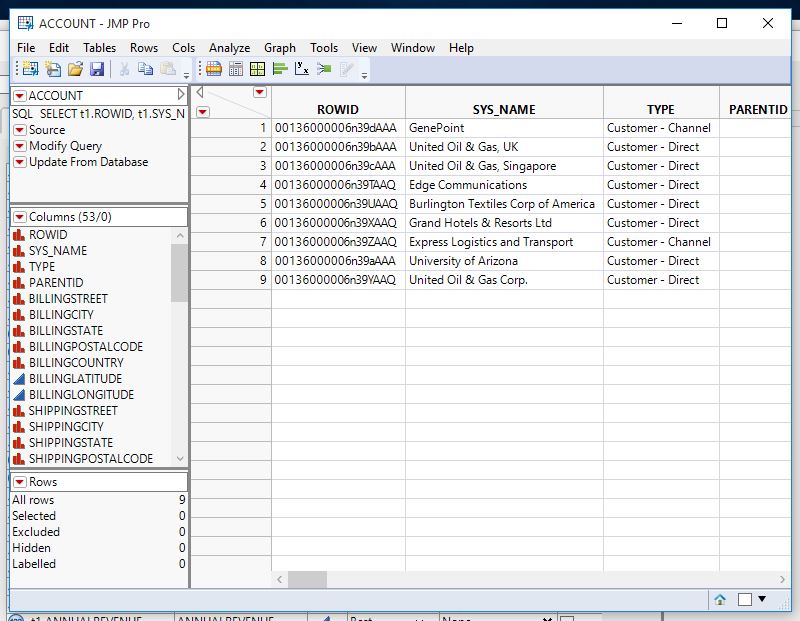
- Select ‘Run Query’ and your JMP Table will be populated. At this point we are done importing the Salesforce data into JMP. We will now focus on creating a simple data visualization.
Consuming Data
In this final section, we will create a simple chart in JMP using the Salesforce data we previously imported.
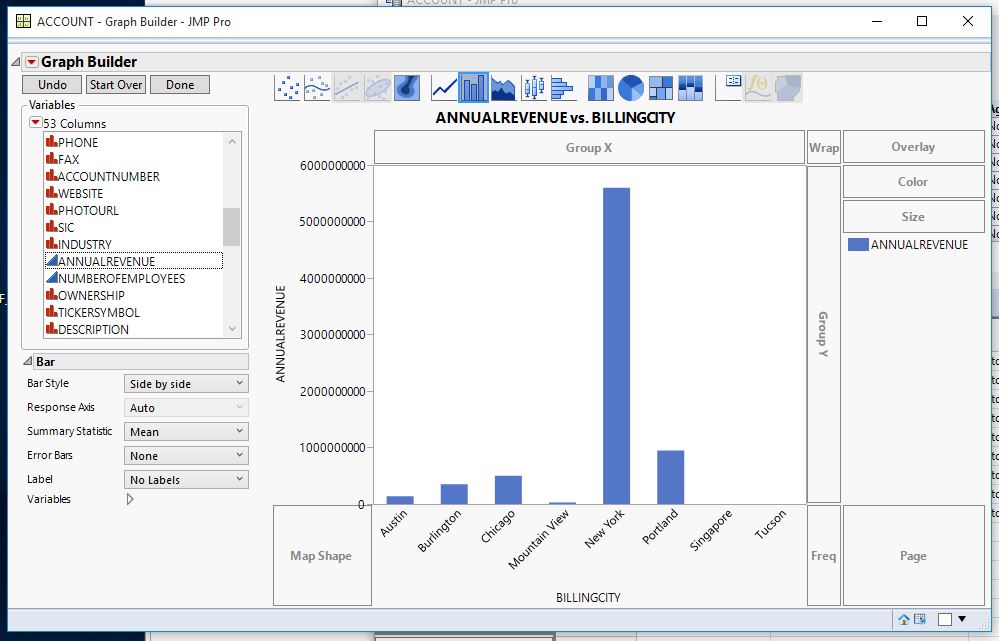
- First, select the ‘Graph Builder’ icon from the JMP Table we previously created

- From here I used ‘BILLINGCITY’ and ‘ANNUALREVENUE’ as my datasets for the bar chart. Feel free to try any combinations of both data as well as chart type. Have fun!
Try it out Today
Our connectors offer real-time access to Salesforce data via ODBC, JDBC, OData or cloud. These drivers instantly connect from your existing applications to Salesforce and come with ongoing support for the latest quarterly Salesforce updates. Based on your workload, we also leverage multiple Salesforce interfaces for the best experience possible. Give it a test run for free for 15 days!
Try Now
Continue reading...