
A
Aakash Chauhan
Guest
It's easier than you might think to utilize machine learning in your next mobile app. See how you can quickly build an app using machine learning in this tutorial.
Machine learning is becoming increasingly prevalent in modern applications, and it’s easier than you think to incorporate it into your mobile app with minimal coding. To work with machine learning concepts we need data to be analyzed. We can also do funny things with this concept, like analyzing your smile to determine how funny you think something is. Wouldn’t it be cool if we could quickly build an app that made using basic machine learning concepts easy? To show you how simple it can be, let’s walk through what it takes to create an app using machine learning with the popular JavaScript framework, Angular, and the Progress Kinvey high productivity platform.
Our app will be called the Joke-O-Matic app, where you can check your “smile factor” just by capturing your picture with your phone, or selecting a picture you’ve already taken. The app will display a number of jokes and ask you to upload a picture of your reaction, and it will use machine learning to analyze your smile and tell you just how funny you thought the joke was.
Our app will also be able to find out how funny other users think the joke is, and then visualize our results on a graph, letting us know what the average “funniness” is for any given joke. I think this app will be gold for standup comedians everywhere. Let’s dive in.
Setting up the Kinvey Console
This application needs a high-performing backend to store the data we’re going to accumulate, and to help us quickly access our data when we need to show graphs or filter the data.
Kinvey Setup
Kinvey is fast and easy to use for the backend. Within the Kinvey console you can easily use Business Logic, Custom endpoints, Scheduled code or MIC (Mobile Identity Connect). You can also create a collection through Kinvey’s datastore or import other platforms’ data, and much more.
The first step is to login or sign up on the Kinvey console. If you’re new to Kinvey, you can sign up for the Developer edition, which is free forever.
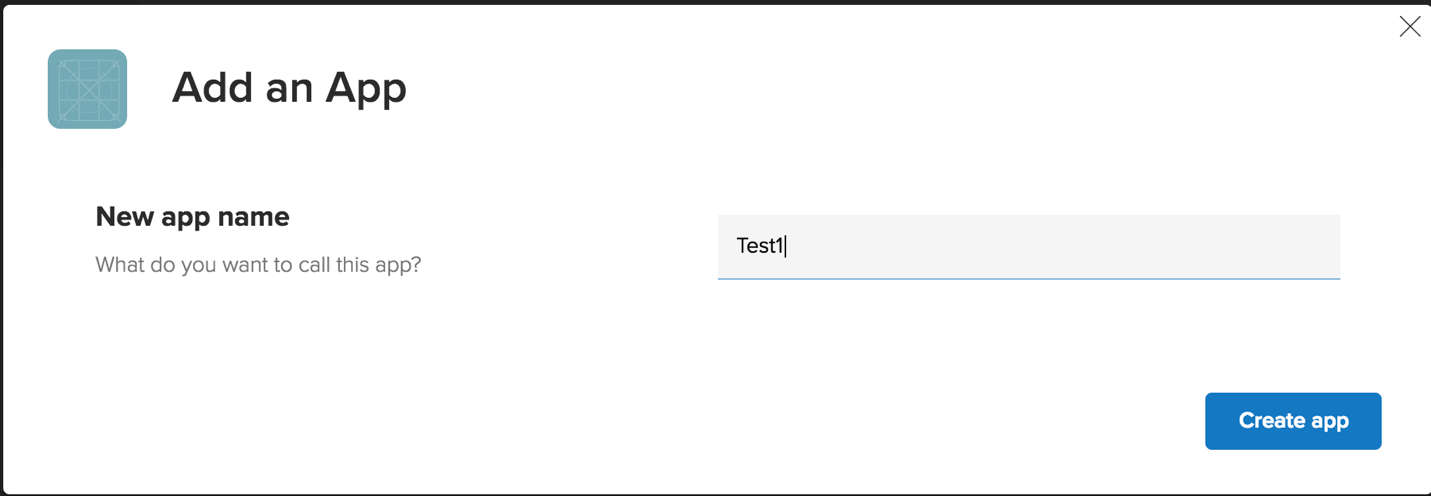
Create a new app by clicking +Add an app button on top right corner of the screen. After clicking on the button you will see the dialog box just like the image below.
And then on the home screen of the Kinvey console create a collection by clicking on +Add a collection button. Once you’ve done this, you’re done with the Kinvey console for now. Your backend is now created, but you don’t have anything in your datastore yet. We’ll return to the console once you do.
Setting up the Frontend
Now let’s download NativeScript Sidekick, which will give us an excellent development experience to create this app.
You can download Sidekick from here. It is also free for development purposes.
Login to/Signup for Sidekick, and then start by clicking the “create an app” button. After that you will see this screen.
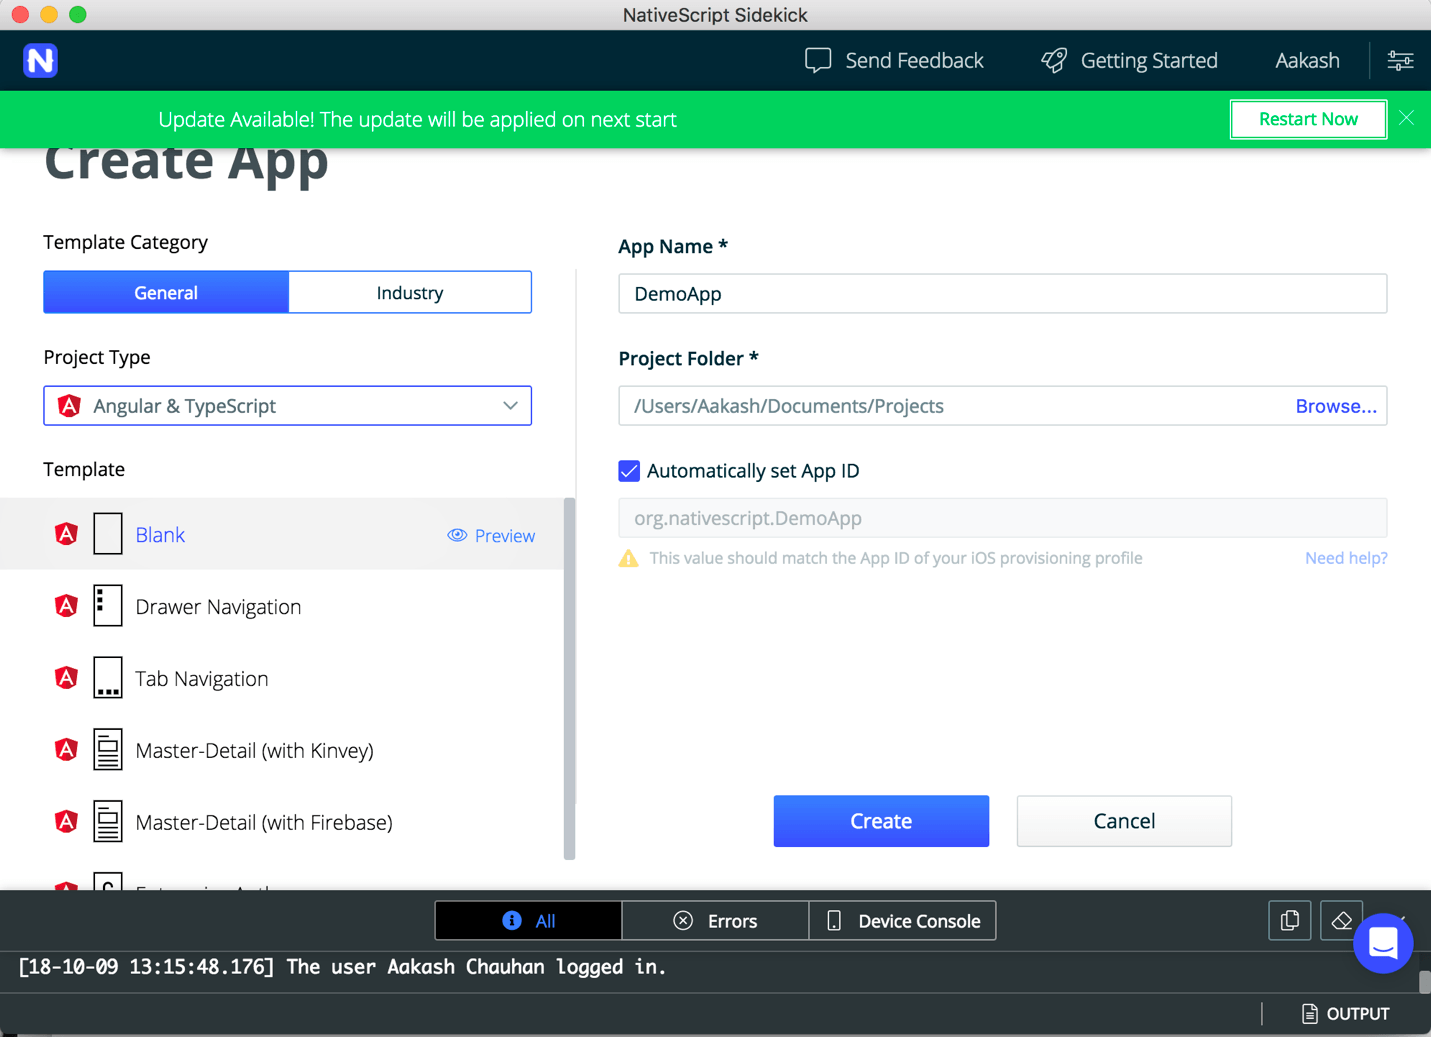
Sidekick has a wide array of choices for building an app. You can choose from a variety of Templates as well as multiple Project Types, like Angular & TypeScript, TypeScript or JavaScript. Choose whichever options you are most comfortable with.
For this application I have used Angular & Typescript and the Blank Template design.
Next, create your application and open it in a code editor.
Note that we want to use Machine Learning concepts like face detection and image labeling in our app. For that, we will need to use Firebase MLkit in our application.
Setting up Firebase
To get started with Firebase first you need to add a plugin to your app. We have an easy way to use a NativeScript plugin for Firebase.
To use this plugin, you’ll need to make sure you have a Firebase account first.
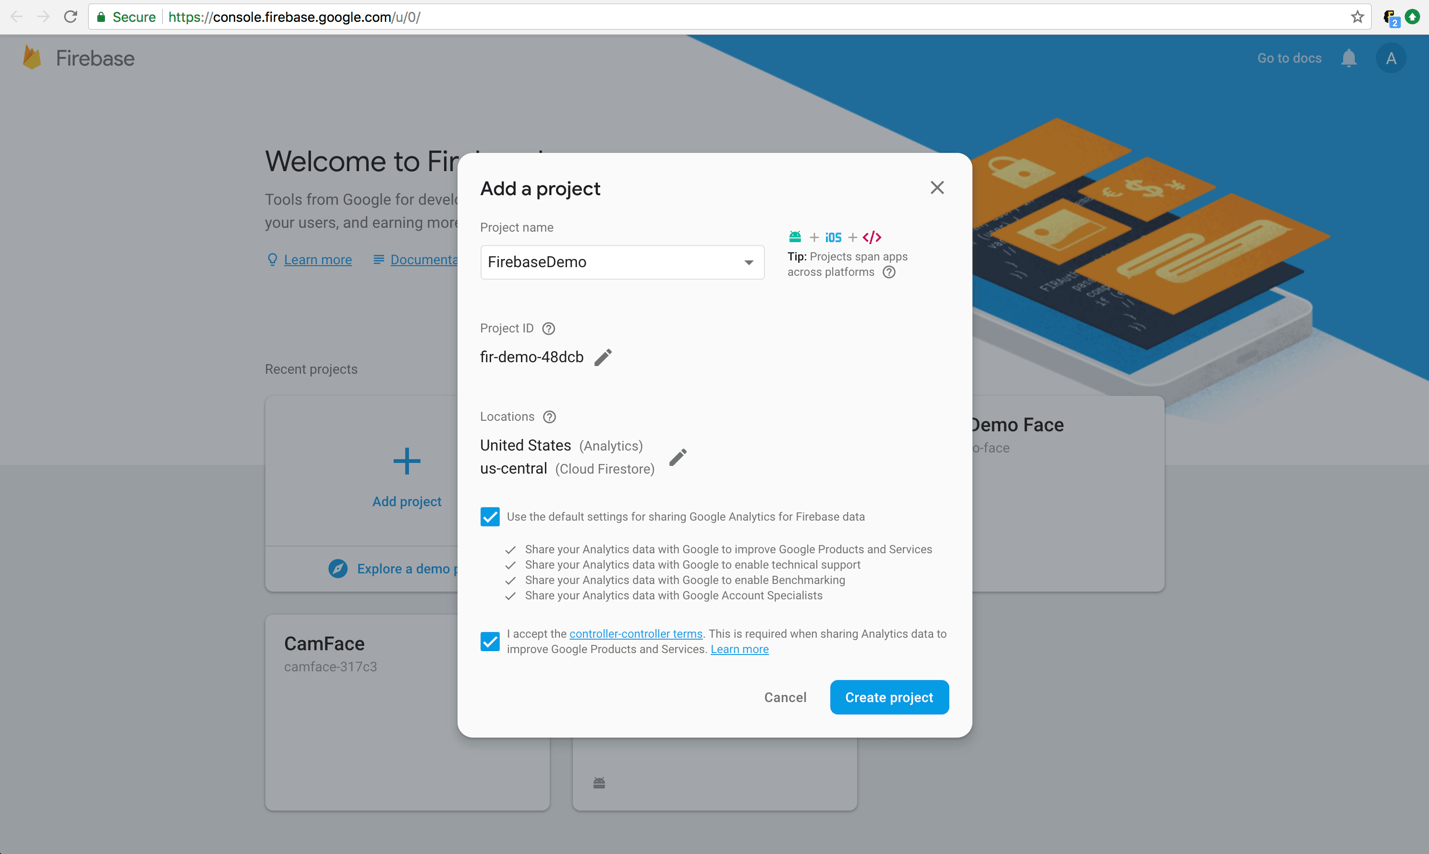
Go to “Sign in - Google Accounts” and either register for an account or sign in if you have not done so already. Add a new project by clicking on the “Add project” button.
Once you’ve created your Firebase account, head back to NativeScript Sidekick. Click on the option to “Get started by adding Firebase to your app,” and select your platform: iOS, Android or both.
Now navigate through your application’s package.json file and copy your nativescript id, which should read: “org.nativescript.NAME_of_App”.
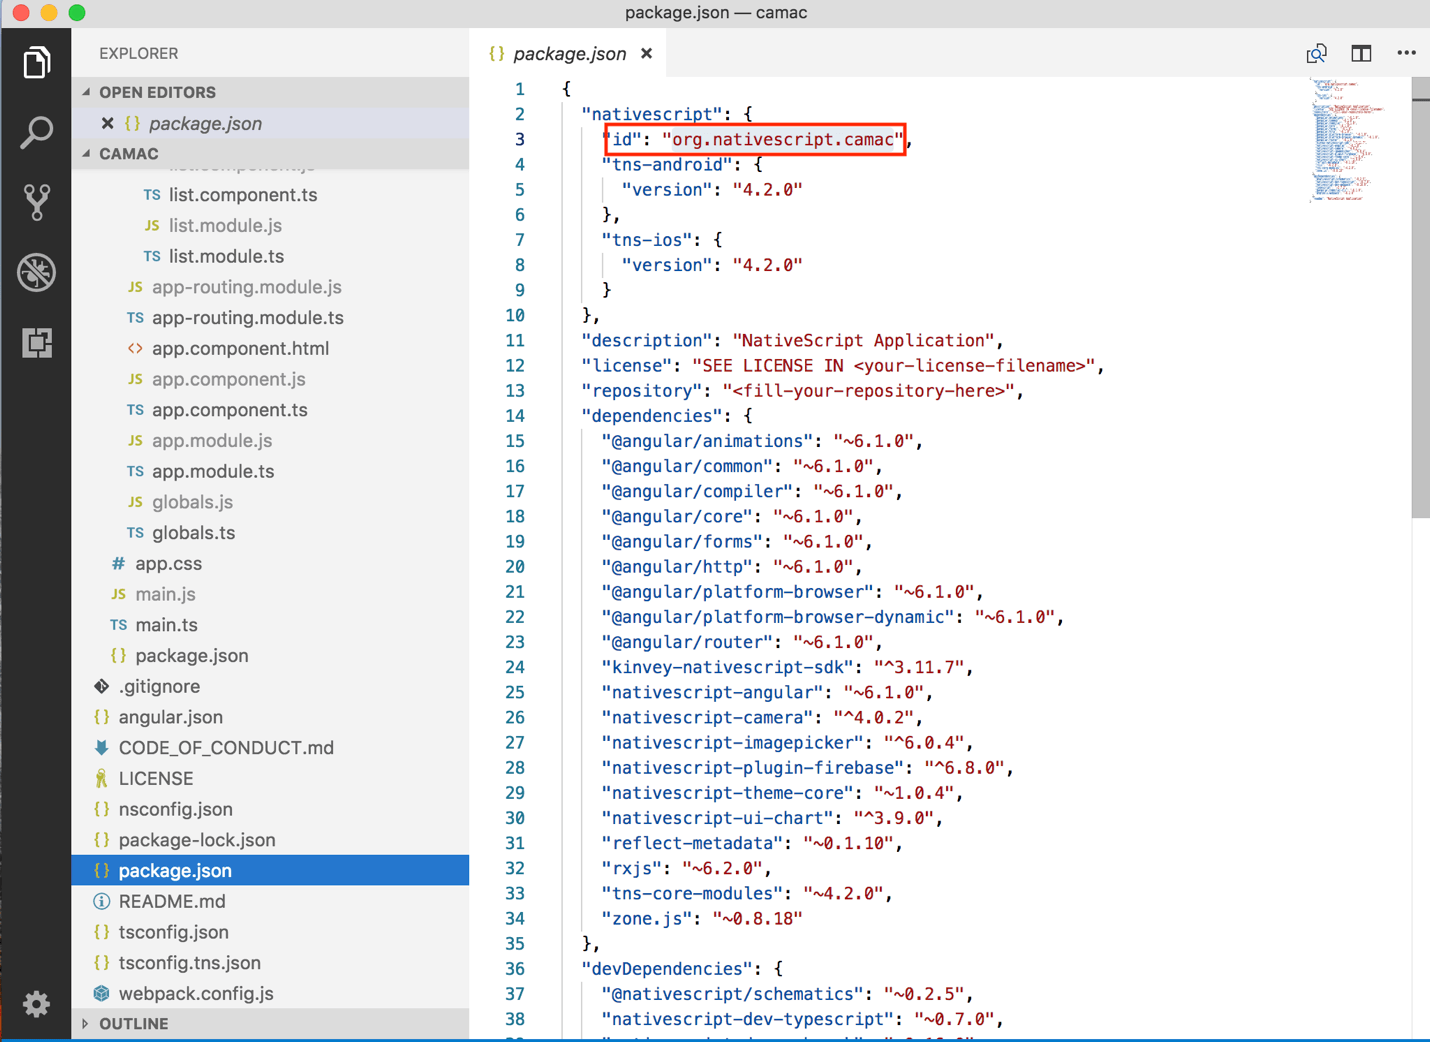
Here my package name is “org.nativescript.camac”.
Next, paste it on iOS bundle id under registering your app with Firebase.
As you complete registration of the app, Firebase will generate a config file named “GoogleService-Info.plist”.
Download the “GoogleService-Info.plist” file and put it in your project path at app/App_Resources/iOS/GoogleService-Info.plist.
Add this plugin by running the following command in your app terminal.
tns plugin add nativescript-plugin-firebase
This plugin will ask you specific questions, like which services you would like to install with it. You can say “No” to every feature except MLkit. MLKit is required to install Face Detection and Image Labeling in your app.
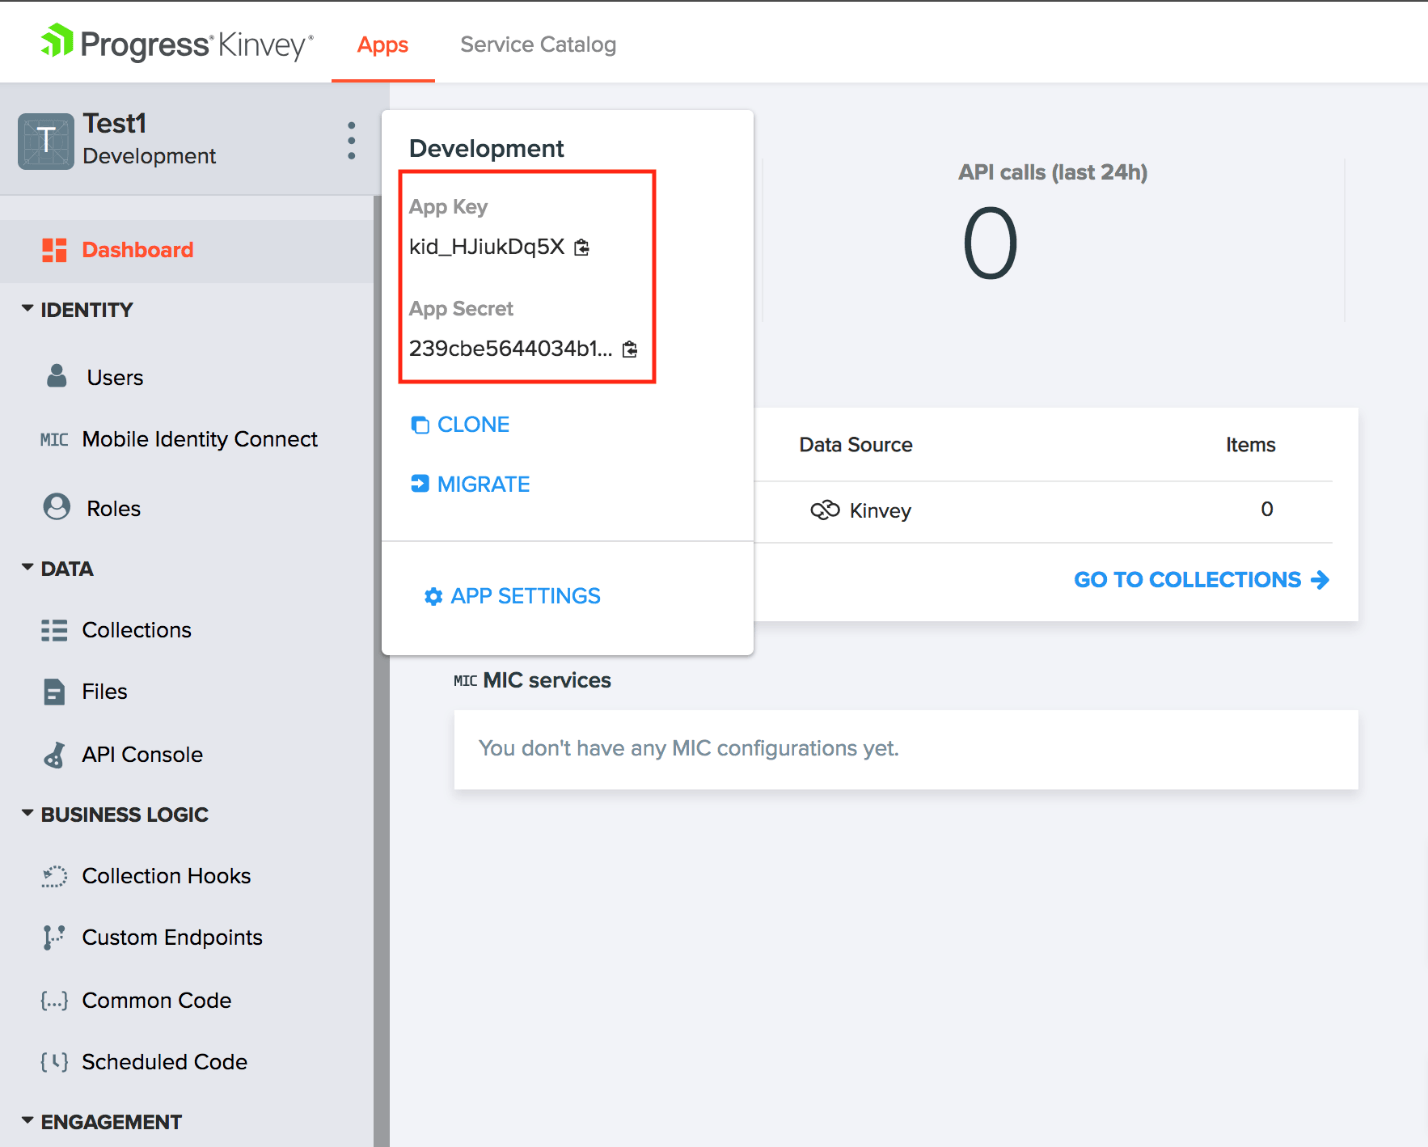
After that open your Kinvey console, and from the Dashboard find your App Key and App Secret.
Go to your app component file and initialize Kinvey by writing this snippet.
import { Kinvey , CacheStore } from 'kinvey-nativescript-sdk';
Kinvey.init({
appKey: " kid_HJiukDq5X",
appSecret: " 239cbe5644034b10b77b47469701a1b1",
});
We are now all set with configuration, so let’s get coding!
Here is the first page of the application.
This is the list of jokes. So, when a user likes a particular joke, he/she clicks on that joke.
For this list you can use a listview. And in the Array list, you can push each joke so we can display it.
this.jokes = [];
Note that here you have to be logged in all the time to use the backend with Kinvey.
To make staying logged in easier, you can add this sample to your home component or app component.
if(Kinvey.User.getActiveUser()){
To log in using the code snippet you have to create a user in the Kinvey console with both the user and password being “admin”.
Next, when users click on a specific joke it will redirect them to the next component, which is the heart of the app.
public onItemTap(args) {
Now you have moved the user to the ‘home’ component from the ‘list’ component. Here you’ll need to use some plugins again to make it work as it supposed to. These are necessary to natively access the camera and image gallery.
import * as Camera from "nativescript-camera";
import * as ImagePicker from "nativescript-imagepicker";
Next you’ll add some additional code, so you can capture a picture or select an image from your phone’s local storage. This way, when a user reads a joke and clicks on the joke, you can have the app capture or upload a picture of your face to calculate your smile percentage.
fromCameraPicture(): void {
fromCameraroll(): void {
You should be able to either capture or upload a picture now. Here is a screenshot showing what that screen will look like.
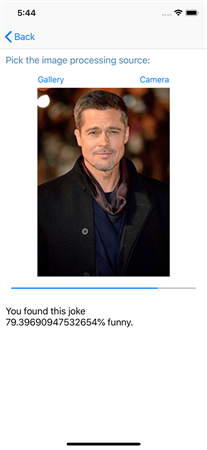
By clicking on Gallery, you can select any picture from your camera roll. Alternatively, by selecting the camera, the user can open their device’s camera. And it will display the percentage and visualize it with a progress bar, to show you how funny it is based on your smile.
You can change it too if you don’t like the current picture.
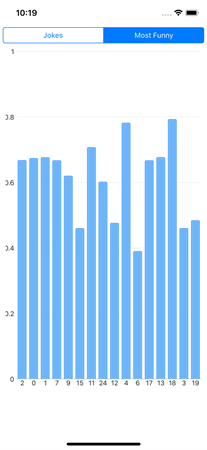
Now let’s get back to home page, where you can find the list of jokes. On the list view there is a segmented bar. You can navigate to the “most funny” segmented page. There will be a graph which shows a bar chart containing each joke and the average value of each users’ funniness rating. Here’s a screenshot of that page.
Whenever you tap on a particular bar, it will show up tool-tip with the text of that specific joke.
Setting up the Chart
NativeScript also has an amazing UI plugin for adding a variety of different charts, and it is so simple and easy to use. Start by running the following command:
tns plugin add nativescript-ui-chart
In order to create a chart, we need to format the data as the chart requires. And to format the data, we will have to first gather it and sync it with our Kinvey datastore. Let’s set up our datastore below.
Syncing your Data with a Kinvey Datastore
Before we sync data to the datastore we need to add two columns to the datastore: one for jokes number and another for percentage. That way you can store your data in the proper column.
We can store the joke number and its different values in the Kinvey backend.
const entity = {_id:null, jnum:myGlobals.UrlComponent.urlArray,percentage:this.confidence};
By using this snippet, you should be able to store and sync data to your backend.
And we are passing jokes number index in ‘jnum’ and its confidence value in ‘percentage’ under entity.
Note that we should give id as ‘null’ because we want to store different values, not just one for each joke.
Here is the screenshot of the data.
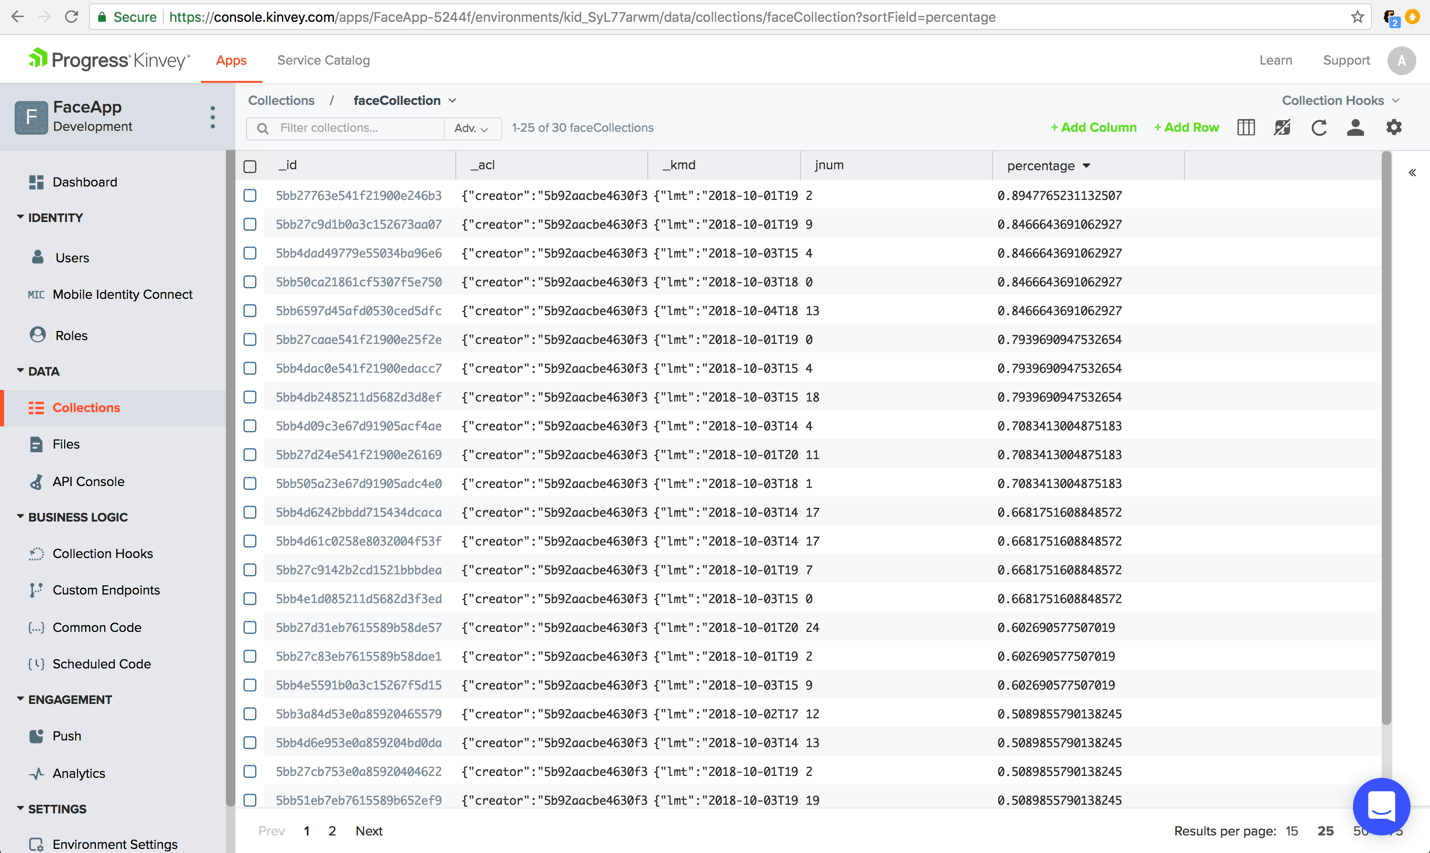
This is the whole datastore in the Kinvey console.
To get the result and pass it to the graph we can use this code below.
const aggregation = Kinvey.Aggregation.average("percentage").by("jnum");
return this.dataStore.group(aggregation).subscribe(
Using this code, our collection will be filtered by each joke’s average funniness value. And this json format data we can pass to the ‘myjokes.’
Finally, we can pass this to draw a chart.
And for the tool-tip of each bar we can use this HTML tag.
<Trackball tkCartesianTrackball snapMode="AllClosestPoints" showIntersectionPoints="true" textWrap="true" (trackBallContentRequested)="onTrackBallContentRequested($event)"></Trackball>
We’ve Just Built a Machine Learning App with Kinvey
That’s how quickly we can build a mobile app that utilizes machine learning. Combining Kinvey with NativeScript we can build a powerful and incredibly fast application with relatively little code. Kinvey has great documentation here to help you get started with NativeScript, but you can also try a different platform as per your requirements.
I hope this tutorial helps you to build your own mobile apps with Kinvey, NativeScript, and Firebase MLKit.
If you’re curious to try out the Kinvey high productivity platform, you can sign up for a free account here:
Try Kinvey
I have pushed whole project to GitHub just in case you would like to look at the source code. If you still have some questions, you can reach out to support or feel free to leave comments below.
Continue reading...
Machine learning is becoming increasingly prevalent in modern applications, and it’s easier than you think to incorporate it into your mobile app with minimal coding. To work with machine learning concepts we need data to be analyzed. We can also do funny things with this concept, like analyzing your smile to determine how funny you think something is. Wouldn’t it be cool if we could quickly build an app that made using basic machine learning concepts easy? To show you how simple it can be, let’s walk through what it takes to create an app using machine learning with the popular JavaScript framework, Angular, and the Progress Kinvey high productivity platform.
Our app will be called the Joke-O-Matic app, where you can check your “smile factor” just by capturing your picture with your phone, or selecting a picture you’ve already taken. The app will display a number of jokes and ask you to upload a picture of your reaction, and it will use machine learning to analyze your smile and tell you just how funny you thought the joke was.
Our app will also be able to find out how funny other users think the joke is, and then visualize our results on a graph, letting us know what the average “funniness” is for any given joke. I think this app will be gold for standup comedians everywhere. Let’s dive in.
Setting up the Kinvey Console
This application needs a high-performing backend to store the data we’re going to accumulate, and to help us quickly access our data when we need to show graphs or filter the data.
Kinvey Setup
Kinvey is fast and easy to use for the backend. Within the Kinvey console you can easily use Business Logic, Custom endpoints, Scheduled code or MIC (Mobile Identity Connect). You can also create a collection through Kinvey’s datastore or import other platforms’ data, and much more.
The first step is to login or sign up on the Kinvey console. If you’re new to Kinvey, you can sign up for the Developer edition, which is free forever.
Create a new app by clicking +Add an app button on top right corner of the screen. After clicking on the button you will see the dialog box just like the image below.
And then on the home screen of the Kinvey console create a collection by clicking on +Add a collection button. Once you’ve done this, you’re done with the Kinvey console for now. Your backend is now created, but you don’t have anything in your datastore yet. We’ll return to the console once you do.
Setting up the Frontend
Now let’s download NativeScript Sidekick, which will give us an excellent development experience to create this app.
You can download Sidekick from here. It is also free for development purposes.
Login to/Signup for Sidekick, and then start by clicking the “create an app” button. After that you will see this screen.
Sidekick has a wide array of choices for building an app. You can choose from a variety of Templates as well as multiple Project Types, like Angular & TypeScript, TypeScript or JavaScript. Choose whichever options you are most comfortable with.
For this application I have used Angular & Typescript and the Blank Template design.
Next, create your application and open it in a code editor.
Note that we want to use Machine Learning concepts like face detection and image labeling in our app. For that, we will need to use Firebase MLkit in our application.
Setting up Firebase
To get started with Firebase first you need to add a plugin to your app. We have an easy way to use a NativeScript plugin for Firebase.
To use this plugin, you’ll need to make sure you have a Firebase account first.
Go to “Sign in - Google Accounts” and either register for an account or sign in if you have not done so already. Add a new project by clicking on the “Add project” button.
Once you’ve created your Firebase account, head back to NativeScript Sidekick. Click on the option to “Get started by adding Firebase to your app,” and select your platform: iOS, Android or both.
Now navigate through your application’s package.json file and copy your nativescript id, which should read: “org.nativescript.NAME_of_App”.
Here my package name is “org.nativescript.camac”.
Next, paste it on iOS bundle id under registering your app with Firebase.
As you complete registration of the app, Firebase will generate a config file named “GoogleService-Info.plist”.
Download the “GoogleService-Info.plist” file and put it in your project path at app/App_Resources/iOS/GoogleService-Info.plist.
Add this plugin by running the following command in your app terminal.
tns plugin add nativescript-plugin-firebase
This plugin will ask you specific questions, like which services you would like to install with it. You can say “No” to every feature except MLkit. MLKit is required to install Face Detection and Image Labeling in your app.
After that open your Kinvey console, and from the Dashboard find your App Key and App Secret.
Go to your app component file and initialize Kinvey by writing this snippet.
import { Kinvey , CacheStore } from 'kinvey-nativescript-sdk';
Kinvey.init({
appKey: " kid_HJiukDq5X",
appSecret: " 239cbe5644034b10b77b47469701a1b1",
});
We are now all set with configuration, so let’s get coding!
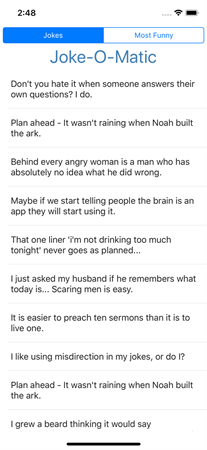
Here is the first page of the application.
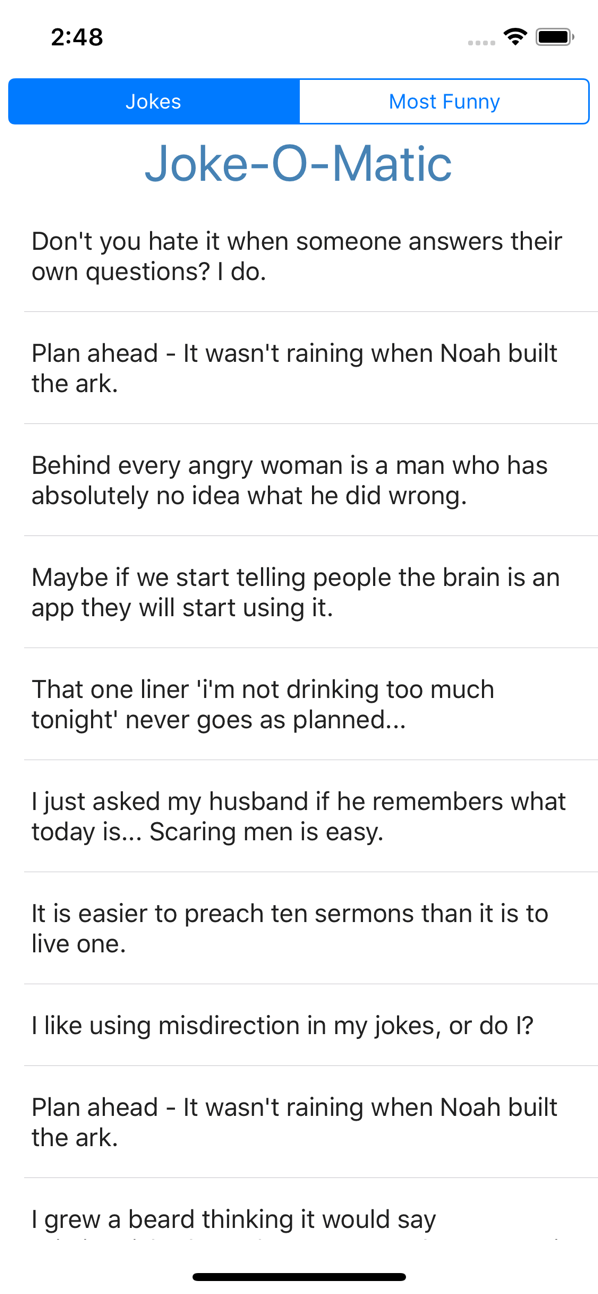
This is the list of jokes. So, when a user likes a particular joke, he/she clicks on that joke.
For this list you can use a listview. And in the Array list, you can push each joke so we can display it.
this.jokes = [];
for(let i=0; i<myjokes.length;i++){
this.jokes.push(new joke(myjokes));
}
Note that here you have to be logged in all the time to use the backend with Kinvey.
To make staying logged in easier, you can add this sample to your home component or app component.
if(Kinvey.User.getActiveUser()){
console.log("Active user");
}
else{
Kinvey.User.login("admin","admin").then(()=>{
console.log("Will be active");
}).catch((e)=>{
alert(e);
});
}
To log in using the code snippet you have to create a user in the Kinvey console with both the user and password being “admin”.
Next, when users click on a specific joke it will redirect them to the next component, which is the heart of the app.
public onItemTap(args) {
myGlobals.UrlComponent.urlArray = args.index;
this._routerExtensions.navigate(['/home']);
console.log("Item Tapped at cell index: " + args.index);
}
Now you have moved the user to the ‘home’ component from the ‘list’ component. Here you’ll need to use some plugins again to make it work as it supposed to. These are necessary to natively access the camera and image gallery.
import * as Camera from "nativescript-camera";
import * as ImagePicker from "nativescript-imagepicker";
Next you’ll add some additional code, so you can capture a picture or select an image from your phone’s local storage. This way, when a user reads a joke and clicks on the joke, you can have the app capture or upload a picture of your face to calculate your smile percentage.
fromCameraPicture(): void {
if (!isIOS) {
Camera.requestPermissions();
}
Camera.takePicture({
width: 800,
height: 800,
keepAspectRatio: true,
saveToGallery: true,
cameraFacing: "rear"
}).then(imageAsset => {
new ImageSource().fromAsset(imageAsset).then(imageSource => {
this.pickedImage = imageSource;
setTimeout(() => this.selectMLKitFeature(imageSource), 500);
});
});
}fromCameraroll(): void {
const imagePicker = ImagePicker.create({
mode: "single"
});
imagePicker
.authorize()
.then(() => imagePicker.present())
.then((selection: Array<ImageAsset>) => {
if (selection.length === 0) return;
const selected = selection[0];
selected.options.height = 800;
selected.options.width = 800;
selected.options.keepAspectRatio = true;
selected.getImageAsync((image: any, error: any) => {
if (error) {
console.log(`Error getting image source from picker: ${error}`);
return; }
if (!image) {
alert({
title: `Invalid image`,
message: `Invalid`,
okButtonText: "ok."
});
return; }
const imageSource = new ImageSource();
imageSource.setNativeSource(image);
this.zone.run(() => {
this.pickedImage = imageSource;
});
setTimeout(() => this.selectMLKitFeature(imageSource), 500);
});
})
.catch(e => {
console.log(`Image Picker error: ${e}`);
});
}
You should be able to either capture or upload a picture now. Here is a screenshot showing what that screen will look like.
By clicking on Gallery, you can select any picture from your camera roll. Alternatively, by selecting the camera, the user can open their device’s camera. And it will display the percentage and visualize it with a progress bar, to show you how funny it is based on your smile.
You can change it too if you don’t like the current picture.
Now let’s get back to home page, where you can find the list of jokes. On the list view there is a segmented bar. You can navigate to the “most funny” segmented page. There will be a graph which shows a bar chart containing each joke and the average value of each users’ funniness rating. Here’s a screenshot of that page.
Whenever you tap on a particular bar, it will show up tool-tip with the text of that specific joke.
Setting up the Chart
NativeScript also has an amazing UI plugin for adding a variety of different charts, and it is so simple and easy to use. Start by running the following command:
tns plugin add nativescript-ui-chart
In order to create a chart, we need to format the data as the chart requires. And to format the data, we will have to first gather it and sync it with our Kinvey datastore. Let’s set up our datastore below.
Syncing your Data with a Kinvey Datastore
Before we sync data to the datastore we need to add two columns to the datastore: one for jokes number and another for percentage. That way you can store your data in the proper column.
We can store the joke number and its different values in the Kinvey backend.
const entity = {_id:null, jnum:myGlobals.UrlComponent.urlArray,percentage:this.confidence};
const promise = this.dataStore.save(entity)
.then((entity: {}) => {
// ...
})
.catch((error: Kinvey.BaseError) => {
// ...
});
const promise1 = this.dataStore.sync()
.then(() => {
})
By using this snippet, you should be able to store and sync data to your backend.
And we are passing jokes number index in ‘jnum’ and its confidence value in ‘percentage’ under entity.
Note that we should give id as ‘null’ because we want to store different values, not just one for each joke.
Here is the screenshot of the data.
This is the whole datastore in the Kinvey console.
To get the result and pass it to the graph we can use this code below.
const aggregation = Kinvey.Aggregation.average("percentage").by("jnum");
return this.dataStore.group(aggregation).subscribe(
d => {this.myjokes = d});
Using this code, our collection will be filtered by each joke’s average funniness value. And this json format data we can pass to the ‘myjokes.’
Finally, we can pass this to draw a chart.
And for the tool-tip of each bar we can use this HTML tag.
<Trackball tkCartesianTrackball snapMode="AllClosestPoints" showIntersectionPoints="true" textWrap="true" (trackBallContentRequested)="onTrackBallContentRequested($event)"></Trackball>
We’ve Just Built a Machine Learning App with Kinvey
That’s how quickly we can build a mobile app that utilizes machine learning. Combining Kinvey with NativeScript we can build a powerful and incredibly fast application with relatively little code. Kinvey has great documentation here to help you get started with NativeScript, but you can also try a different platform as per your requirements.
I hope this tutorial helps you to build your own mobile apps with Kinvey, NativeScript, and Firebase MLKit.
If you’re curious to try out the Kinvey high productivity platform, you can sign up for a free account here:
Try Kinvey
I have pushed whole project to GitHub just in case you would like to look at the source code. If you still have some questions, you can reach out to support or feel free to leave comments below.
Continue reading...