
T
Thierry Ciot
Guest
Rollbase now offers an easy to use graphical workflow designer. In this tutorial, learn how to use it in your own low-code apps to design a workflow in minutes.
Many applications require some form of workflow process. Most importantly, a lot of processes can be implemented and enforced in software for greater productivity and traceability. But due to the high cost of implementing applications, and sometimes due to a huge IT backlog, many processes do not get implemented.
Thus it is critically important for any modern platform—and in particular for a low-code platform—to provide great support for workflow processes. With the release of version 5.0, Rollbase has raised the bar by providing an innovative graphical workflow designer.
Now an application designer can literally create a workflow process in minutes.
In this blog post we will show how it takes only a few minutes to create a simple task management application with an associated workflow process where a task can be started, completed, approved or rejected.
Creating a Graphical Workflow in Rollbase
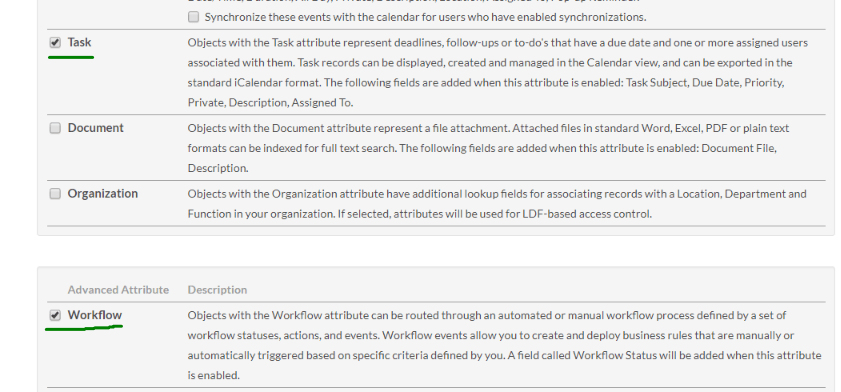
First, we create the Simple Task object (click on the "new" menu in the sidebar, and make sure you are logged in as an admin). Besides giving it a name, we enable the Task and the workflow attribute as illustrated below.
Creating a workflow process in the new workflow designer consists of creating workflow states and connecting the states with actions to form a flow diagram. Let’s do that with our task management app.
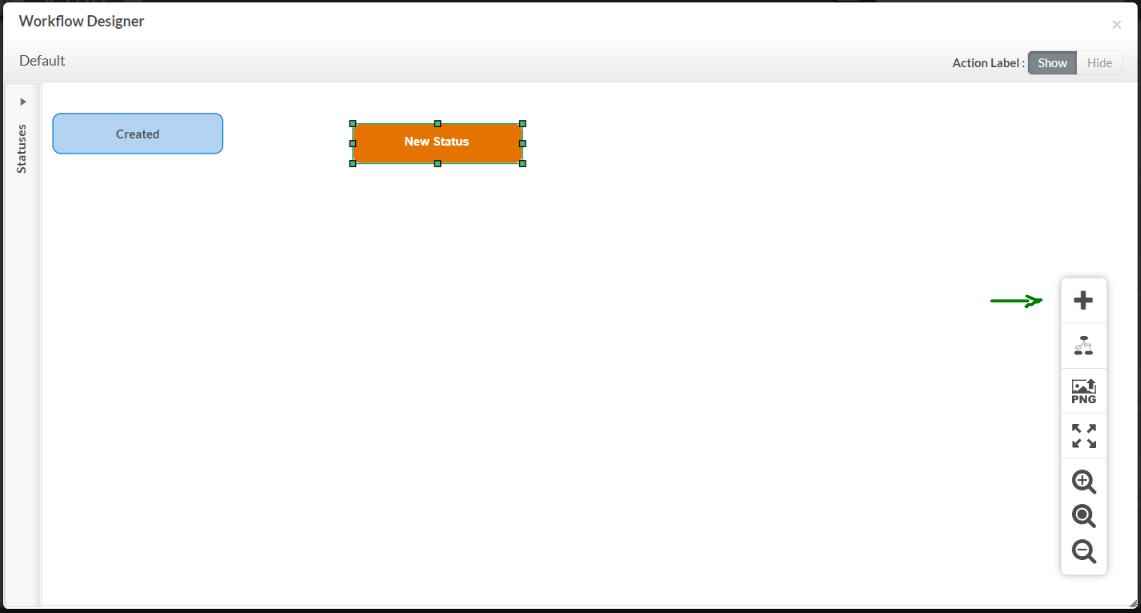
Creating a Workflow Status
When we enable workflow on an object, we automatically get the Created state, so let’s create the task “In Progress Status”. For this we just click the + icon in the canvas toolbar:
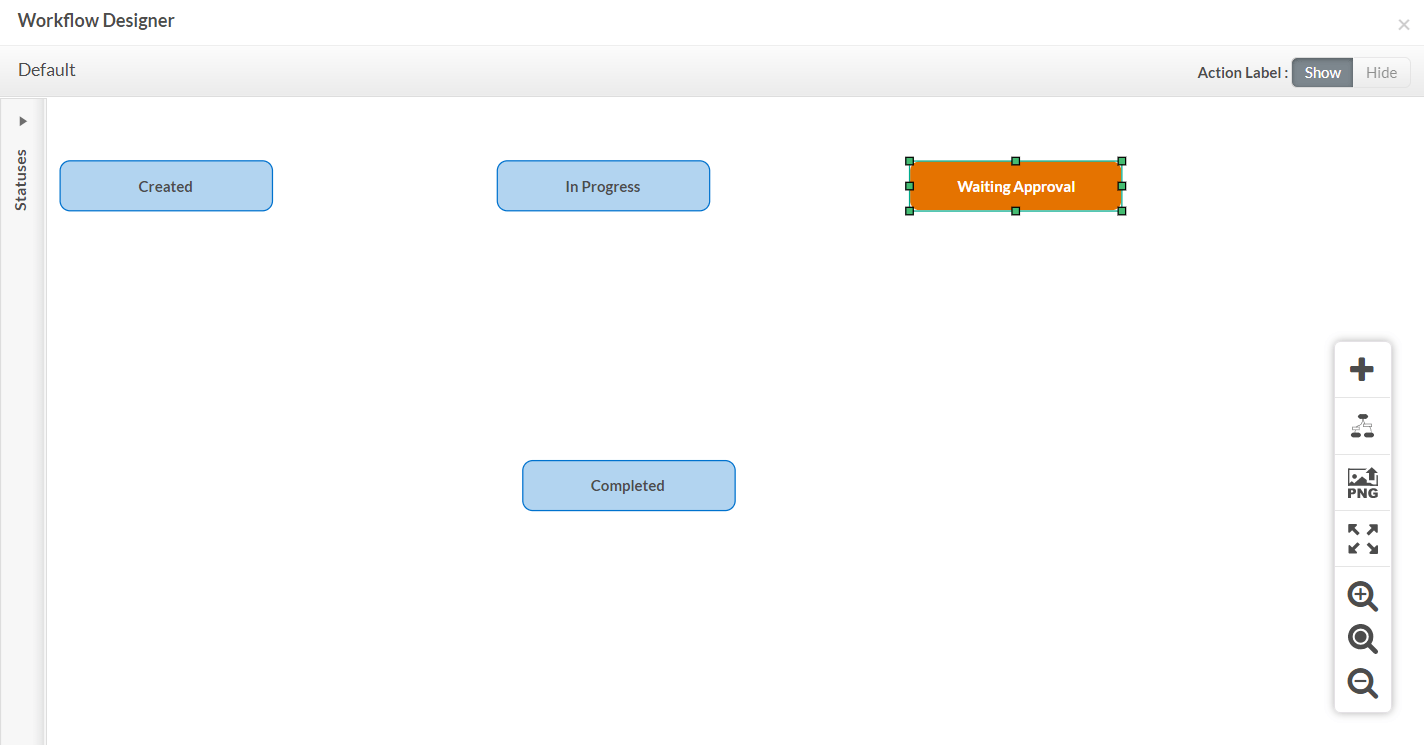
We then double-click on the status and give it a proper name, repeating these steps for waiting approval and completed states. We can place the nodes anywhere we want by simply dragging them around on the canvas.
Designing the Flow
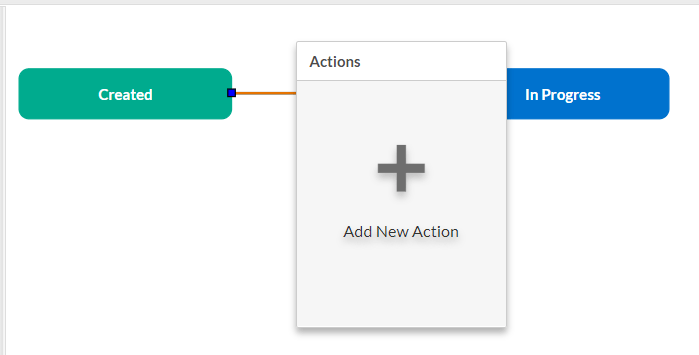
Now we are ready to create the flow. When we mouse over a status, we get connector points. We simply drag a connector point to a target status. On connecting, we get the Actions pop-up. We click on the + icon to create a new action. The popup will also list the available actions when we have created them.
Now the sidebar will open and let us enter multiple properties for the action.
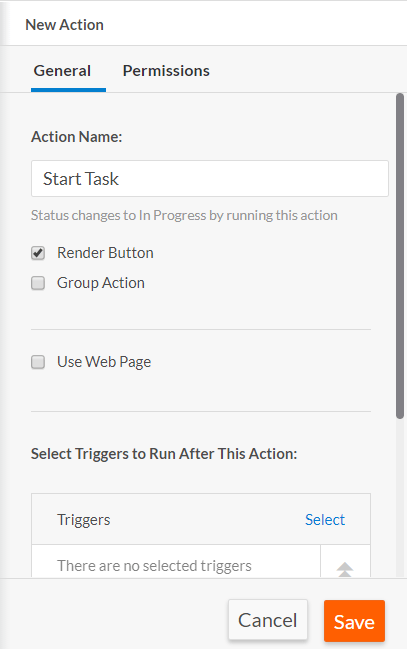
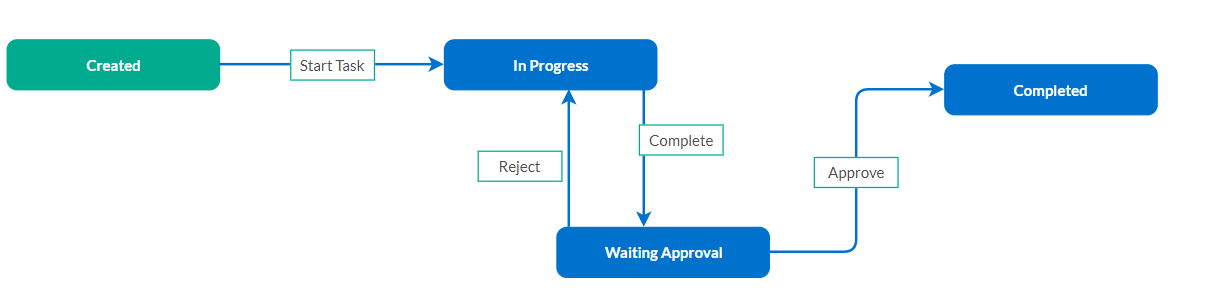
We repeat these steps for the Complete, Approve and Reject actions. At this stage, you can select any element and drag them around to layout the flow as you like. Note that you can move the action label independently of the arrow. We end up with something like this:
 The designer offers some built-in layout managers. We can give them a try by clicking on the layout icon in the canvas toolbar.

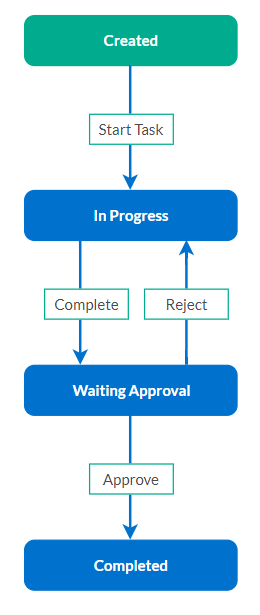
In the below example, we selected Top to Bottom. Note that our manual layout remains in effect until we click the Apply command. After applying Top to Bottom, the flow looks like this:
At this stage, I’m free to move elements to further tailor the generated layout.
Complex Workflows
Of course, many workflows are more complex than our first example. They may contain many more statuses and actions. We have provided zoom-in, zoom-out and a fit to available space function so that you can get a high level view of complex diagrams. Here is an example of a more complex workflow and using the “fit to available space” function:

Other features promoting scale:
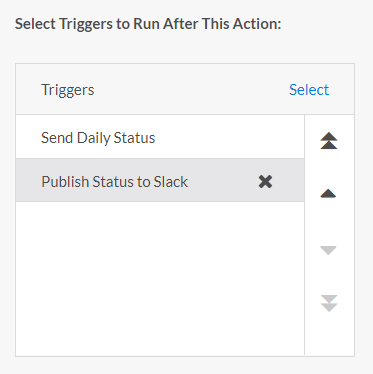
Workflow is more than managing status changes. Its full power comes with the capability to execute triggers. For example, in the step where a task is rejected, we may want to send an email to the user.
When you click on an action, the side panel provides an interface to select which triggers to run and in which order to run them. For example:
You can find more information on triggers in our documentation.
Security
The graphical workflow designer provides immediate access to workflow action permissions. Now with just a few clicks, the application designer can specify who can execute specific workflow actions:
In this blog, we have demonstrated how Rollbase provides the necessary tools to create workflow driven applications. In less than 15 minutes, we built a cloud-enabled simple task management application that works out of the box on smartphones, tablets and desktop.
You can learn more about the workflow designer here, or check out everything that's new in Rollbase 5.0.
Curious to give Rollbase a try? Get started with a free 30 day trial today.
Try Rollbase for Free
Continue reading...
Many applications require some form of workflow process. Most importantly, a lot of processes can be implemented and enforced in software for greater productivity and traceability. But due to the high cost of implementing applications, and sometimes due to a huge IT backlog, many processes do not get implemented.
Thus it is critically important for any modern platform—and in particular for a low-code platform—to provide great support for workflow processes. With the release of version 5.0, Rollbase has raised the bar by providing an innovative graphical workflow designer.
Now an application designer can literally create a workflow process in minutes.
In this blog post we will show how it takes only a few minutes to create a simple task management application with an associated workflow process where a task can be started, completed, approved or rejected.
Creating a Graphical Workflow in Rollbase
First, we create the Simple Task object (click on the "new" menu in the sidebar, and make sure you are logged in as an admin). Besides giving it a name, we enable the Task and the workflow attribute as illustrated below.
Creating a workflow process in the new workflow designer consists of creating workflow states and connecting the states with actions to form a flow diagram. Let’s do that with our task management app.
Creating a Workflow Status
When we enable workflow on an object, we automatically get the Created state, so let’s create the task “In Progress Status”. For this we just click the + icon in the canvas toolbar:
We then double-click on the status and give it a proper name, repeating these steps for waiting approval and completed states. We can place the nodes anywhere we want by simply dragging them around on the canvas.
Designing the Flow
Now we are ready to create the flow. When we mouse over a status, we get connector points. We simply drag a connector point to a target status. On connecting, we get the Actions pop-up. We click on the + icon to create a new action. The popup will also list the available actions when we have created them.
Now the sidebar will open and let us enter multiple properties for the action.
We repeat these steps for the Complete, Approve and Reject actions. At this stage, you can select any element and drag them around to layout the flow as you like. Note that you can move the action label independently of the arrow. We end up with something like this:
The designer offers some built-in layout managers. We can give them a try by clicking on the layout icon in the canvas toolbar.
In the below example, we selected Top to Bottom. Note that our manual layout remains in effect until we click the Apply command. After applying Top to Bottom, the flow looks like this:
At this stage, I’m free to move elements to further tailor the generated layout.
Complex Workflows
Of course, many workflows are more complex than our first example. They may contain many more statuses and actions. We have provided zoom-in, zoom-out and a fit to available space function so that you can get a high level view of complex diagrams. Here is an example of a more complex workflow and using the “fit to available space” function:
Other features promoting scale:
- Built-in layout managers (as shown above): for very complex workflows, it may become difficult to manually organize them. Using one of the built-in layout managers will most likely be a good starting point.
- We added panning support for quick access to scrolling from the canvas without having to use the scrollbars: simply mouse down on canvas and move mouse.
Workflow is more than managing status changes. Its full power comes with the capability to execute triggers. For example, in the step where a task is rejected, we may want to send an email to the user.
When you click on an action, the side panel provides an interface to select which triggers to run and in which order to run them. For example:
You can find more information on triggers in our documentation.
Security
The graphical workflow designer provides immediate access to workflow action permissions. Now with just a few clicks, the application designer can specify who can execute specific workflow actions:
- Select the action in the graph
- Click on permissions tab
- Assign role(s)
In this blog, we have demonstrated how Rollbase provides the necessary tools to create workflow driven applications. In less than 15 minutes, we built a cloud-enabled simple task management application that works out of the box on smartphones, tablets and desktop.
You can learn more about the workflow designer here, or check out everything that's new in Rollbase 5.0.
Curious to give Rollbase a try? Get started with a free 30 day trial today.
Try Rollbase for Free
Continue reading...